#12 Custom UIViewController transitions in VIPER
View Controller Transitioning API is available since iOS 7. It has made creating custom transitions between UIViewControllers much easier and our apps got a new life. You can use the API in both Storyboard and non-Storyboard projects.
If you have read our post about VIPER architecture, it might have turned many of your iOS coding practices upside down and might have left you with numerous questions. That’s why, from time to time, we will blog about some VIPER specific solutions to common problems. One of them was a post about invalidating NSTimer where we smuggled a tiny bit of VIPER. This post will cover using View Controller Transitioning API in VIPER project.
Bird’s eye view
We will just focus on how to wire up everything neatly in a VIPER project. If you feel like a tiny revise on the topic would be helpful, there are some great resources at the bottom of this article.
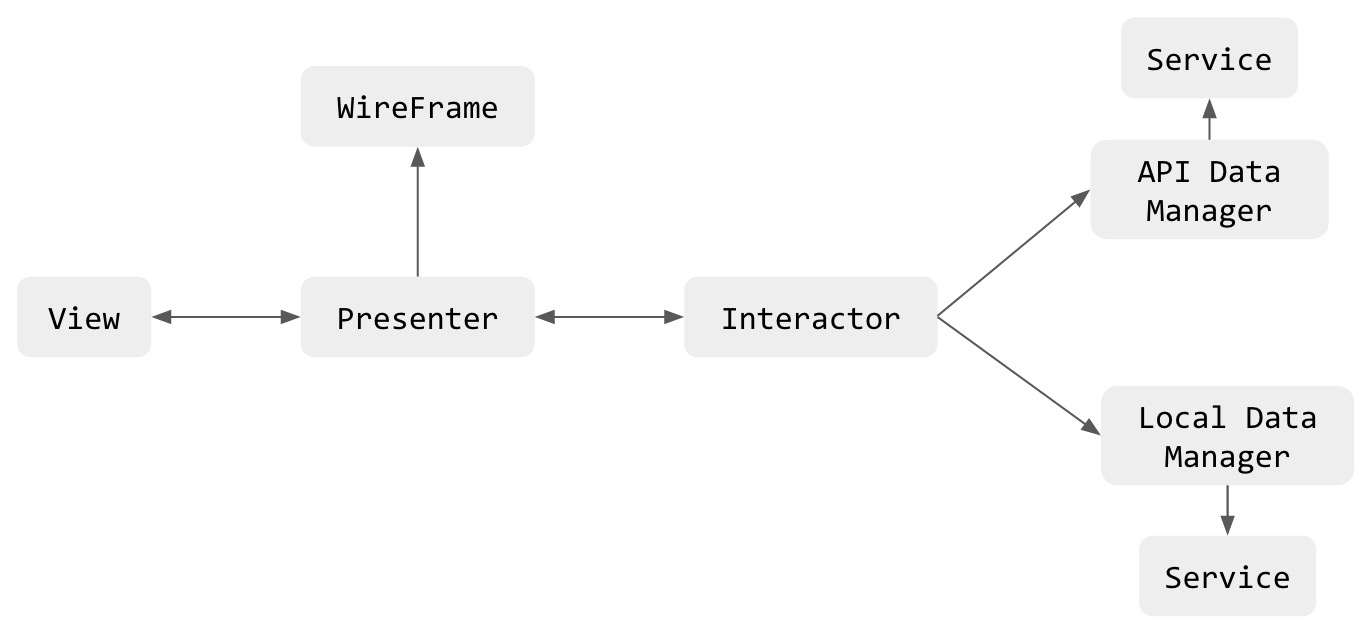
Let’s take a quick look at VIPER architecture and responsibilities:

Speaking of View Controller Transitioning API the main responsibility is on a component that becomes a transitioningDelegate in the custom transition process.
Non-VIPER solutions usually have presenting UIViewController acting as presented UIViewControllers transitioningDelegate.
In VIPER, navigation and transition work is moved to Presenter and WireFrame. Presenter interprets an event from View and tells Wireframe to do the heavy work of transitioning to a new module (aka app’s screen).
Similarly to the standard approach, it is the UIViewController being presented that needs a delegate. In our VIPER implementation, Presenter of a module initiating a transition does not have an access to a module being presented. Wireframe initialises the presented module and at this point has access to its View.
Implementation
Now, with the solid foundation of who is the man for the job, let’s have a look at the actual implementation.
Imagine we have a wall where posts are displayed and from this screen we can navigate to a post composer. You can find this for example in Facebook app. It is a perfect place for custom transition.
Let’s name our modules as Wall and WallPostEditor.
From your prior knowledge or articles linked in references you know that we need animation controllers for presenting and preferably for dismissal:
class WallCreatePostAnimationController: NSObject, UIViewControllerAnimatedTransitioning {

    func transitionDuration(transitionContext: UIViewControllerContextTransitioning?) -> NSTimeInterval{
        return 0.7
    }

    func animateTransition(transitionContext: UIViewControllerContextTransitioning) {

       let fromViewController = transitionContext.viewControllerForKey(UITransitionContextFromViewControllerKey)
       let toViewControllerNav = transitionContext.viewControllerForKey(UITransitionContextToViewControllerKey)
       let containerView = transitionContext.containerView()

		//Animate here

       	transitionContext.completeTransition(!transitionContext.transitionWasCancelled())
    }
}


class WallCreatePostDismissAnimationController: NSObject, UIViewControllerAnimatedTransitioning {

// Same as above, reverse animations, etc.

}
Now Wireframe of the Wall module has a following function to present the WallPostEditor module:
//In WallWireFrame
func presentWallPostEditor(fromView view:WallViewProtocol) {
        let destination = WallPostEditorWireFrame.setupWallPostEditorModule()
        destination.transitioningDelegate = self
        if let viewController = view as? UIViewController {
            viewController.presentViewController(destination, animated: true, completion: nil)
        }
    }
What happens in the code above?
The Wall module instantiates WallPostEditor module using class function setupWallPostEditorModule(). Then Wall’s Wireframe is set as transitioningDelegate and WallPostEditor module is presented.
Without the line where we set up transitioningDelegate we would have a standard transition between modules in VIPER.
However, as we go fancy and want our custom transitions, we have to set up transitioningDelegate and implement its methods:
extension WallWireFrame:  UIViewControllerTransitioningDelegate {
    func animationControllerForPresentedController(presented: UIViewController,
        presentingController presenting: UIViewController,
        sourceController source: UIViewController) -> UIViewControllerAnimatedTransitioning? {
            return WallCreatePostAnimationController()

    }
    func animationControllerForDismissedController(dismissed: UIViewController) -> UIViewControllerAnimatedTransitioning? {
        return WallCreatePostDismissAnimationController()
    }
}
Voilá!
That is actually all we need. Delegate methods were implemented in extension as Swift good practices advise. They are both optional. Presenter UIViewController will ask its transitioningDelegate for presented and dismissed controllers when necessary.
Summary
To sum up, there are 2 steps needed to wire up a custom transition in VIPER:
- instantiation of a new module and assign parent module’s wireframe as
transitioningDelegateofUIViewControllerreturned from set up function - implementation of delegate methods as an extension of parent module wireframe
Hope you have enjoyed our little exploration of the transitioning topic. We would be happy to hear from you in comments or on Twitter. Let us know what else you would like to read in VIPER context.
