#8 VIPER to be or not to be?
This time we would like to tell our story and share the experience about VIPER. Especially about good practices, how we deal with some specific cases and about our recommendations. We count on the comments with your experience!:)
In this article our goal is not to talk about VIPER’s rules and explain every component of VIPER from scratch. Many sources with very good explanations about these things are already available:
We would like to show what we have learnt, what have been the biggest challenges during working with this architecture. At the beginning we had many questions to answer. Last year we started a new big project: a conference application (consisting of an agenda, a participants’ list, a speakers’ list, a news’ list, etc.) and then the story began…
Ready for a fast ride with VIPER?

Why did we choose VIPER ?
Note: If you have doubts about which architecture to choose for your new project, maybe this site will be helpful for you. Our reasons for using VIPER:
-
VIPER architecture should be used for applications whose requirements are very well defined at the beginning. Fortunately, in our case they were. If you know that your screens and business logic can be strongly affected by a product owner, VIPER may be not a perfect solution for you. Even a small change can impact your all module files (a view, a presenter, an interactor…). Redesigning can be a very time-consuming task. A better solution would be just creating a new VIPER module.
-
Our project was quite big. By setting one module you have to generate and write a lot of (it seems sometimes) redundant code. Very often you have to just pass data between all VIPER components from a view to API manager, and then come back with some returned data to view. That’s why there is no point in using this architecture for very small projects.
-
VIPER (without a few exceptions:) ) has very clear politics about responsibility for each component. It helps with reducing amount of code in files and putting into the right place according to a single responsibility principle. Additionally a project is very well structured what enforced on every developer in our project using the same practices. If a new developer joins the team, he should really fast adapt to VIPER and from the other hand it is less possible that he destroys something in this kind of architecture:)
-
If you work in a team of for example 3 developers, then everyone can work on one module. In this way you can easily divide your work.
-
In our case we also had very good defined features and screens from the very beginning so it wasn’t a problem to translate it into VIPER modules.
-
On the basis of VIPER principles, everything in one module is very well separated, so it creates good environment for unit testing. Look at this article regarding more info about TDD in VIPER.
-
Finally, we wanted to check and try out a new architecture!!! Hoping to avoid a bad decision:

which starts from MVC and ends up with MassiveVC.
Project structure, folders and VIPER modules
Do you remember all VIPER module components? Our proposal is based on this website, where used components are called “Services”. You can find more about services in a section Services.

How to translate this into project files? Every component should be translated into a separate folder and class:
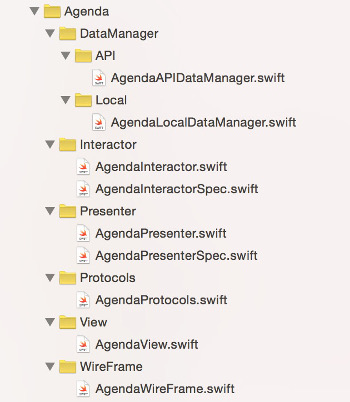
Next question is: what is the best candidate for VIPER module? Basically the easiest approach is to translate one screen (or big feature) into VIPER module. For example:
- Login screen -> Login Module.
- Participant List -> Participant List Module
Do you imagine creating whole stack by hand every time? Fortunately, there are generators:
VIPER modules Generators
If you really want to make your application based on VIPER architecture, do not even think to make it all manually. It will be a disaster! You need an automated process to create a new module (Trust me:)) . First of all, you can download one of available VIPER generators here:
In our project we took the first one and customized it further for our purposes. For example, we have added test files for Interactor and Presenter. Our custom vipergen tool is available here:
That customization required a little bit of modifications in Ruby. Note, that it was only because we wanted to have an auto-inserted swift module name in all unit test files.
You will probably just need your custom templates. They can be easily created by copying and editing one of existing folders with templates. Just follow this instruction to learn how to add a new template. You have two options, send a PR to an existing repo or create your own fork and gem for more control. Git repositories of vipergen provide more useful information.
We did not use other solutions much, but Generamba seems like a well supported tool and provides nice setup steps from CLI. Make sure that you have checked out all available solutions to find one which one suits you best.
Sending information between VIPER modules
From the very beginning we thought how to deal with passing data between VIPER modules, there was no clear answer. It was very helpful to start reading below topics:
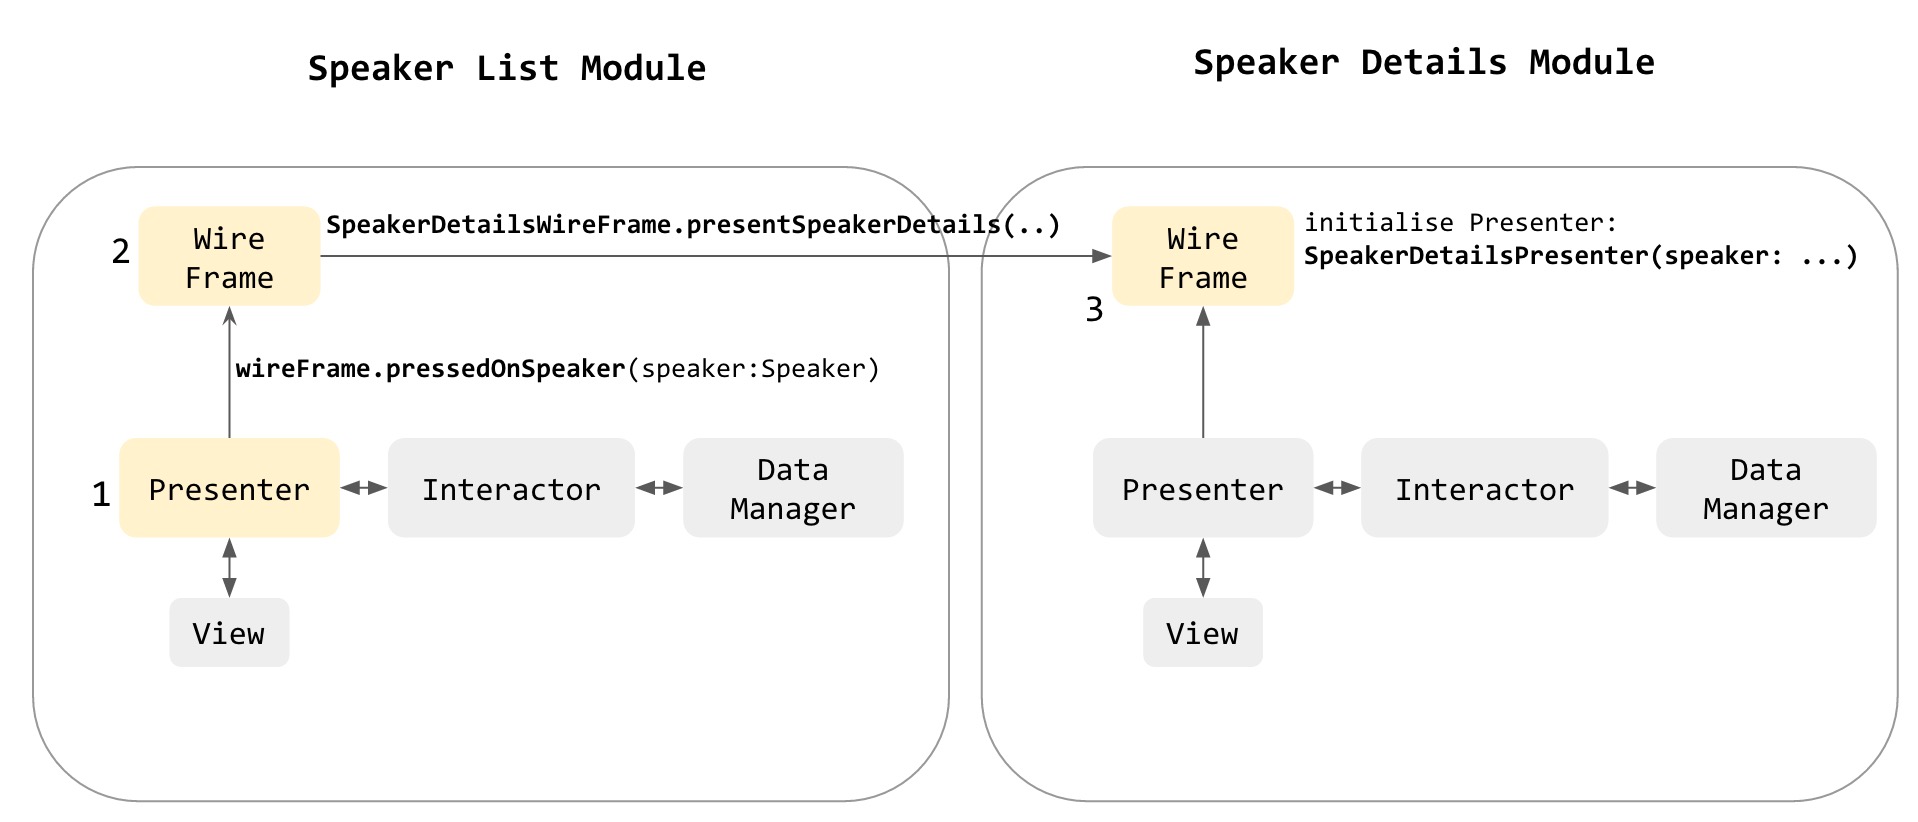
Finally we decided to send information from one module to Presenter in the second module (it seemed to be the best natural way without breaking VIPERs principles):
What does it mean in context of code?
    class func setupSpeakerDetailsModule(speaker: Person) -> UIViewController  {
        // Generating module components
        let view: SpeakerDetailsViewProtocol = SpeakerDetailsView()
        let presenter: protocol<SpeakerDetailsPresenterProtocol, SpeakerDetailsInteractorOutputProtocol> = SpeakerDetailsPresenter(speaker: speaker)
        let interactor: SpeakerDetailsInteractorInputProtocol = SpeakerDetailsInteractor()
        let APIDataManager: SpeakerDetailsAPIDataManagerInputProtocol = SpeakerDetailsAPIDataManager()
        let localDataManager: SpeakerDetailsLocalDataManagerInputProtocol = SpeakerDetailsLocalDataManager()
        let wireFrame: SpeakerDetailsWireFrameProtocol = SpeakerDetailsWireFrame()
        // Connecting
        view.presenter = presenter
        presenter.view = view
        presenter.wireFrame = wireFrame
        presenter.interactor = interactor
        interactor.presenter = presenter
        interactor.APIDataManager = APIDataManager
        interactor.localDataManager = localDataManager
        return view as! UIViewController
    }
SpeakerDetails module is initialised based on a class method invoked in SessionList wireframe, then in above method a presenter of SpeakerDetails has knowledge about what session user has selected.
VIPER Entities and Core Data
First of all, we decided to create our own core data stack. Why not to use external libraries to make this quicker? Because we wanted to have full control of our persistence store.
Our Core Data stack have two managed object contexts: one on the main thread and one on the background thread. Both connected to the same persistent store coordinator. Each context operates independently of the other. Changes are exchanged by merging the did-save notification:

Note: This idea was taken from a great book: Advanced Core Data, where you can find much information about how to setup your own CoreData stack with many alternatives. We strongly recommend this book:)
But what about entities?
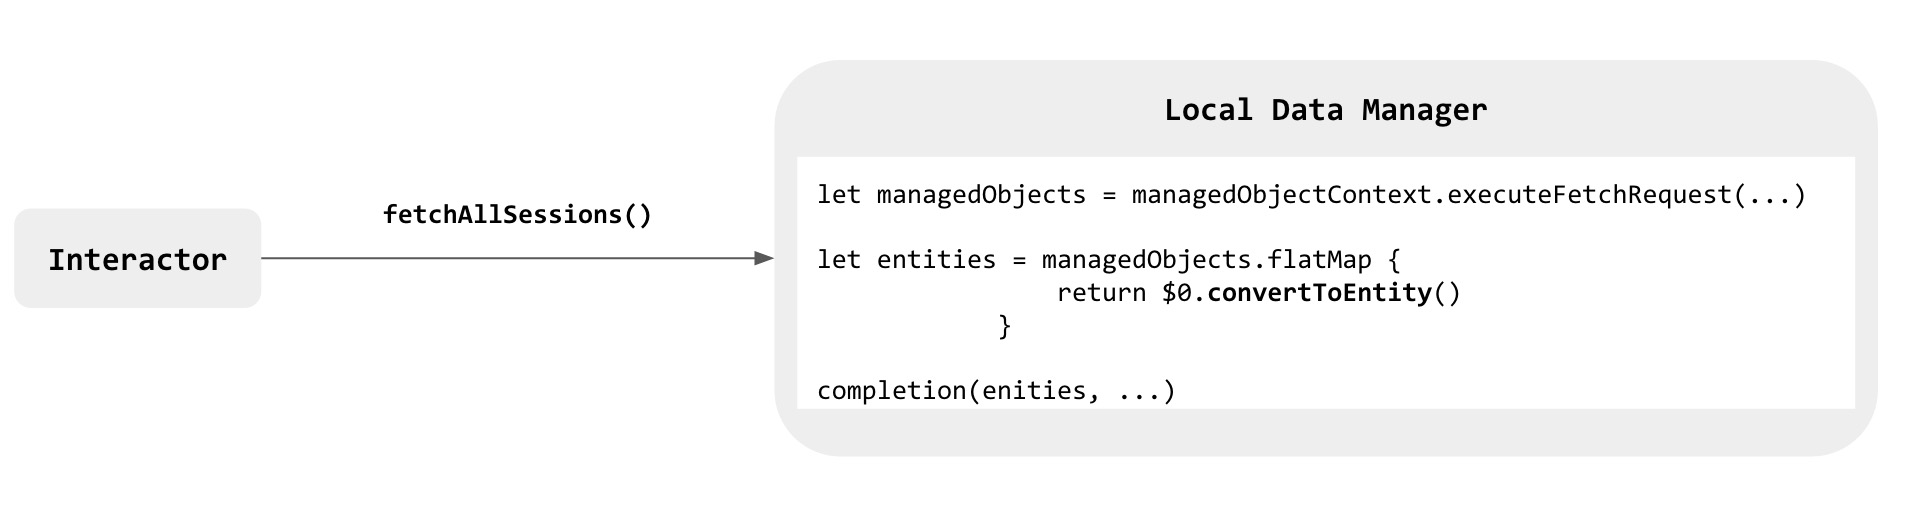
Entities are sent between VIPER components but not as CoreData’s NSManagedObject instances. Managed objects are accessible only in local managers, where they are converted to entity ( in convertToEntity() function) and passed to an interactor:
Why not to send NSManagedObjects? Because in this way our application is separated from data model and data layers. In this way we keep Core Data where it should be: at the data store layer.
What data type represents entity? In our case every time it is just a struct:
struct Person {
	var firstName: String?
    var lastName: String?
    var location: String?
    var email: String?
	...
}
which is small, immutable and thread-safe, just perfect:)
Dependency Injection
Use of VIPER architecture gives great possibility to apply dependency injection. For example, let’s consider an example of a local manager:
final class ParticipantListLocalDataManager: ParticipantListLocalDataManagerInputProtocol {
    private let coreDataStack: CoreDataStack
    private let personService: PersonService
        init(coreDataStack: CoreDataStack = CoreDataStack.sharedStack, personService: PersonService = PersonService()) {
        self.coreDataStack = coreDataStack
        self.personService = personService
    }
    func getAllParticipants(conference: Conference, completion: ([Person]?, error: ErrorType?) -> ()) {
        let context = coreDataStack.managedObjectContext
 ...
Injection in the constructorn in this class gave us two advantages:
- We have a better sense what’s going on in this code. We see immediately what dependencies our class has
- On the other hand, our class is prepared for unit testing
Another example for a presenter:
final class ParticipantDetailsPresenter: ParticipantDetailsPresenterProtocol, ParticipantDetailsInteractorOutputProtocol {
    weak var view: ParticipantDetailsViewProtocol?
    var interactor: ParticipantDetailsInteractorInputProtocol?
    var wireFrame: ParticipantDetailsWireFrameProtocol?
    var participant: Person
    let conference: Conference
    init(participant: Person, conference: Conference) {
        self.participant = participant
        self.conference = conference
    }
...
When using VIPER architecture a good practice is to use DI in every component. We will show in Unit Test section a few examples how this approach can really help us during testing.
What is really Wireframe?
In our case wireframe has two functions:
- It initialises instances of each VIPER’s component and wires them up:
final class ParticipantListWireFrame: ParticipantListWireFrameProtocol
{
    class func setupParticipantListModule(conference: Conference) -> UIViewController
    {
        // Generating module components
        let view: ParticipantListViewProtocol = ParticipantListView()
        let presenter: protocol<ParticipantListPresenterProtocol, ParticipantListInteractorOutputProtocol> = ParticipantListPresenter()
        let interactor: ParticipantListInteractorInputProtocol = ParticipantListInteractor(conference: conference)
        let APIDataManager: ParticipantListAPIDataManagerInputProtocol = ParticipantListAPIDataManager()
        let localDataManager: ParticipantListLocalDataManagerInputProtocol = ParticipantListLocalDataManager()
        let wireFrame: ParticipantListWireFrameProtocol = ParticipantListWireFrame()
        // Connecting
        view.presenter = presenter
        presenter.view = view
        presenter.wireFrame = wireFrame
        presenter.interactor = interactor
        interactor.presenter = presenter
        interactor.APIDataManager = APIDataManager
        interactor.localDataManager = localDataManager
        let nvc = UINavigationController(navigationBarClass: NavigationBar.self, toolbarClass: nil)
        nvc.viewControllers = [view as! UIViewController]
        return nvc
    }
- The second responsibility is to navigate and present other modules:
    func presentParticipantDetailsModule(participant: Person, conference: Conference, fromView: ParticipantListViewProtocol) {
        let destinationVC = ParticipantDetailsWireFrame.setupParticipantDetailsModule(participant, conference: conference)
        if let sourceVC = fromView as? UIViewController {
            sourceVC.navigationController?.pushViewController(destinationVC, animated: true)
        }
    }
Nothing more:)
Unit testing
We have to admit that we didn’t have a big experience with unit testing before. To make first steps in this field: we started from testing interactor and presenter, because interactor contains main business logic and presenter contains logic responsible for preparing data before displaying. These components seemed to us more critical than others, but it was just our subjective opinion.
Libraries used by us for unit tests:
In VIPER every component of a module is strictly separated what creates a very friendly scenario for adopting unit tests in terms of single responsibility principle:

As we can see, by separating components in our test we can focus only on testing responsibility of interactor. The others components which talk with interactor are just mocked.
How does it look like in perspective of code?
class ParticipantListInteractorSpec: QuickSpec {
    private class PresenterMock: ParticipantListPresenterProtocol {
        ...
    }
    private class LocalDataManagerMock: ParticipantListLocalDataManagerInputProtocol {
        ...
    }
    private class APIDataManagerMock: ParticipantListAPIDataManagerInputProtocol {
        ...
    }
    override func spec(){
        describe("ParticipantListInteractor") {
            var sut: ParticipantListInteractor!
            var presenterMock: PresenterMock!
            beforeEach {
                sut = ParticipantListInteractor(conference: conferenceMock)
                presenterMock = PresenterMock()
                sut.presenter = presenterMock
                presenterMock.interactor = sut
            }
            afterEach {
                sut = nil
                presenterMock = nil
            }
            context("should success in getting participants", {
                beforeEach {
                    sut.localDataManager = DataManagerMock()
                    sut.fetchAllParticipants()
                }
                it("should call local data manager and presenter", closure: {
                    ...
                })
            })
            ...
        }
    }
}
Services
What are services? They are independent components, separated from strict VIPER components. One Service can be used in multiple modules. As it is mentioned here, services are not necessary but can be really helpful, especially in keeping high cohesion. Their responsibilities are for example:
- dealing with Calendar (CalendarService)
- dealing with Adress Book (AdressBookService)
- managing Keychain (KeychainService)
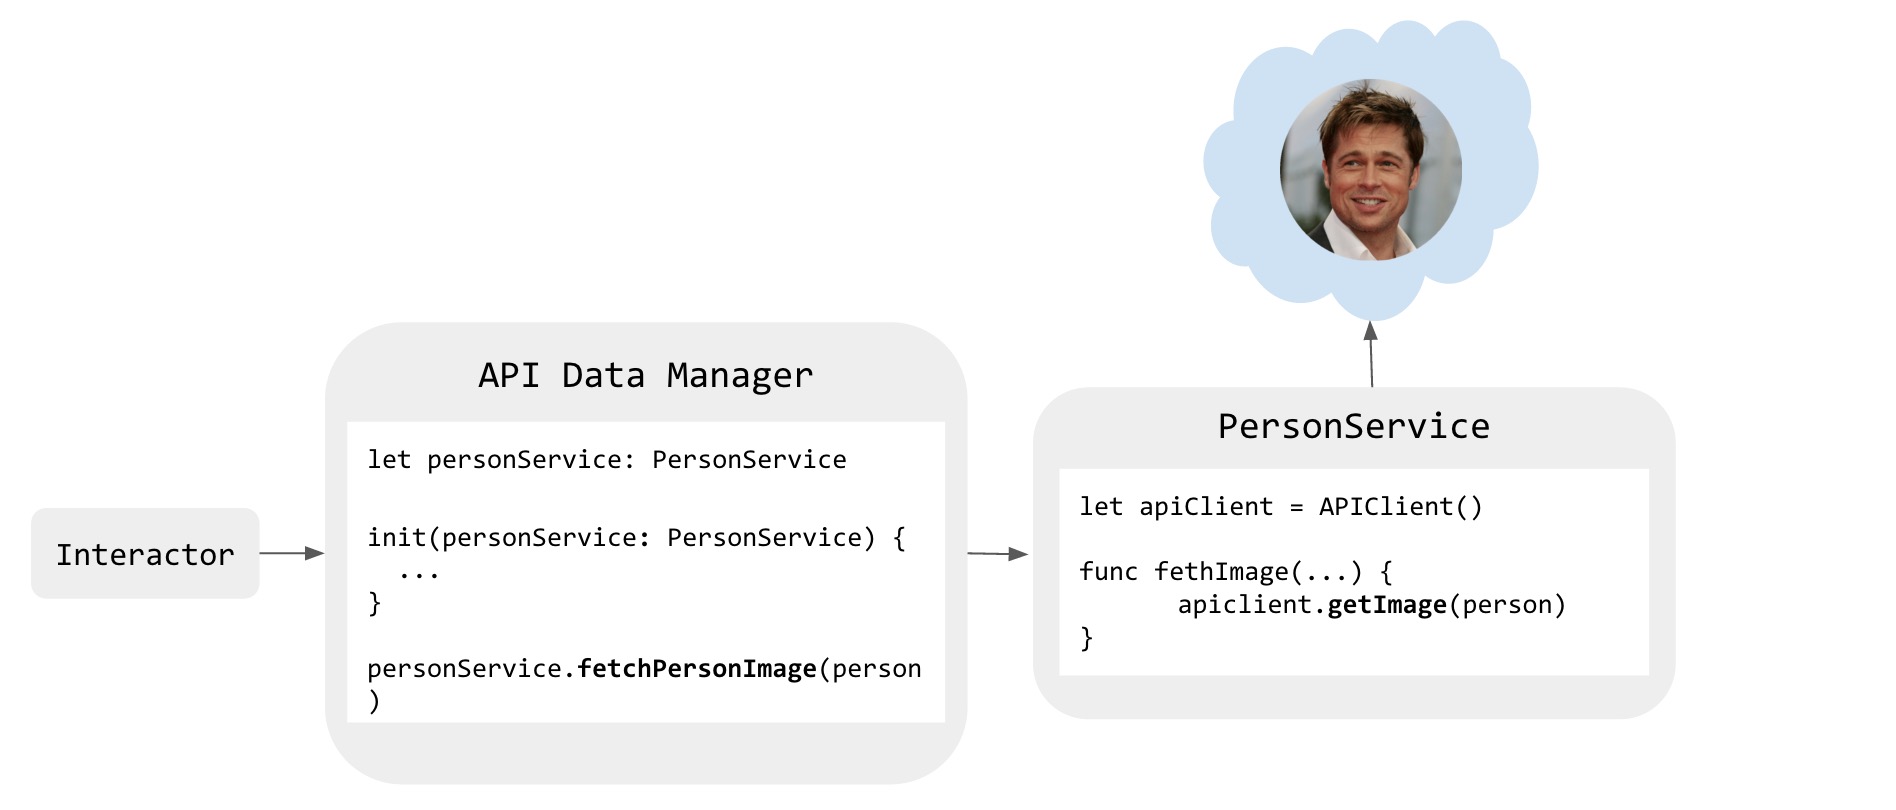
- Person Service (PersonService) - manages downloading user data like a photo etc. In this case a service has also an instance of
apiClientneeded for network requests.
Service in action:
How to deal with listening changes from backend?
In our app we have a couple of lists to display that should be auto-refreshed. Our SynchronizerService does the heavy work of downloading and putting JSON responses into CoreData in background. It happens every 1 minute.
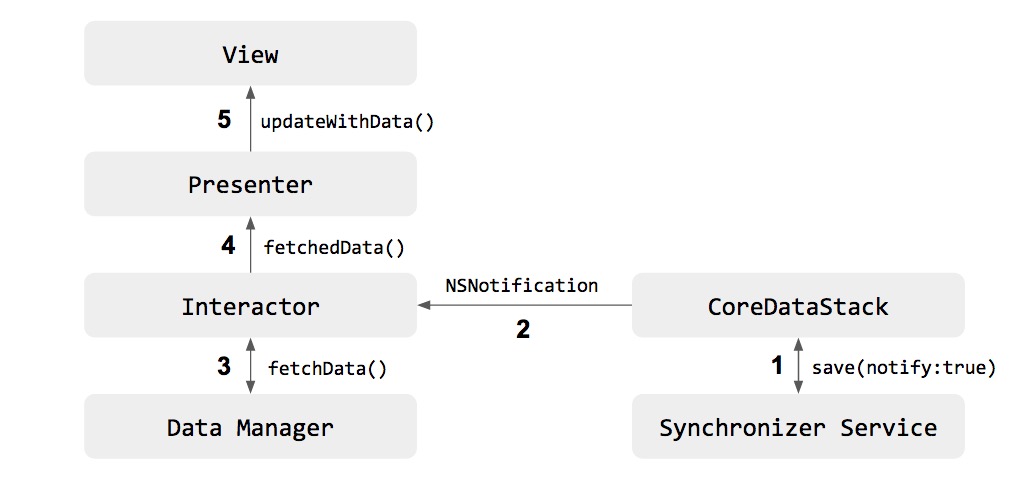
CoreDataService is the first of important components that initiates the whole process of updating content.
It has a save method that accepts an optional parameter to send notification:
func save(notify:Bool?){
	//save logic
}
CoreDataService also listens to NSManagedObjectContextObjectsDidChangeNotification. When this context notification is triggered and save function was called with notifiy flag set to true, a custom NSNotification - CoreDataStackDataUpdatedNotification is fired. That is all regarding the participation of CoreDataService in the process. Clearly you may want to have a more precise notification mechanism. For example, each CoreData entity would have own notification. So far a simplified approach works for us.
The next participant in the update flow is an interactor. We had a very long discussion who should listen to notifications sent by CoreDataService and act on it. Interactor as a main logic engine is our arbitrary choice. Interactors in modules that require data refresh inherit from DataUpdateListener class:
class DataUpdateListener{
    init(){
        NSNotificationCenter.defaultCenter().addObserver(self, selector: "dataUpdated:", name: CoreDataStackDataUpdatedNotification, object: nil)
    }
    deinit{
        NSNotificationCenter.defaultCenter().removeObserver(self)
    }
    @objc func dataUpdated(notification: NSNotification){
        print("This method should be overriden")
    }
}
The dataUpdated(notification:NSNotification) is overridden in interactors. There, as you may expect, standard VIPER flow kicks in. Interactor after receiving notification asks its local data manager for data. This fresh data is then passed to presenter to preprocess. Then presenter passess it to view to display. Voilá!
APIs between VIPER module components are defined in a separate protocol file so that bidirectional communication is always possible (if we define it like that). Using a closure for completion would block us from pushing data from interactor to presenter:
//presenter
 func viewDidLoad(){
 	 interactor.fetchNews{[weak self] (news, error)->() in
			guard error != nil else { return }
 	 		self?.view.updateWithNews(news)
 	 }
 }
 //interactor missing method to push data to presenter!
A good old delegate pattern works better in our update mechanism. Not only presenter can ask interactor to get data for it, but it can also initiate the whole update process:
//presenter
func viewDidLoad(){
 	 interactor.fetchNews()
}
func fetchedNews(news:[News]){
	 view.updateWithNews(news)
}
//interactor
func fetchNews(){
	//some calls to data managers
	presenter.fetchedNews(newsArray)
}
Looks clean and solid, right?
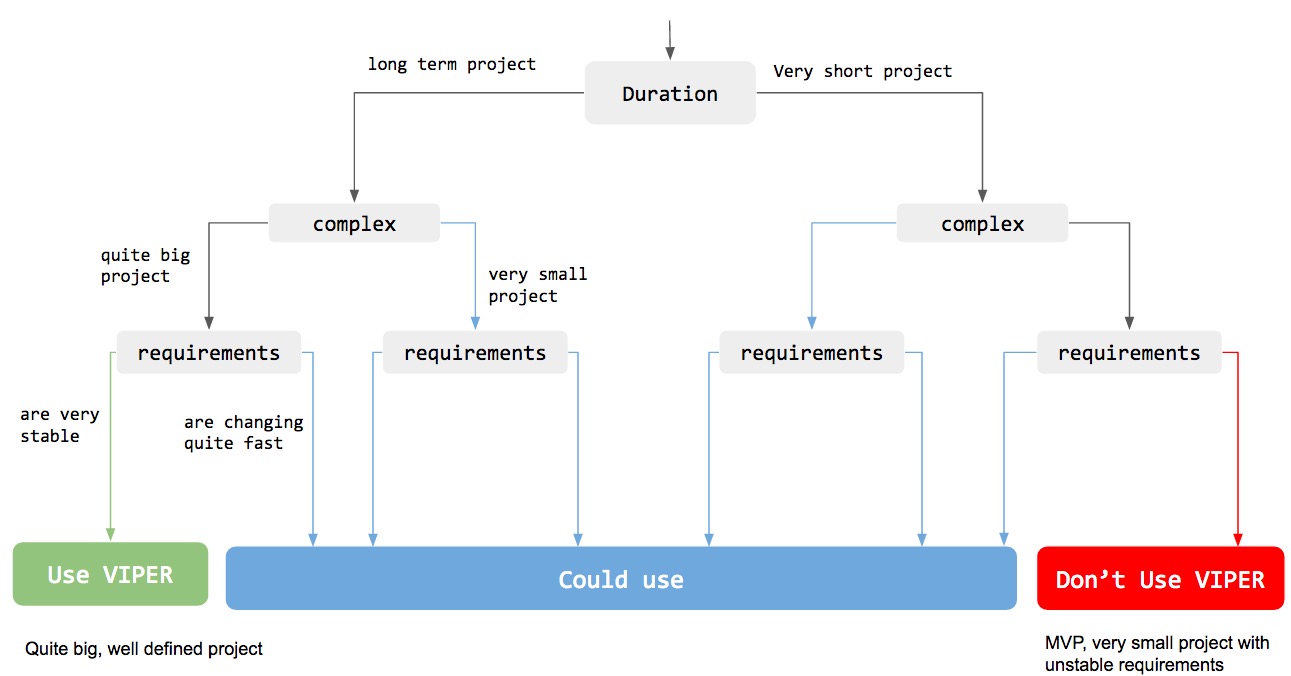
So when to use VIPER, and when not?
The answer is always the same: it depends.
We hope that below block diagram will help you in answering this crucial question (but of course as always, this is a very individual issue):
Summarizing
Starting to use VIPER can be a big challenge, especially when it is your first project in this architecture. We hope that after reading this article most of your doubts and questions will disappear.
In our case we have practiced git flow with pull requests. It was very helpful, especially at the beginning, when every developer in project could observe carefully what colleagues were pushing to the repository. It would be a disaster, if everyone would make his own version of VIPER without consulting and watching what the others were doing. When we have inconsistency in some rule, then we immediately call the meeting to brainstorm and to choose solution together that everyone agrees to use.
VIPER determines very generally how to build an application. We encourage you to stay open minded, never stop to customize and optimize each component. Discuss each doubt with your colleges.
VIPER requires continuous improvements, we hope that in our new projects, we will do better having experience from our first project.
On every step of your development be very careful not to turn architecture into a nightmare, especially at the beginning, when you have to set up the whole project’s structure. One mistake in an architecture can turn into a chain reaction in multiplying further mistakes. That can cause a lot of tedious work.
Finally, VIPER gave us an opportunity to implement unit tests very easily, without big experience in this area:) Thanks VIPER!
What is your opinion about VIPER? Share your comments! :)