Dispatching protocol
In issue #50 Synchronous Unit Tests I described an approach on how to get rid of waiting for XCTestExpectation to be fulfilled. The approach assumes hiding an asynchronous dispatch of a block/closure of code to a GCD queue behind an abstraction layer called the Dispatching protocol.
protocol Dispatching {
    func dispatch(_ work: @escaping ()->Void)
}
In the production code you would implement a Dispatcher type like this:
class Dispatcher: Dispatching {

    let queue: DispatchQueue

    init(queue: DispatchQueue) {
        self.queue = queue
    }

    func dispatch(_ work: @escaping ()->Void) {
        queue.async(execute: work) //  This runs your code asynchronously on the queue
    }
}
This runs your code asynchronously on the queue
}
}
If you had e.g. a view model which needed to perform some asynchronous computations instead of calling DispatchQueue.global().async { /* your code */ } you inject an instance of the Dispatcher and use its dispatch(:) method:
class MessagesViewModel {
    let dispatcher: Dispatching

    init(dispatcher: Dispatching) {
        self.dispatcher = dispatcher
    }

    func load(_ callback: @escaping([Message]) -> Void) {
        dispatcher.dispatch { //NEW!
            var messages: [Message] = []
            //TODO: fetch messages in background
            completion(messages)
        }
    }
}
Running unit tests synchronously – a simpler way
In the previous post I suggested using a synchronous dispatch to a queue during a unit test run. Actually, there is a simpler approach. Thanks to the abstraction layer of Dispatching protocol you can create a stub which invokes your block of code instantly. It doesn’t have to use DispatchQueue type at all, as it was suggested in the previous post (#50 Synchronous Unit Tests).
class DispatcherStub: Dispatching {
    func dispatch(_ work: @escaping ()->Void) {
        work()
    }
}
In a unit test case you create an instance of the stub and the code runs synchronously :)!
func testAtLeast1MessageOnLoad() {

    //Arrange
    var messages: [Message] = []
    let dispatcher = DispatcherStub()
    let viewModel = MessagesViewModel(dispatcher: dispatcher)

    //Act
    viewModel { fetched in
        messages = fetched
    }

    //Assert
    XCTAssertFalse(messages.isEmpty)
}
]]>A few months ago I finished my 17 months long stay in Singapore. It was an amazing time during which I met brilliant people, sweated a lot in tropical weather and worked on a messaging application for iOS.
The company I worked for used eXtreme Programming methodologies for software development. We used XP every business day for 8 hours. Because of that TDD became a habit, lack of companion when programming became a burden, and the legacy code became no fear to me. Let me tell you why XP is useful and why pair programming is helpful when working on a project.
eXtreme Programming
We live in times in which everything changes rapidly. Not longer than 5 years ago (June 2014) majority of production code for iOS apps was written in Objective-C only, whereas today many companies try to minimise Objective-C code in favour of Swift. Not only technology and tools we use evolve and change, but also business requirements for our apps. Companies that can adapt to changing conditions and can develop quality software in an agile way can survive and ship valuable products.
Extreme programming (XP) is a methodology for creating software of high quality in a responsive way to changing requirements. It values a set of good practices and pushes using them to their limits:
- Unit tests are great, they verify that app components behave in a desired way. XP uses TDD approach – tests are written before production code.
- Integration & Deployment can be done manually – code is tested and build locally on our computer and archived to be deployed to Appstore. With XP it is done automatically and continuously on integration servers after every push to the repository.
- Code review catches bugs and improves the design and quality of our code. XP pushes it to extremes too – pair programming is used to conduct continuous code review.
Pair programming = 2 people doing one person’s job
I heard about this wrong perception that pair programming is 2 people doing one person’s job. What actually is pair programming?
Setup
Two people in front of 2 screens, 2 keyboards and 2 mice connected to a single computer working on the same thing. Pair programming is mainly a discussion about how to solve a certain problem. It leads to coming up with a better design and doing it right the first time. Pair members get instant feedback on their ideas thanks to the continuous conversation about the task at hand and its implementation.
Getting quality fast
Have you ever had this feeling that it takes ages to merge your PR (Pull Request) to the main development branch? You implement your new functionality, push changes to a remote branch, create a PR and then you wait… and wait… and finally somebody reviews your changes, leaves some comments. You apply them to your work, and then you wait for feedback again… With continues code review a.k.a. pair programming you get feedback right away. It’s a faster way of working and getting better quality of code. You can push directly to the master because the code you worked on with your pair is considered reviewed. Of course, crucial parts can still go through PR if you need another opinion. Be agile and change approach if needed  !
!
Ramping up and spreading knowledge
We had these new guys joining our development team. If they had to dive into our legacy codebase solo, they wouldn’t have become effective quickly. Pairing allowed them to ramp up fast. The project’s legacy codebase was extremely complicated, old and lacking unit tests for crucial parts. When they worked with experienced peers they could learn about the project from them. Good practices were spread right away and a knowledge about the project was shared on the job.
Some new teammates didn’t have experience in Objective-C, nor in TDD. If you learnt Objective-C you know how difficult it probably was for you at the beginning and how different it is from Swift. If you practice TDD, you understand that it demands perseverance and skill in unit testing. Our teammates could learn from the experience of other peers thanks to pair programming.
It would be great if knowledge of application components was distributed evenly, i.e. every team member would feel comfortable and capable of working on any part of the app. You can achieve that by rotating pairs. At every daily standup, people would tell what they planned to work on. Then peers agree on what and whom they want to work with. And hey – not every task makes sense to be done in pair programming mode  .
.
Pair rotation teaches the skill of adaptation to new tasks easily. One person from the initial pair working on the task stays with it till it’s finished and the other person can step back from the task and work with someone else on another task. It also spreads the knowledge and gives fresh look and opinion on solutions when new people joined to pair with you.
Distraction free
Nowadays it’s extremely easy to get distracted. Phone buzzing with notifications, e-mail needs to be answered, new blog post on “XYZ” needs to be read. After an hour you can find yourself still not having started the work…
While you’re pairing, you’re actively involved in the task. You discuss the code and you don’t answer sms or watch YouTube.
A few days ago I was thinking through how to solve a certain problem in the application. Then my colleague waved at me and ask some question about the app. I needed to navigate to a different part of the project and talk about it for a while. When we finished I needed a few minutes to get back on track…
When programmers are pairing people see that they are actively involved in their work. People will wait for the appropriate moment to approach them to discuss things through. What’s also great about pairing is that when somebody approaches the pair one member can handle the interruption while another will stay focused and work on the task.
Rewarding way to work
Pair programming is just fun and rewarding way to work. You have a mutual goal and pursue with your pair to achieve it. This pursuit is accompanied with a lot of laughter and it allows you to get to know your colleagues more and to make this special connection with them.
Glimpse of an eye
When you do pair programming you never end up in situations when people start arguing about who will use the keyboard. Of course you have two sets of them, but usually only one is used at a time. Pair agrees on the way they want to work. It can be that one person writes the test and the other implements the code. It can be communicated verbally that one wants to write code – “Hey, let me do it!” .
But there is more than that. When you practice pair programming constantly for some period you start understanding non-verbal communication.
When you type on a keyboard and you notice by a glimpse of an eye a subtle movement of your peer’s hand approaching their keyboard, you immediately know that it means that they want to start typing and to introduce their concepts so you can react to this non-verbal language right away. You understand your pair with no words.
Speaking the same language
Sometimes even if we speak the same language we don’t understand each other. Language can mean many aspects – Objective-C/Swift, Polish/English, body language, language of shared experienced.
I spent 17 months where Chinese is one of spoken languages and my friends taught me some of it:
我不说你说的语言
Wǒ bù shuō nǐ shuō de yǔyán in Chinese means I don’t speak the same language that you speak.
Pair programming allowed me to learn non-verbal language, to understand people coming from different backgrounds and cultures. It allowed me to “speak” the same language, share my experience and learn a lot from others.
Summary
I can’t sum up pair programming by not quoting my previous manager. It’s just a rewarding way to work. You have a lot of fun while working with others. It’s an exciting adventure which gives new experience. With pair programming you get better code and higher quality much faster than in a standard approach to software development.
| pair programming | |
|---|---|
| wait ages for PR review | instant feedback |
| slow solo discover | fast developer ramp up |
| distraction threat | focus on the job |
TL;DR;
If you want go fast, go alone.
If you want to go further, go together.
African proverb
Links
]]>Mobile applications are usually multi-threaded. We perform UI operations on the main thread and dispatch heavy tasks (e.g. network requests, JSON parsing, writing to a file on a disk) on background threads. The iOS allows us to use backgrounds threads for example by using Grand Central Dispatch API (GCD), i.e. by performing operations on DispatchQueue objects. Work dispatched to a background DispatchQueue is usually done asynchronously with queue.async{} call.
If we wanted to test an object that uses a queue to perform work in background, we would use an XCTestExpectation and wait for an async operation to finish. We can fulfil the expectation in a callback.
func testCompletionGetsAtLeast1Message() {
//Arrange
let laoder = MessageLoader()
let expectation = XCTestExpectation(description: "should call completion handler with at least 1 message")
//Act
laoder.load { messages in
//Assert
XCTAssertFalse(messages.isEmpty)
expectation.fulfill()
}
wait(for: [expectation], timeout: 5)
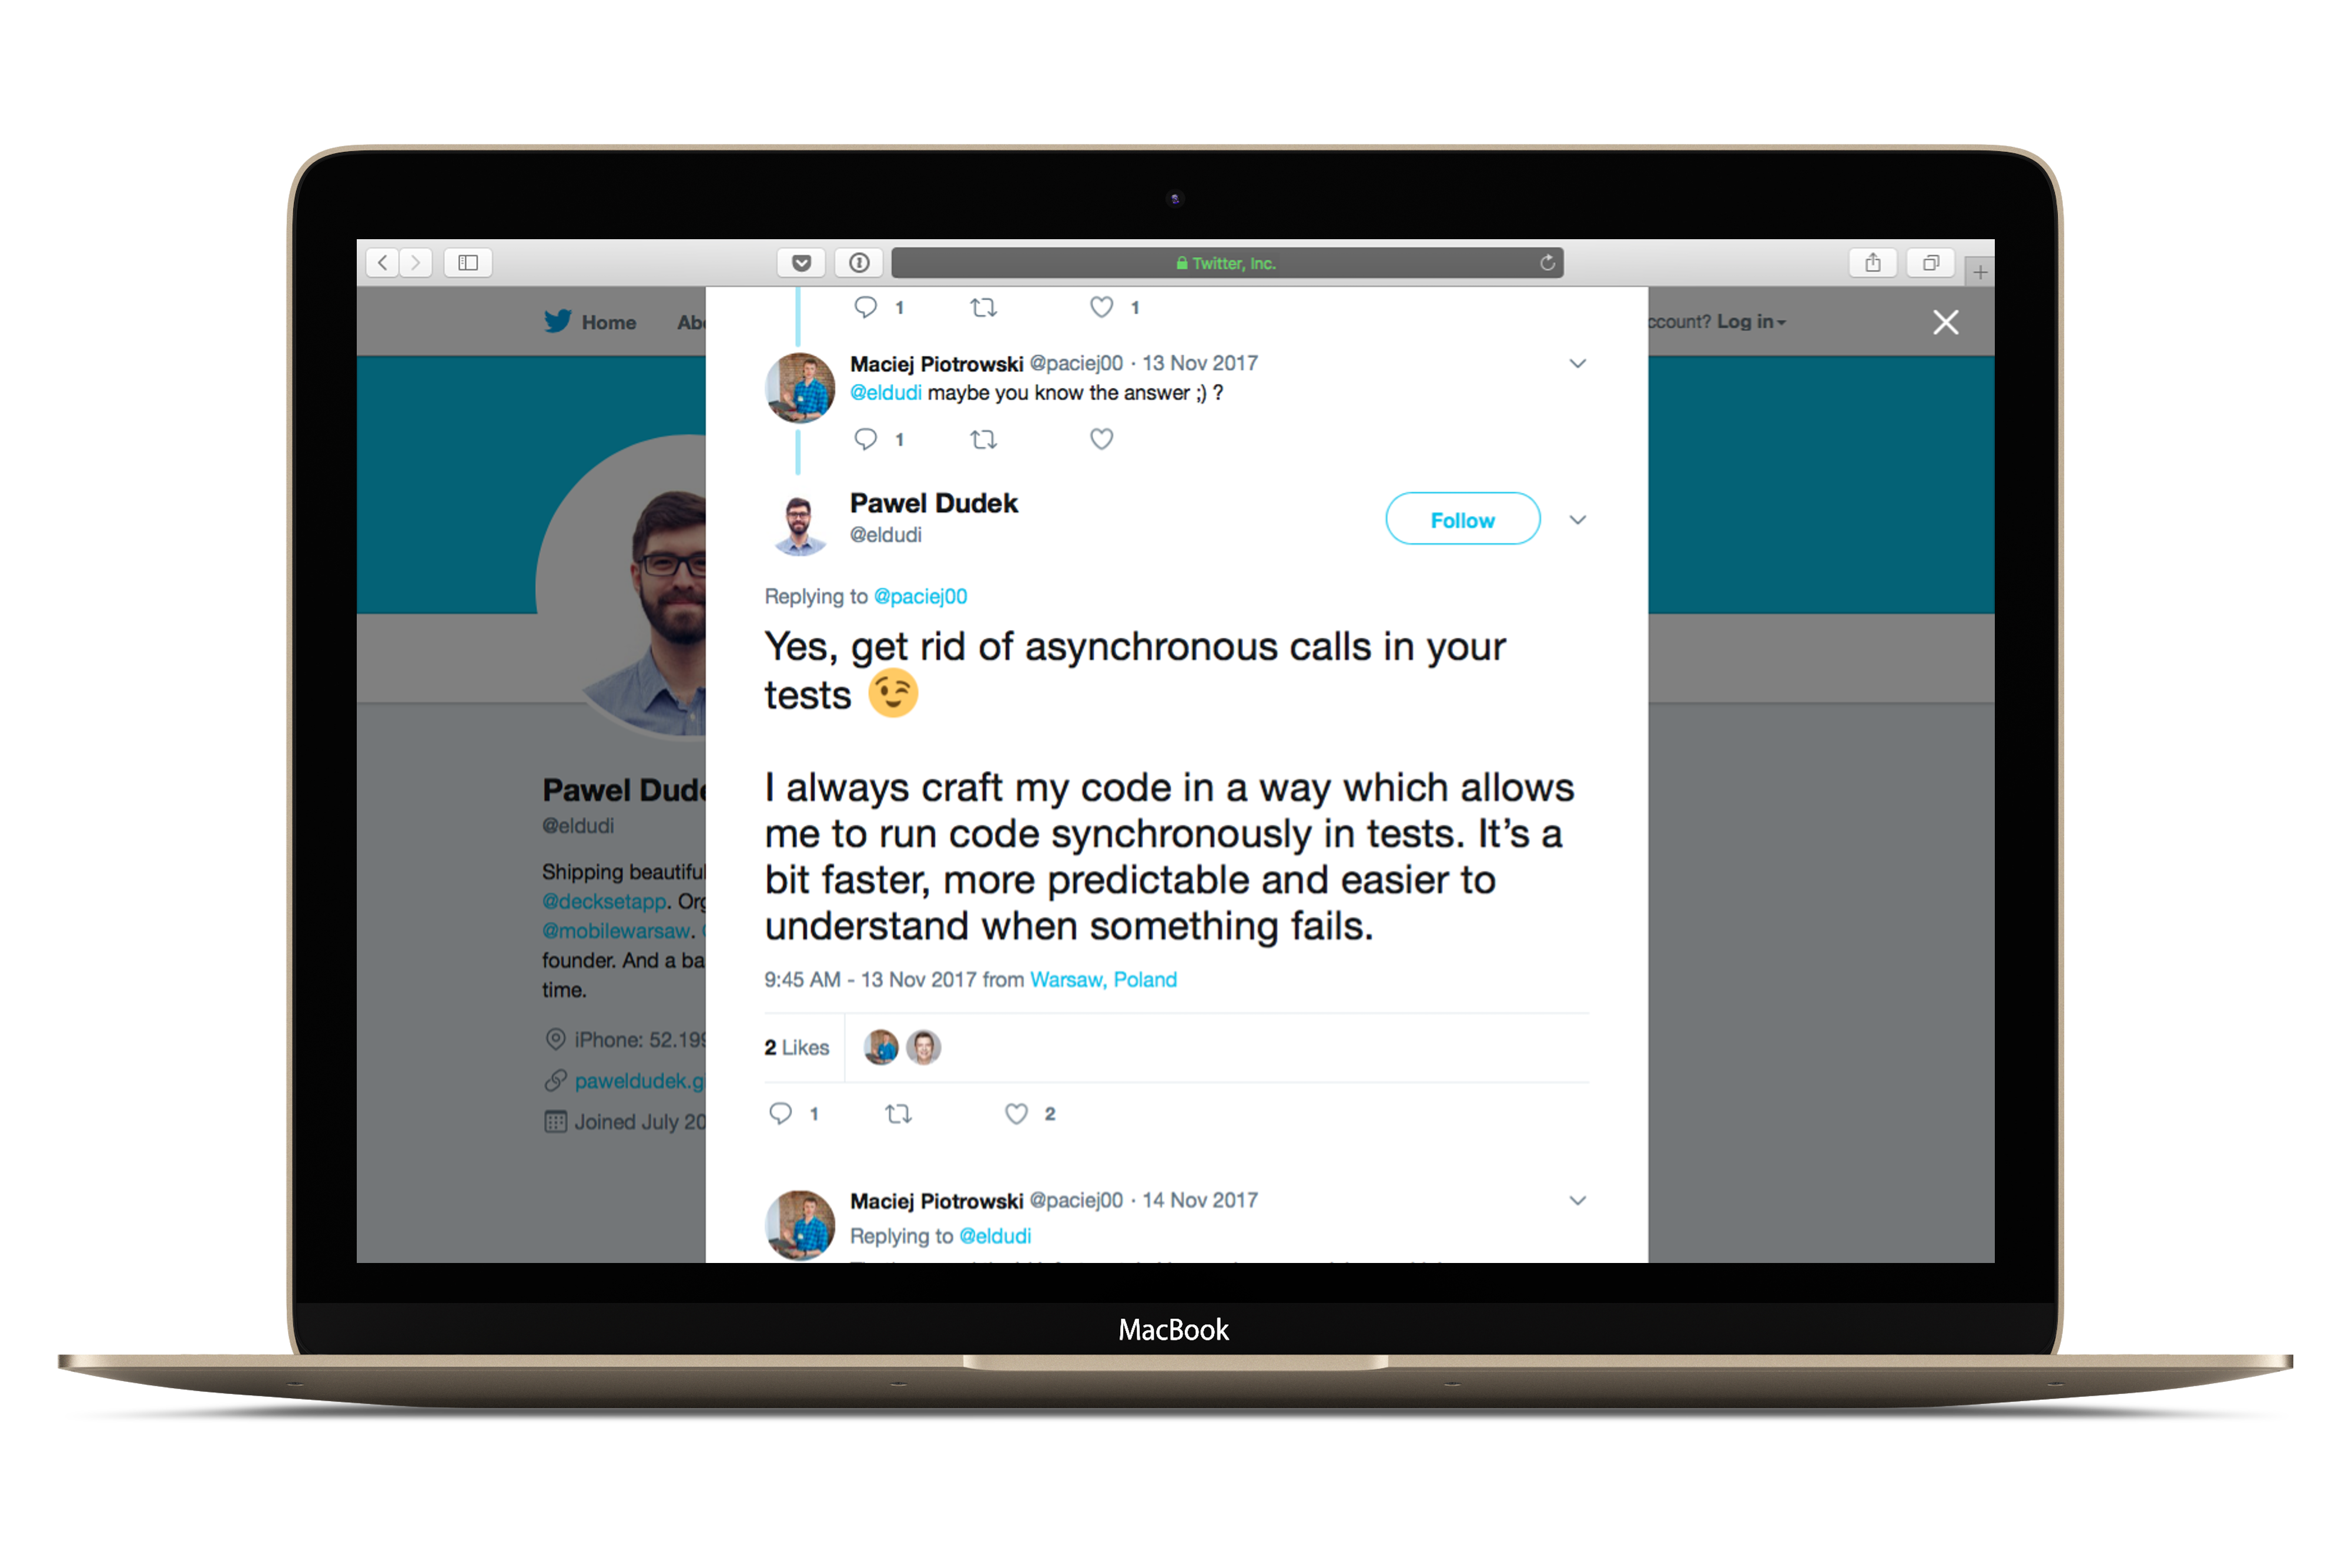
}In autumn I asked on Twitter about the best way to wait for an XCTestExpectation. The interface of XCTestCase class declares a few methods:

I didn’t get a clear answer, but the reply gave food for thought…
Asynchronous drawbacks
Unclear AAA pattern
It’s a good practice to divide test into 3 phases:
– Arrange – setup a subject under test, set it in the desired state
– Act – perform an action on the subject
– Assert – test if a desired behaviour or change happened
In an asynchronous test the phases aren’t clearly visible. How would you name the last phase? A Wait phase?
func testCompletionGetsAtLeast1Message() {

    //Arrange
    let laoder = MessageLoader()
    let expectation = XCTestExpectation(description: "should call completion handler with at least 1 message")

    //Act
    laoder.load { messages in
        //Assert
        XCTAssertFalse(messages.isEmpty)
        expectation.fulfill()
    }

    //???
    wait(for: [expectation], timeout: 5)
}
Overhead
In the code snippet above we wait 5 seconds for the expectation. It means that our unit test can take up to 5 seconds in the worst case scenario (i.e. if execution of load(:) method took more that 5 seconds). XCTest framework would fail the test after 5 seconds of waiting.
wait(for: [expectation], timeout: 5)
Waiting for 5 seconds for a unit test seems too much… Even 1 second seems! Imagine we had 1200 unit tests with asynchronous expectations fulfilment and because of some mistake in our code all of them fail. The framework needs to wait for each of them for 1s. Math is like that:
1s * 1200 tests = 1200s = 20min
We would have to wait 20 minutes for results of our unit test suite execution. Feels like eternity… Even Swift apps compile faster nowadays…
wait(for: [expectation], timeout: 0.1)
Typically the waiting time should be set to 100ms. But even 100ms is a bit too much. In the case of failing tests we would have to wait for 2 minutes…
100ms * 1200 tests = 120s = 2 minutes
No control
But the main drawback is that we have NO CONTROL over DispatchQueue.main singleton used. We don’t know how much time the execution of our code will take. But we can regain the control. How? By running code synchronously!
Synchronous Assertions
Let’s assume we have a MessageLoader class that performs some operations on a background DispatchQueue:
class MessageLoader {
    let queue: DispatchQueue

    init(queue: DispatchQueue) {
        self.queue = queue
    }

    func load(_ completion: @escaping ([Message])->Void) {
        queue.async {
                        var messages: [Message] = []
                        //NOTE: fetches messages in background
                        completion(messages)
        }
    }
}
In this approach we cannot test in other way than using an XCTestExpectation that completion closure gets called after our function finishes doing stuff.
We can create a Dispatching protocol that declares a single method – dispatch(:).
protocol Dispatching {
    func dispatch(_ work: @escaping ()->Void)
}
Let’s create a Dispatcher class that gets initialised with a queue. It will serve as a superclass for other dispatchers.
class Dispatcher {
    let queue: DispatchQueue

    init(queue: DispatchQueue) {
        self.queue = queue
    }
}
We can hide async dispatch of a job to a DispatchQueue by creating an async dispatcher – let’s call it AsyncQueue. The class conforms to our Dispatching protocol and performs action asynchronously on a queue that an instance is initialised with.
class AsyncQueue: Dispatcher {} //inheritance gives an initialiser with a queue

extension AsyncQueue: Dispatching {
    func dispatch(_ work: @escaping ()->Void) {
        queue.async(execute: work) //IMPORTANT!
    }
}
We can also create a SyncQueue that would dispatch a job synchronously on a queue.
class SyncQueue: Dispatcher {} //inheritance gives an initialiser with a queue

extension SyncQueue: Dispatching {
    func dispatch(_ work: @escaping ()->Void) {
        queue.sync(execute: work) //IMPORTANT!
    }
}
Ok, but what is this all for? We wanted to test synchronously! So we need to upgrade our MessageLoader to use the Dispatching queue to perform a job.
class MessageLoader {
    let queue: Dispatching

    init(queue: Dispatching) {
        self.queue = queue
    }

    func load(_ callback: @escaping([Message]) -> Void) {
        queue.dispatch { //NEW!
            var messages: [Message] = []
            //TODO: fetch messages in background
            completion(messages)
        }
    }
}
Instead of using sync or async method on a DispatchQueue we call dispatch on our Dispatching type. How to test synchronously that completion closure gets called? We just need to initialise MessageLoader with a SyncQueue.
Before that, let’s create some queues just like DispatchQueue gives access to commonly used queues:
extension SyncQueue {
    static let main: SyncQueue = SyncQueue(queue: .main)
    static let global: SyncQueue = SyncQueue(queue: .global())
    static let background: SyncQueue = SyncQueue(queue: .global(qos: .background))
}

extension AsyncQueue {
    static let main: AsyncQueue = AsyncQueue(queue: .main)
    static let global: AsyncQueue = AsyncQueue(queue: .global())
    static let background: AsyncQueue = AsyncQueue(queue: .global(qos: .background))
}
Let’s write a unit test for our completion closure being called. We need to initialise MessageLoader with a background queue on which jobs are dispatched synchronously. Imagine we are writing a messaging app. Our product manager gave us a task to welcome a user with a “hello” message even if there are no other messages.
let welcome = Message(author: "The App", text: "Welcome in the app!")
So we need to assert that we have at least one message in the array given as an argument to the completion handler. We can create an array outside a completion closure and assign a value to it in the completion.
func testAtLeast1MessageOnLoad() {

    //Arrange
    var messages: [Message] = []
    let background = SyncQueue.background
    let loader = MessageLoader()
    loader.queue = background

    //Act
    loader.load { fetched in
        messages = fetched
    }

    //Assert
    XCTAssertFalse(messages.isEmpty)
}
Thanks to the synchronous nature of this testing approach we also benefit from it by enhancing test readability. We have clearly visible Arrange, Act and Assert phases.
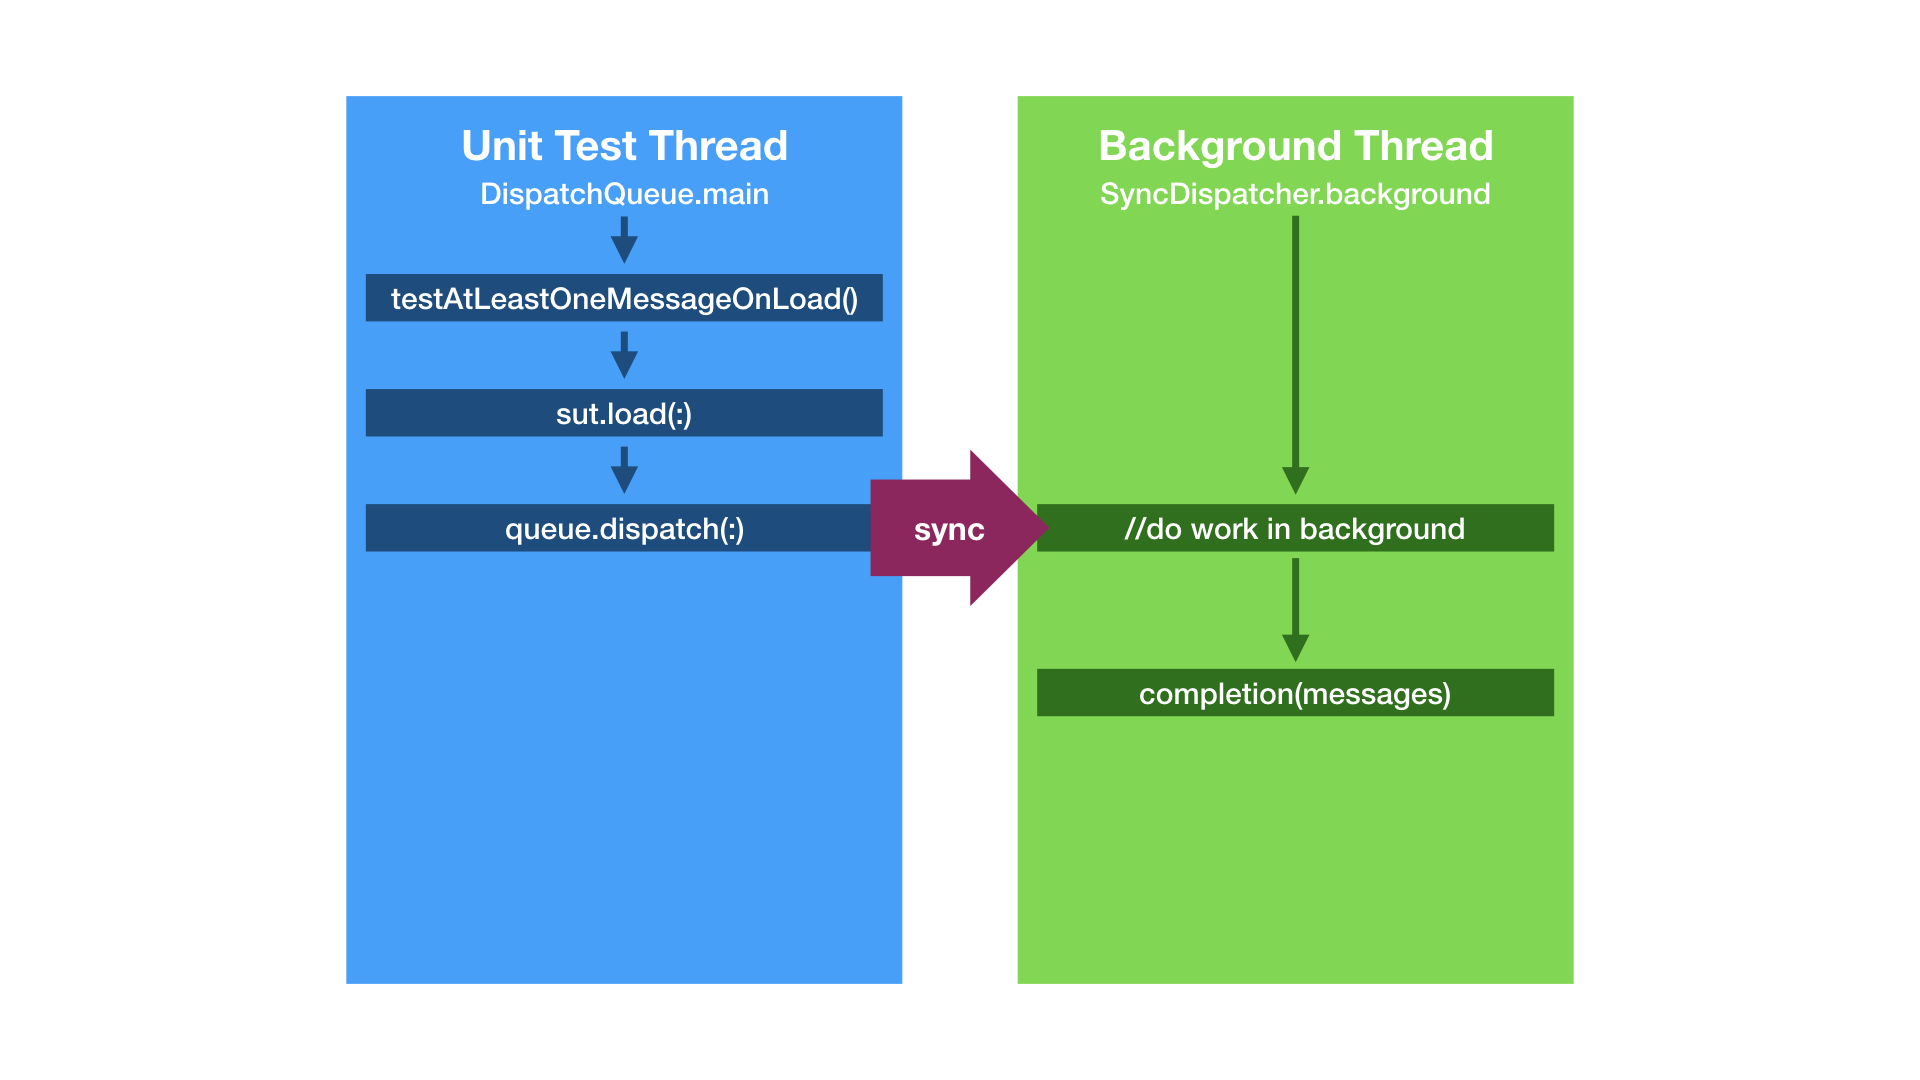
TL;DR;(1) – making things clear
We don’t have to use the XCTestExpectation because our code executes synchronously with SyncQueue. Unit test is run on the main thread and then load(:) executes it’s job synchronously on a background thread. The sync dispatch means, that the calling thread waits until execution of the job dispatched on a background thread finishes.
Beware of the  deadlock!
OK, let’s refactor. Or make things more difficult… But look out for a deadlock!
Imagine we have a loader that dispatches work on a background queue but calls completion closure on the main queue. If we used DispatchQueue objects our code would look like this:
func load(_ completion: @escaping ([Message])->Void) {

    DispatchQueue.global().async {
        //fetch messages on a background thread

        DispatchQueue.main.async {
            completion([ ]) //on the main thread
        }

    }
 }
Again, as in previous example, we can use the Dispatching protocol to hide a use of a DispatchQueue.
class MessageLoader {
    let main: Dispatching
    let background: Dispatching

    init(main: Dispatching, background: Dispatching) {
        self.main = main
        self.background = background
    }

    func load(_ callback: @escaping([Message]) -> Void) {

        background.dispatch { //NEW!

            var messages = [ Message.welcome ]

            //TODO: fetch messages in background

            self.main.dispatch { //NEW!
                callback(messages)
            }
        }
    }
}
If we wanted to test that completion closure gets called and we didn’t pay attention to what queue we dispatch jobs during a unit test we might end up with a deadlock.
What is the deadlock? In a multi-threaded application it occurs when a thread enters a waiting state because a requested system resource is held by another waiting thread.
We want to test our new loader with a simple test that calls load(:) method on MessageLoader instance. We initialise our loader with SyncQueue.main and SyncQueue.background objects that perform work synchronously on the main queue and on a background queue respectively.
func testAtLeast1MessageOnLoad() {
//Arrange
var messages: [Message] = []
let loader = MessageLoader(main: SyncQueue.main,
background: SyncQueue.background)
//Act
loader.load { fetched in
messages = fetched
}
//Assert
XCTAssertFalse(messages.isEmpty)
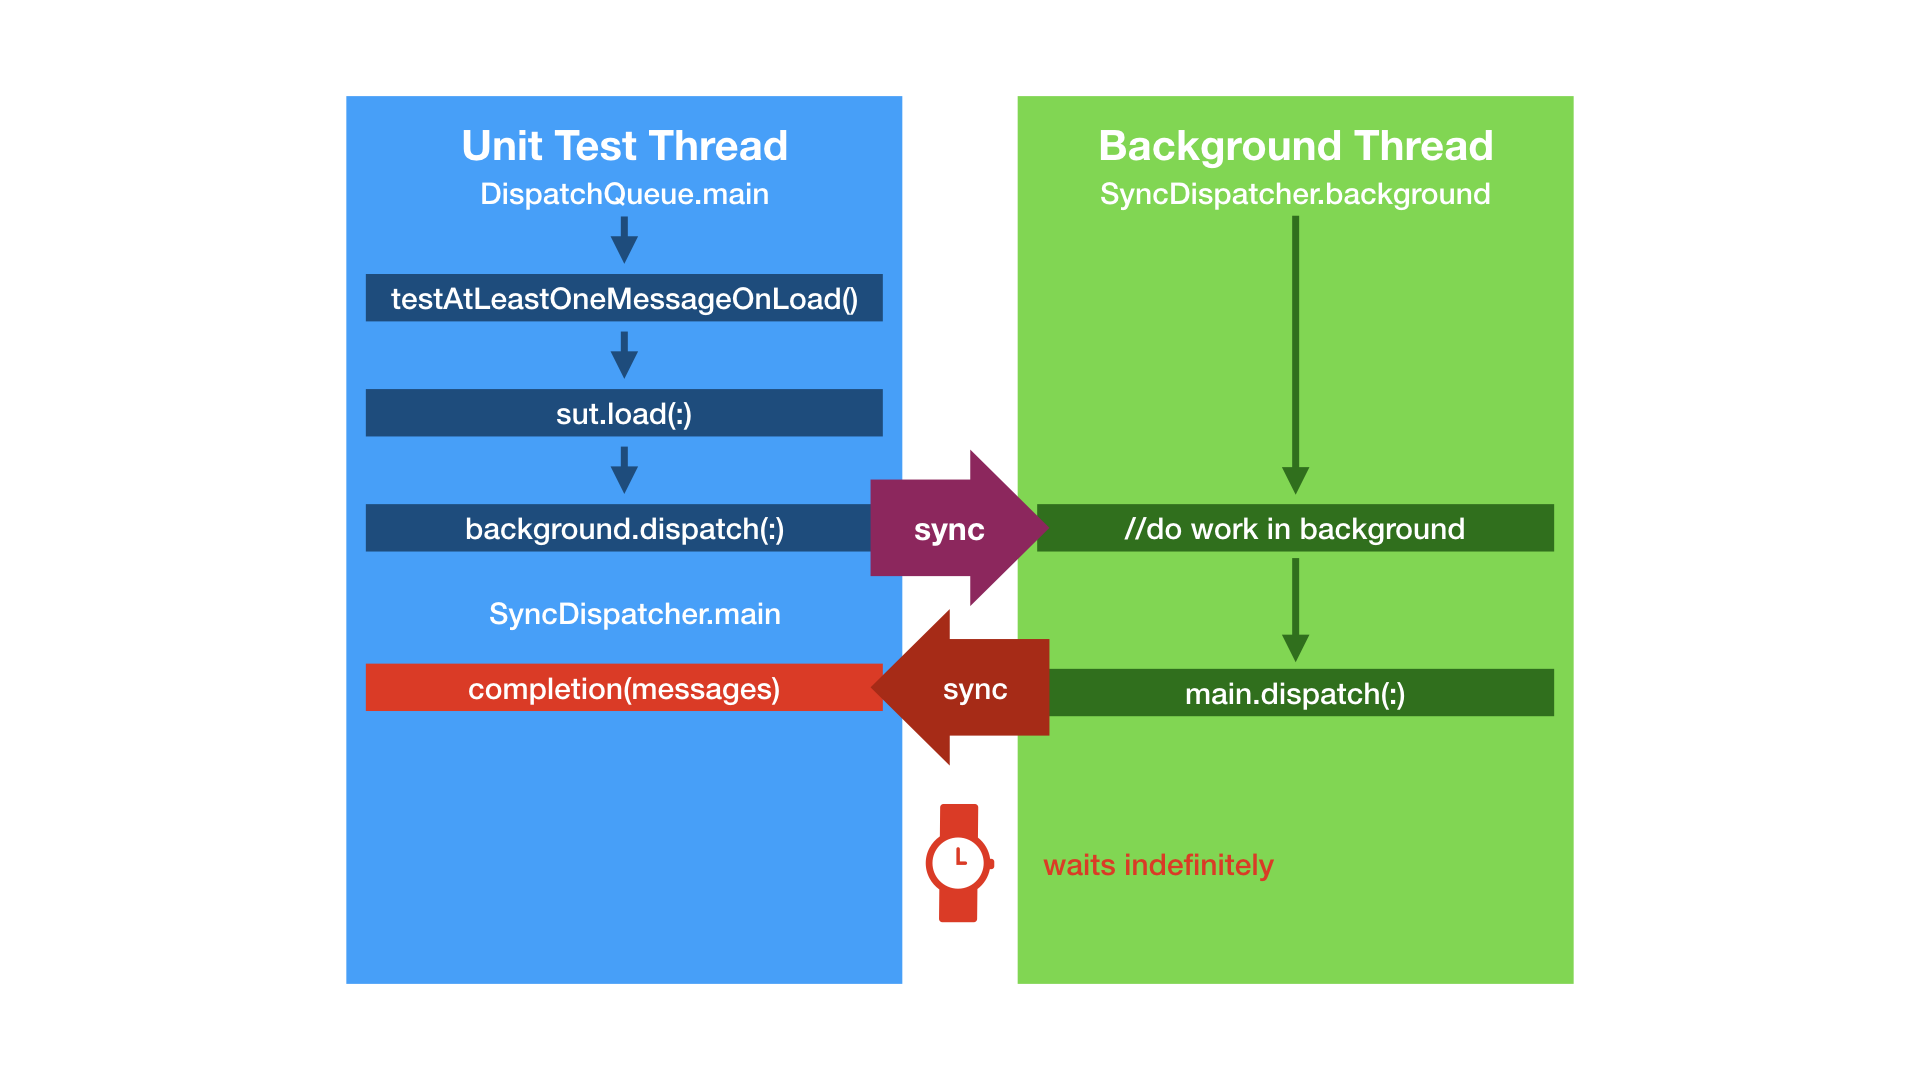
}Just to remind you – unit test is run on the main thread and then load(:) executes it’s job synchronously on a background thread. When the job on the background thread finishes the method dispatches work synchronously to the main thread to call completion closure. Do you see an issue with this approach?
A synchronous dispatch means that a dispatching thread waits for a work to be finished on a thread it dispatches the job to. In the load(:) we dispatch work synchronously from the main thread to a background thread and then we perform another synchronous dispatch to the main thread. Because the previous synchronous dispatch is not finished and we try to do another synchronous dispatch to the same queue we end up with a deadlock.
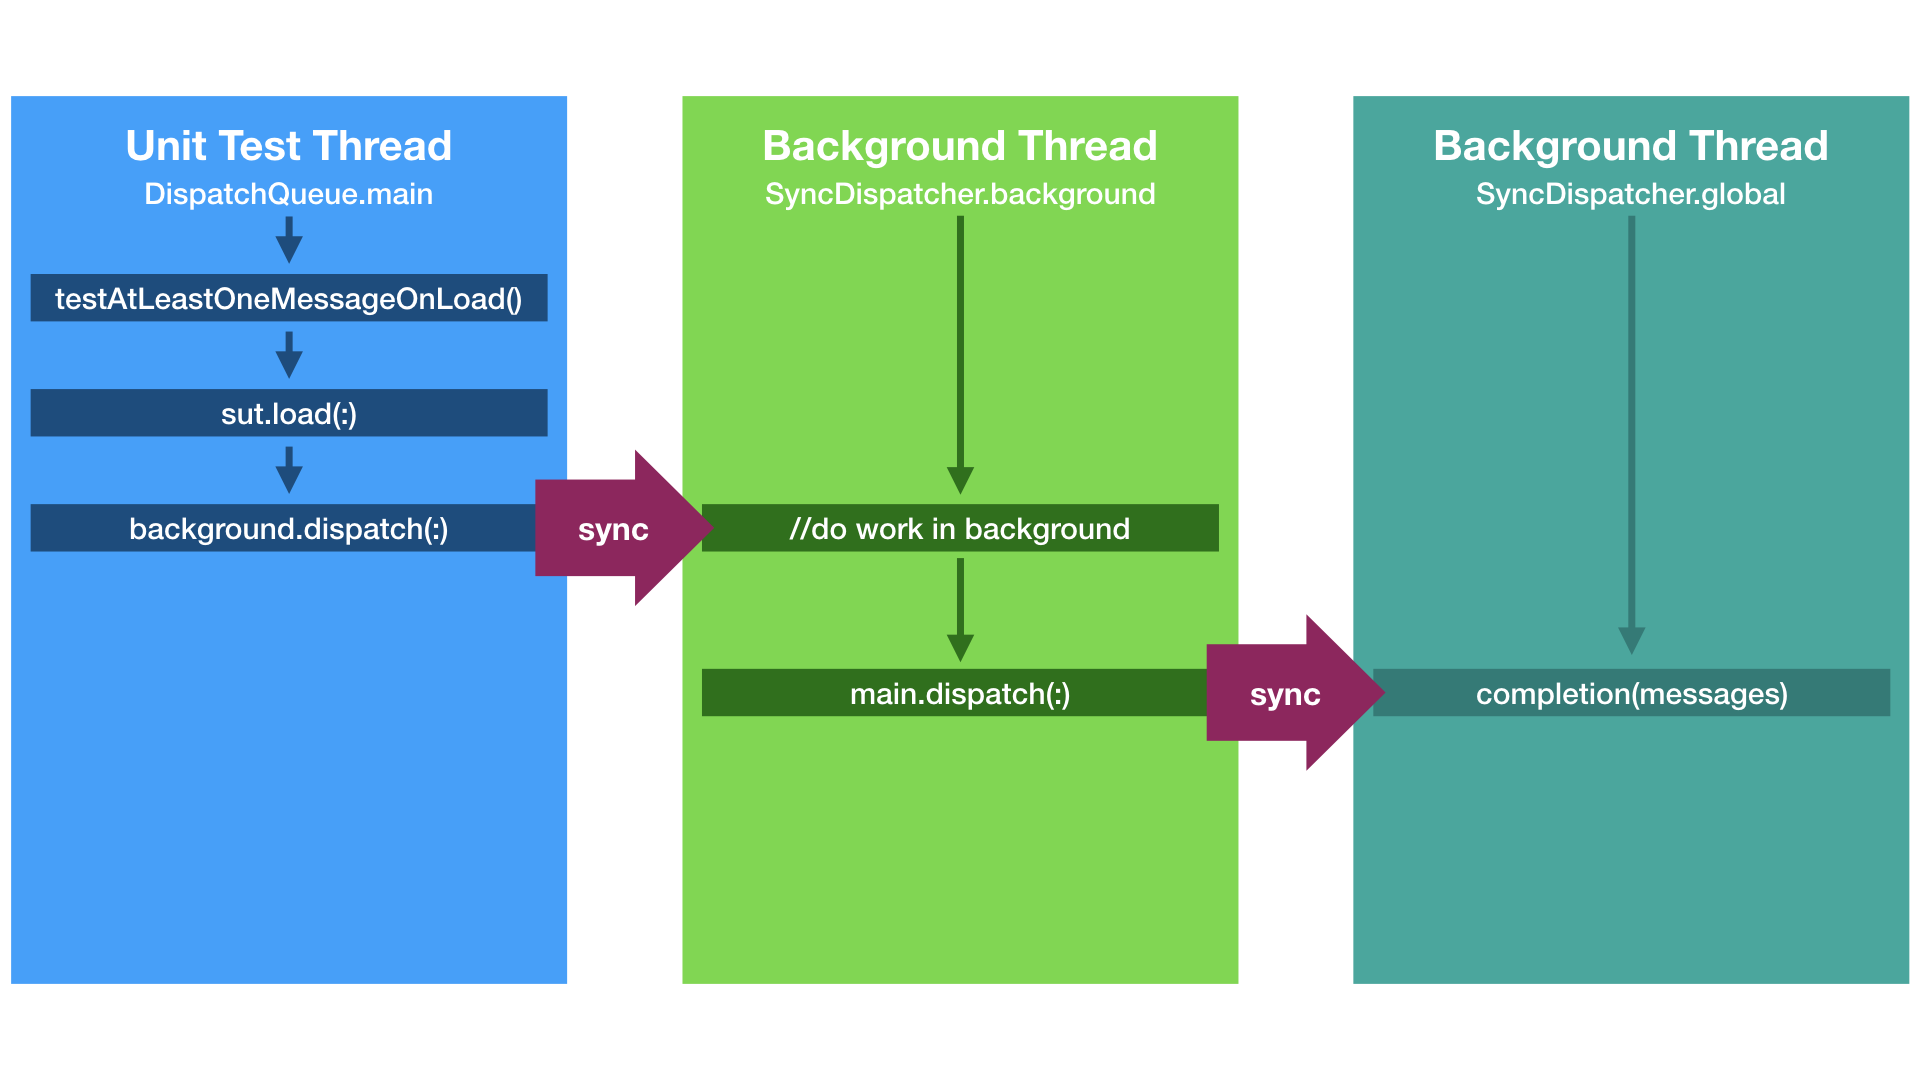
How can we fix that? We need to use a different queue than main, e.g. SyncQueue.global .
let loader = MessageLoader(main: SyncQueue.global,
                               background: SyncQueue.background)
And now we use threads as following and no deadlock occurs:
Summary a.k.a TL;DR;(2)
Asynchronous tests are unreadable, might give an overhead to test execution and we don’t have full control over them.
Using a protocol to “hide” dispatching jobs to different threads allows running tests synchronously. It gives us FULL CONTROL over unit tests execution and prevents us from waiting for too long in the case of their failure. We can also clearly see the Arrange, Act and Assert phases of a unit test.
You can check our sample code on GitHub.
Special thanks to Paweł Dudek for a review!
Links
]]>Unit test all the things!
We encourage you to test all the things 😉 ! But mainly interactions between objects. I also like to test communication of view controllers with their dependencies. The example below shows how a sample test could look like:
context("ViewController") {
    var sut: ViewController!
    var dependencyOfSut: Dependency!

    beforeEach {
        dependencyOfSut = MockDependency()
        sut = ViewController(dependency: dependencyOfSut)
    }

    describe("when view loads") {
        beforeEach {
            sut.viewDidLoad()
        }

        it("setups something") {
            expect(dependencyOfSut.setupSomethingCount).to(equal(1))
        }

    }
}
The snippet should be self-explanatory. If it isn’t, let me elucidate it a bit. This is a test of ViewController class, that is initialised with a Dependency object in beoforeEach‘s closure argument. Test checks what happens when viewDidLoad method gets called. It is expected that setupSomething method is called once when view loads.
Ok, but what else can we test?
We can check if appropriate buttons are set on navigationItem:
it("has right button") {

    expect(sut.navigationItem.rightBarButtonItem)
        .to(beAKindOf(UIBarButtonItem))

    expect(sut.navigationItem.rightBarButtonItem?.enabled)
        .to(beTrue())

}
We can also assert if view controller is UITableView’s or UICollectionView’s delegate:
expect(sut.tableView.delegate
    as? MyViewController).to(equal(sut))

expect(sut.collectionView.delegate
    as? MyViewController).to(equal(sut))
Another super important thing to check is if an appropriate action takes place after a tap on a button. Last week we migrated an app from Swift 2.1 to 2.2 and we didn’t have tests for navigation bar buttons. Buttons simply stopped working. If we had tests for their actions we would have noticed the bug before releasing demo version of our app to client. Of course a tester could assert that everything works correctly, but you need to have one. Unit test all the things. Really! 🙂
What has changed in Swift 2.2? Among other things the syntax for selectors.
The old way:
navigationItem.rightBarButtonItem =
        UIBarButtonItem(barButtonSystemItem: .Add, target: self,
                        action: "doSomething")
Code in Swift 2.2:
navigationItem.rightBarButtonItem =
        UIBarButtonItem(barButtonSystemItem: .Add, target: self,
                        action: #selector(doSomething))
BTW, if you don’t know what’s your Swift version in Xcode you can check it out with the xcrun swift -version command in Terminal.
Ok, but how to test if an action is connected to a button? Look at the snippet below. Imagine we had a Helper class that could perform a tap on a button (more about it in a moment). In assert part of your test you simply need to check if a desired action happened, just like before, by using method counters.
What if you wanted to check if a new view controller was shown after action? You need to use toEventually function that is able to asynchronously assert the expectation. Your expectation is to check if presented view controller of tested object is of certain kind:
describe("tap on the right button") {
    beforeEach {
        Helper.tap(sut.navigationItem.rightBarButtonItem)
    }

    it("shows my other view controller") {
        expect(sut.presentedViewController)
            .toEventually(beAKindOf(MyOtherViewController))
    }
}
The Helper class actually exists. It was typealiased in the snippet. I’ve actually called it UnitTestHelper and its contents is available in this gist.
class UnitTestHelper {

    class func tap(button: UIButton?) {}

    class func tap(button: UIBarButtonItem?) {}

    //...

}
The tap function uses UIApplication‘s sendAction:to:from:forEvent method for sending an action to button’s target.
If you want to see more samples of UIViewController unit tests, check this gist. It contains snippet for testing a view controller with a view model and a table view. Ok but let’s go to the main question of this post.
Do pure Swift objects have load method?!
NSObject instances/subclasses have load() class function that is
Invoked whenever a class or category is added to the Objective-C runtime;
–Apple’s documentation
In my recent project I used MVVM architecture, where every view controller has its own view model (a component that deals with business logic and formats data to be displayed). One of the desired interactions of view controller with its view model was that view controller, in viewDidLoad, calls load method on view model to load data to be displayed.
class MyViewModel {
    func load() {}
}

class MyViewController: UIViewController {
    let viewModel: MyViewModel
    init(viewModel: MyViewModel = MyViewModel()) {
        self.viewModel = viewModel
    }
    override func viewDidLoad() {
        super.viewDidLoad()
        view.backgroundColor = UIColor.whiteColor()
        viewModel.load()
    }
}
In terms of unit test spec the desired behaviour was asserted like this:
describe("when view loads") {
     beforeEach {
        sut.viewDidLoad()
     }
     it("calls load on viewModel") {
        expect(viewModel.loadCount)
        .to(equal(1))
    }
}
I ran tests, they failed, which was ok at that point. After all I use BDD and I was in the red phase. Then I implemented the code, ran tests again and the aforementioned assertion failed again. I started scrutinising my code, but I didn’t find any flaw. What had possibly gone wrong? The assertion looked like this:
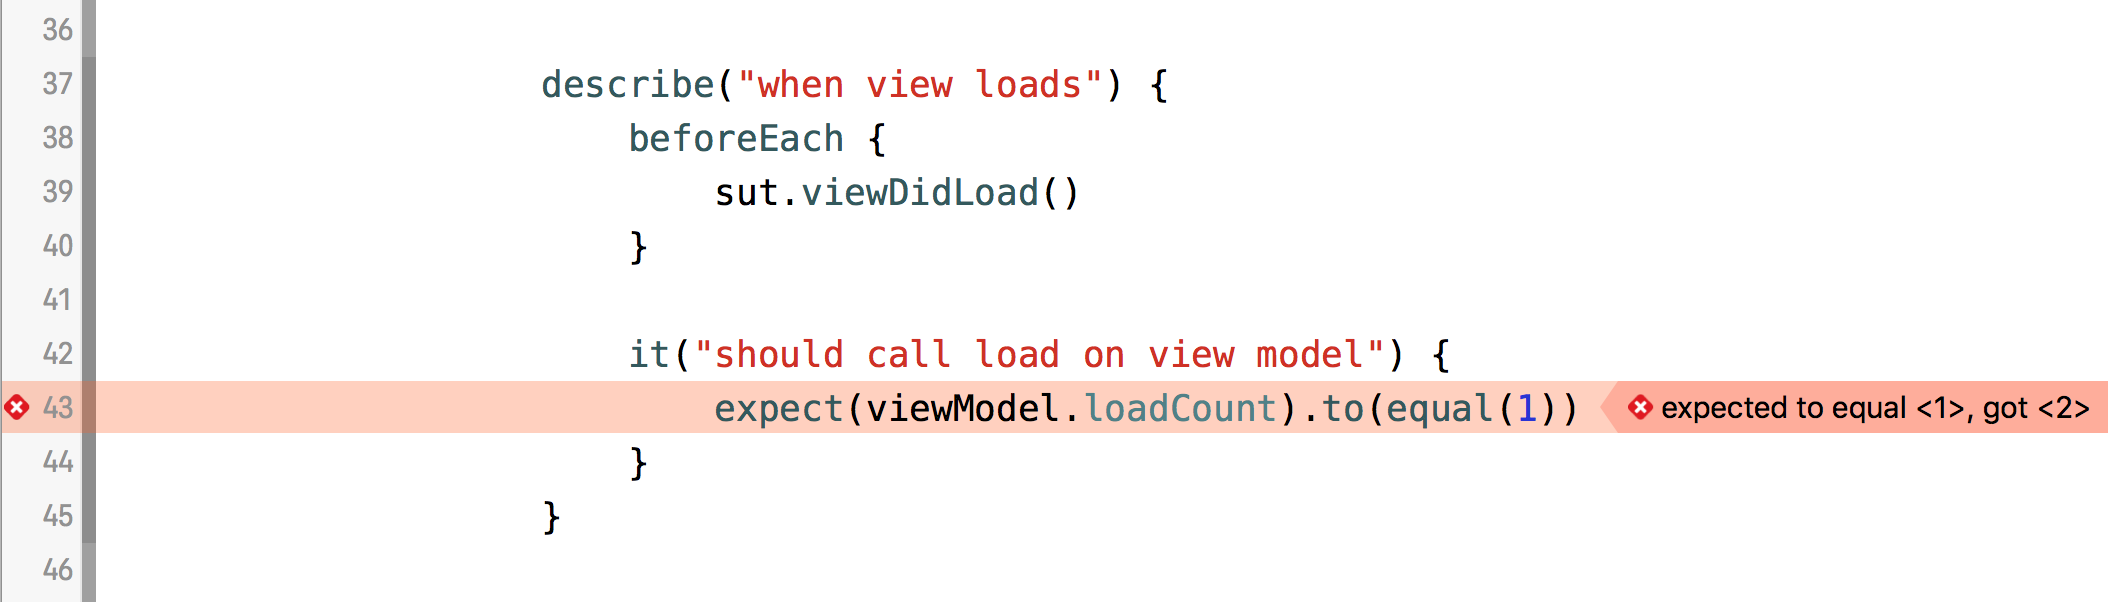
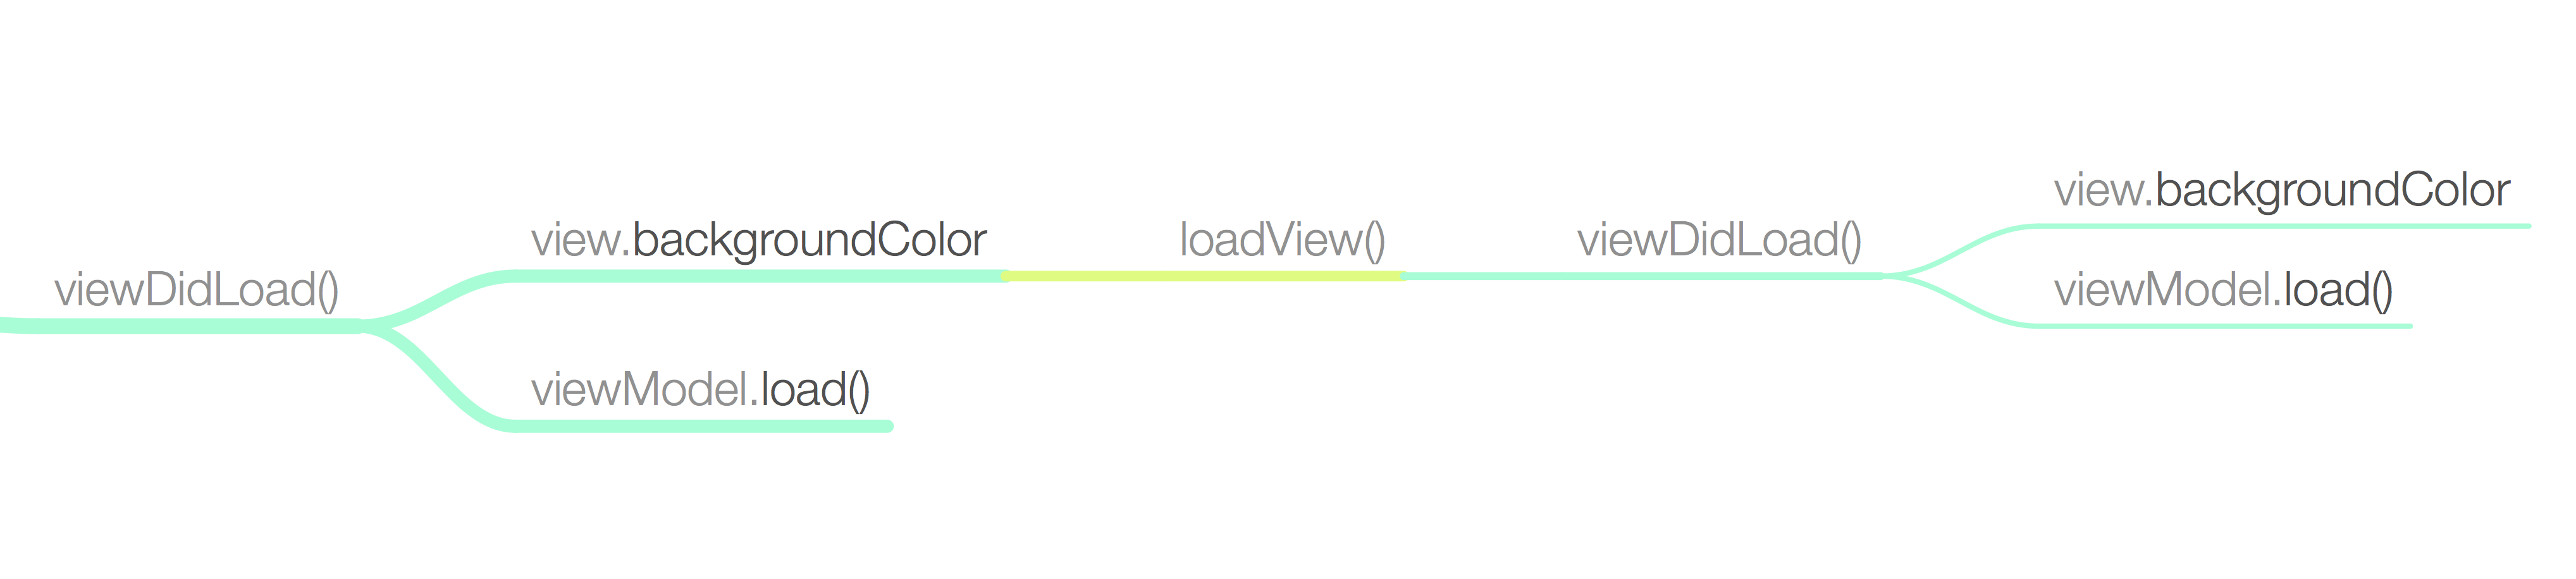
I couldn’t believe my eyes. How?! Pure Swift object with load method called before I called it? Do pure Swift objects have load method?! I scrutinised my code again, put some breakpoints here and there. Then I realised that this method gets called after I called viewDidLoad:
func loadView()
The view controller calls this method when its view property is requested but is currently nil.
–Apple’s documentation
Do you know what’s called after loadView? The viewDidLoad method. Hence load was called twice on viewModel. And why on Earth was the loadView called? Because I touch view property for the first time during test runtime:
override func viewDidLoad() {
        super.viewDidLoad()
        view.backgroundColor = UIColor.whiteColor() //HERE view is touched for the first time during the unit test
        viewModel.load()
}
What’s the solution to this problem? Mine was to accept the loadCount to be greaterThan(0). Instead of calling viewDidLoad I could just access sut.view in beforeEach in order to call viewDidLoad only once. UPDATE July 9th 2016: Starting from iOS9 you can also use the loadViewIfNeeded method and remember not to touch view during initialisation ! Thx for Kakamil for the tip!
Maybe you have other solution to the problem, or have experienced other unit testing story. I encourage you to share them in comments :)!
TL; DR
Pure Swift objects don’t have load method.
When I was at the 3rd year of my BEng studies I had a chance to visit Turin, Italy, and to take part in Erasmus student’s exchange programme. At Politechnico di Torino I attended "Operating Systems" course on which the lecturer used to ask participants wether they had ever done some programming in C or not, had used selected linux commands and etc. Then he would count all the hands in the air to check how many of us had had a knowledge about the certain topic. No matter how many hands were up he always wittingly said a half.
Recently I did the same on iOS Developers Meetup in Poznań, Poland. And of course, the result was that a half of attendants had done the activity I asked about . I wonder to which group you belong. So now I’m asking you:
Are you a person who has never written a unit test in Xcode?
If not, maybe you are a person who would answer positively to this question:
Have you  ever written a unit test in Xcode?
Regardless of your answer, this post is for you  ! It will cover basic topics in BDD
 , explain my Swift toolset
 for unit testing and summarise benefits
 of performing unit tests in your project.
3 types of programmers
When I started my professional career I didn’t know what unit tests are. But after a few years I can easily point out three groups of programmers.
There is a small group of unit test lovers who say that unit testing is cool ❤️ and they couldn’t live without testing all the things. Really, a really small group!
There is also the majority that says that real men  test on PRODUCTION. Kinda risky but good luck for them
  !
!
And there are many, especially in iOS world, that don’t know how the they can start doing it? I was one of them two years ago. Thanks to interesting people I have met now I know …
… WT a unit test is?
If you have ever tried out searching on Wikipedia what a unit test is you would be surprised what its standard bla, bla, bla says.
In computer programming, unit testing is a software testing method by which individual units of source code, sets of one or more computer program modules together with associated control data, usage procedures, and operating procedures, are tested to determine whether they are fit for use.
–Wikipedia
It didn’t illuminate me a bit. So based on my experience I have created my own definition:
code that tests source code
–Maciej Piotrowski

To understand the definition profoundly we have to understand a few terms at first.
What’s an app?
There are a few equations that can define an app. Let’s look at them.
First of all we should know that the app is a set of behaviours. By behaviour one can understand certain actions that take place, e.g. when user taps a button in our app it shows another view controller, etc.
- App = Set(behaviours

 )
)
Application consists of components. If not, you’re probably doing it wrong !
- App = component
 + … + component
Those components interact with each other in order to fulfil a certain behaviour.
- component ← interaction
 → component
Our code that tests source code can test that particular interaction between components took place. This is called behavioural unit testing.
- unit test = checks( ← interaction → ) == ✅
Of course we can also test function’s output when sticking to BDD. BDD!? Wait. What’s BDD?
TDD & BDD
BDD stands for Behaviour Driven Development. It’s built upon TDD, Test Driven Development. Basic rule of TDD is:
Don’t you dare writing code before writing a test for it!
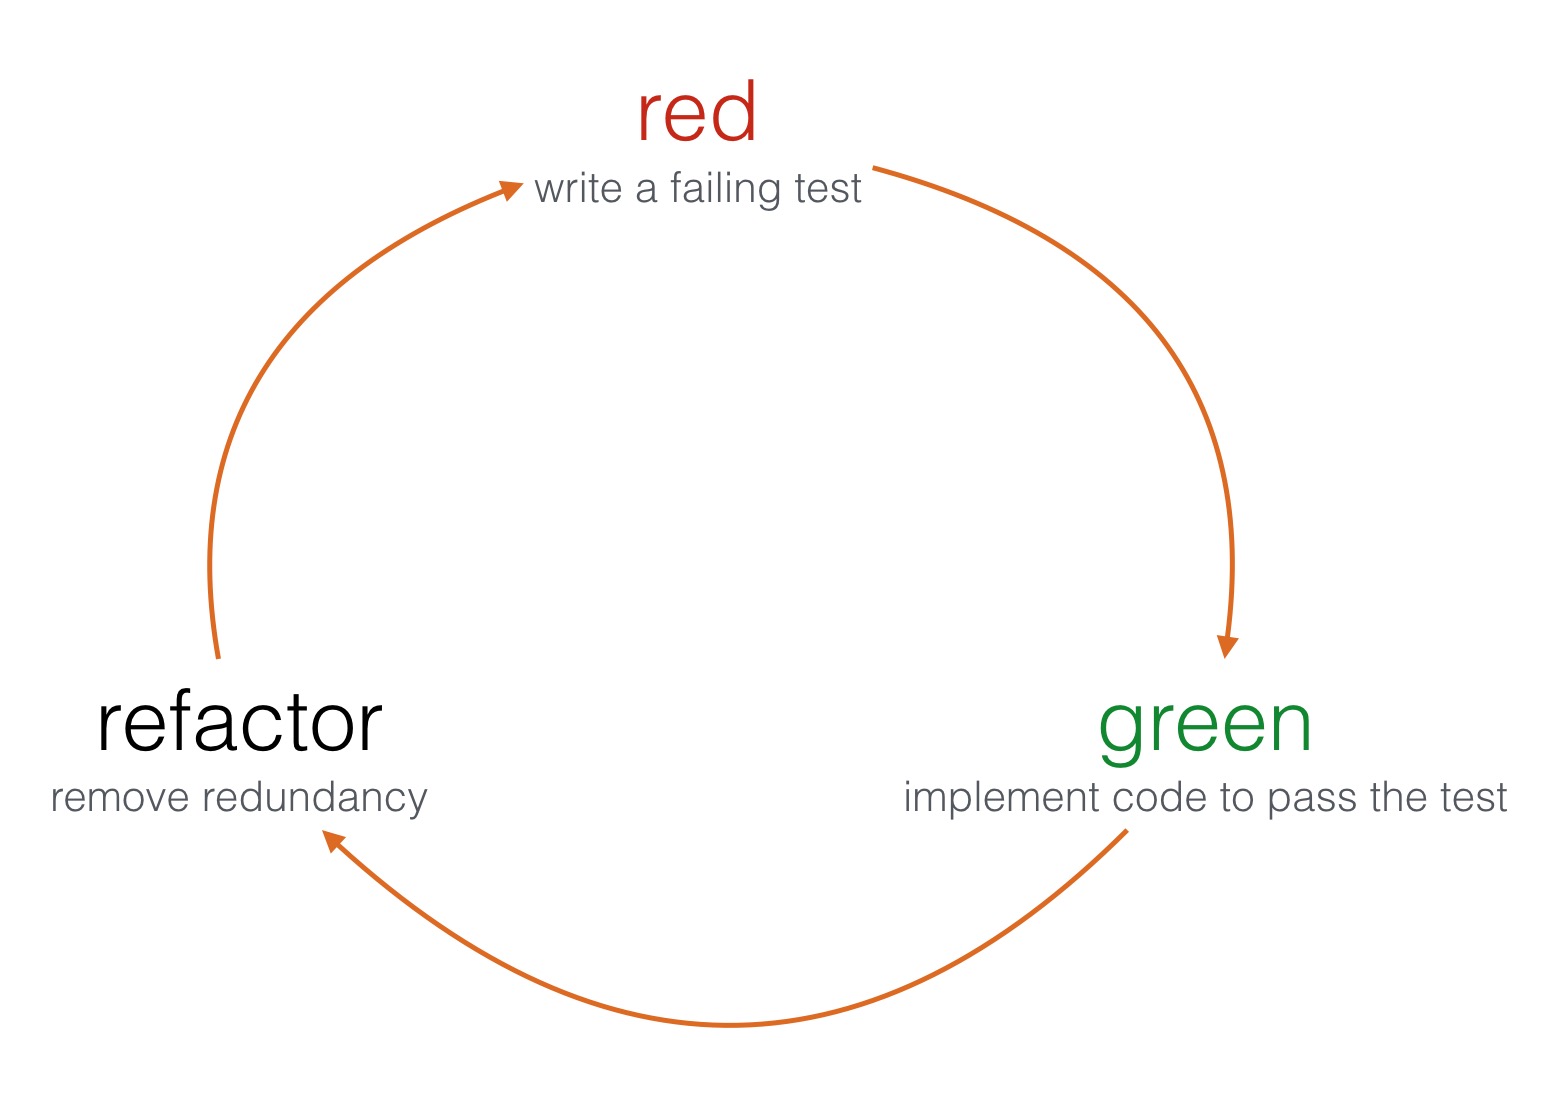
Namely, you have to write testing code to assert what component code should do and then implement the component itself. TDD flow distinguishes three steps: RED, GREEN, REFACTOR.
What’s different in BDD? Behaviour-driven development tells that tests of any unit of software should be specified in terms of the desired behaviour of the unit. Basically, a behaviour is what a component does when a certain action (i.e. method call) takes place. When you call a function it probably communicates and interacts with other components. When writing a unit test we can just test if an interaction took place (as mentioned earlier).
Behaviours
Imagine we have to write a component which deals with CoreBluetooth API. Let’s call it BluetoothModule. It’s main responsibility is to start and stop advertising Bluetooth Services. It will support only that, hence our iPhone would become a Bluetooth Low Energy Peripheral (information for curious readers)
Ok, so let’s write down our expected Behaviours .
"BluetoothModule"
            "when turned on"
                "advertises services"

            "when turned off"
                "doesn't advertise services"
What the spec?!
I kinda looks like a specification  of our source code. There is a nice BDD framework to write testing code with a DSL. It’s called Quick and we can create specs with it! :). An excerpt from a spec would looks like this:
context("BluetoothModule") {
    describe("when turned on") {
        it("advertises services") {}
    }
    describe("when turned off") {
        it("doesn't advertise services") {}
    }
}
Normally a spec contains assertions  (testing code). Quick has a counterpart, called Nimble – it has a set of matchers handy in writing expectations. More on that in a moment, but before let’s have a look on how to write a QuickSpeck:
import Quick
import Nimble
@testable import <#Module#>
class <#TestedClass#>Spec: QuickSpec {
    override func spec() {
        //Magic goes here
    }
}
}
}
First and second lines import Quick (BDD DSL) and Nimble (matchers) frameworks. The @testable directive introduced in Swift 2.0 let’s us import our app’s module in a ‘testable’ manner, i.e. we can access components’ internal methods and properties.
All tests should be contained in spec() method overriden in QuickSpec subclass. Inside the method we use Quick DSL to describe component’s specification and assert its behaviours.
Arrange, Act, Assert
Ok, but now a question should have already crossed your mind – how to write asserting (testing) code?
Every test consists of three phases:
– Arrange – arrangement of our ‘scene’, i.e. initialisation of tested object and its dependencies (components that it interacts with)
– Act – execution of an action, i.e. a method call on a tested object
– Assert – actual testing code, an assertion that checks that the expected behaviour/interaction took place
Let’s assume our component to be tested has this simple interface:
class BluetoothModule {
    init(peripheralManager: CBPeripheralManagerProtocol)
    func turnOn()
    func turnOff()
}
It has two methods and takes an object that implements CBPeripheralManagerProtocol as its dependency. Why CBPeripheralManagerProtocol and not just CBPeripheralManager? More will be explained in I wish we had mockingjays  section of this article. We can arrange testing "scene" for with mock object as in the snippet below:
class BluetoothModuleSpec: QuickSpec {
    override func spec() {
        context("BluetoothModule") { //i.e. newly initialised
            var sut: BluetoothModule!
            var peripheralManager: CBPeripheralManagerProtocol!
            beforeEach {
                peripheralManager = MockPeripheralManager()
                sut = BluetoothModule(peripheralManager: peripheralManager)
            }
            afterEach {
                peripheralManager = nil
                sut = nil
            }
        }
    }
}
Quick gives us a few functions we can use to arrange a "scene":
- context – description of object’s state (e.g. object is newly initialised), takes
Stringwith a description and aclosureas argument - beforeEach – takes a
closureargument to setup local variables (corresponds XCTest’s setup) - afterEach – takes a
closureargument to cleanup local variables (corresponds XCTest’s tearDown)
When we have all objects set up the Act phase approaches. It’s the phase in which we invoke certain methods on the tested object:
context("BluetoothModule") {
    //...
    describe("when turned on") {
        beforeEach {
            sut.turnOn()
        }
    }
    describe("when turned off") {
        beforeEach {
            sut.turnOff()
        }
    }
}
Again, Quick gives us a few functions we can use to perform actions on the arranged object:
- describe – used for description of an action performed on the subject, takes
Stringwith a description and aclosureas argument - beforeEach – used for performing an action on the sut (subject of unit testing a.k.a. system/subject under test – choose what suits you best)
The last, but not least, is Assert phase. In this part we write actual testing code (code that tests source code):
context("BluetoothModule") {
    describe("when turned on") {
        //...
        it("advertises services") {
            expect(peripheralManager.isAdvertising)
                .to(beTrue())
        }
    }

    describe("when turned off") {
        //...
        it("advertises services") {
            expect(peripheralManager.isAdvertising)
                .to(beFalse())
        }
    }
}
Quick comes in handy with it function – takes a String with a description of desired outcome of a test and closure with a test of an expected behaviour. Nimble gives as a way to write some expectations. But what and how to expect?
What and how to expect?
Of course you can Expect the unexpected. Sometimes test outcome will surprise you remarkably. In the next issue I will write about one of surprises I had with my testing code.
In our code that tests source code we use expect() method from Nimble  framework, which also provides a number of matchers to fulfil the expectation. Matchers are used in it blocks to assert the expectation ✅. Let’s have a look at some example expectations:
expect(sut.something)
    .to(equal(5))

expect(sut.somethingDifferent)
    .toNot(beAKindOf(MyClass))

expect(sut.somethingElse)
    .toEventually(beNil())
As you can easily see, the expect() function takes as an argument an expression to be evaluated by using a matcher provided in to*() function. We can expect e.g. a property on our tested object to equal some value, to be a certain kind of class, or to eventually be Optional(.None) .
The to() and toNot() functions are rather straight forward – they test the actual value of expectation with the matcher. The toEventually() function is used for asynchronous tests. It continuously checks the assertion at each pollInterval until the timeout is reached.
Hey, if an object needs to be checked ✅ with equality with other object, we need to implement Equatable protocol! To do so, we just need to implement the ==() operator:
extension MyClass: Equatable {}

func ==(lhs: MyClass, rhs: MyClass) -> Bool {
    return lhs.propertyX == rhs.propertyX
    && lhs.propertyY == rhs.propertyY
    && lhs.propertyZ == rhs.propertyZ
}
When the above approach is suitable for structs, for classes we could be lazier and compare arguments’ ObjectIdetifier() instead of comparing different properties:
extension MyClass: Equatable {}

func ==(lhs: MyClass, rhs: MyClass) -> Bool {
    return ObjectIdetifier(lhs) == ObjectIdentifier(rhs)
}
If you happen to be a super lazy person, this approach is for you. Just allow your class to inherit from NSObject, or probably any Cocoa/CocoaTouch class, because all of them are NSObject subclasses, and you get equality comparison for free!
class class1: NSObject {}
class class2: NSObject {}

let c1 = class1()
let c2 = class2()

it("should not be equal") {
    expect(c1).toNot(equal(c2))
}
It’s important to implement Equatable or use the approach for super lazy people, if we do not, we won’t be able to compare objects for equality with Nimble and will get a confusing message from compiler  .
.

I wish we had mockingjays
Remember our BluetoothModule object? It takes in init() an object that implements CBPeripheralManagerProtocol as its dependency. There are at least two reasons why the dependency is declared in terms of protocol instead of pure CBPeripheralManager instance.
In unit testing we want to have full control over dependencies injected to tested object. To have it we inject test doubles as dependencies. We distinguish a few types of test doubles:
- stub – fakes a response to method call
- mock – allows to check if a call was performed
- partial mock – actual object altered a bit (some responses faked, some not)
WW. Out of the box mocks are not possible in Swift
In Objective-C we were able to easily mock objects thanks to its dynamism and access to run time. But Swift is currently read-only  . There is no way to change class types & objects at run time . So …
Communicate with objects through protocols:
protocol CBPeripheralManagerProtocol: class {

    //...
    weak var delegate: CBPeripheralManagerDelegate { get set }

    func startAdvertising()
    func stopAdvertising()
}
If you don’t you will end up with inheritance and partial mocks, which is not recommended. Bad things can happen when you inject real CBPeripheralManager instances or partial mocks made by subclassing it.
So we have an interface defined by protocol. Why not to implement it in our Mock?
class MockCBPeripheralManager: CBPeripheralManagerProtocol {

    //...
    var startAdvertisingCount = 0

    func startAdvertising() {
        startAdvertisingCount += 1
    }

}
Of course we can leave some methods or properties with an empty implementation. Implement just those you need. E.g. to check if a method was called add a method call counter and assert it’s value in a test:
context("BluetoothModule") {
    describe("when turned on") {
        //...

        it("advertises services") {
            expect(peripheralManager.startAdvertisingCount)
                .to(equal(1))
        }

    }
}
What is it all fr ?
Unit testing is still not common in iOS development. If someone asks TDD/BDD gurus about how much time they spend on writing tests when developing an app, they answer a half⌛️. That’s a lot, isn’t it? But it pays off in the end by having:
- better understanding
 a codebase
  well thought architecture
- properly documented assumptions
- no fear of making changes
- getting to know
 Apple frameworks better
 - ❤️ fun !!! ❤️
If you don’t know how to start, on June 18th Mobile Academy organises Swift TDD training in Poznań. Let’s meet there :)!
TL; DR
The time to start writing unit tests❤️ is now!
Resources
]]>Swift code.
General Tips
It is said that a review goes best when conducted on less than 400 lines of code at a time. You should do a proper and slow review, however, don’t spend on it more than 90 minutes  – you definitely will get tired after that time. It’s tiring to write and understand your own code and it’s even more tiring to understand someone’s. Other tips from the Internet are:
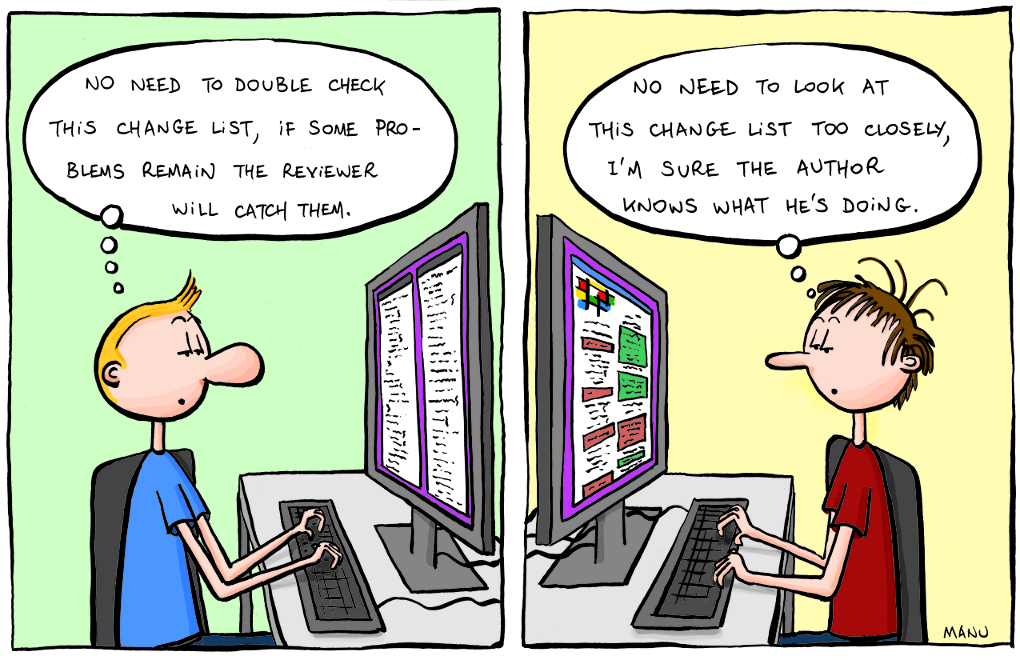
After some years of experience in software development you know what common programming mistakes are. You also do realise what solutions to common problems are most efficient. It’s a good practice to write it down and to check code being reviewed against a checklist ✅ – it leads improved results. Checklists are especially important for reviewers because, if the author forgets a task, the reviewer is likely to miss it too.
In the git flow mentioned in issue #13, code can get merged after receiving agreed number of approvals for a pull request. The number should depend on your team size, but it’s good to get at least 1️⃣ !
When you recommend fixes to the code, suggest their importance  . Maybe some of them could be postponed and extracted as separate tasks. Before approving a pull request, verify that defects are fixed .
Foster in your company a Good Code Review Culture in which finding defects is viewed positively . The point of software code review is to eliminate as many defects as possible, regardless of who "caused" the error. Few things feel better than getting praise from a peer. Reward developers for growth and effort. Offer as many positive comments as possible. I always try to put a line saying that a solution is good and clever (if it really is ).
You can also benefit from The Ego Effect  . The Ego Effect drives developers to write better code because they know that others will be looking at their code and their metrics. No one wants to be known as the guy who makes all those junior-level mistakes. The Ego Effect drives developers to review their own work carefully before passing it on to others.
And don’t bother with code formatting style …
… there are much better things on which to spend your time, than arguing ☔️ over the placement of white spaces.
Looking for bugs and performance issues is the primary goal and is where the majority of your time should be spent.
So, what to review?
Much better things to look for should be a part of your checklist. When I scrutinise a piece of code I look especially:
- at
ifconditions,forandwhileloops for "off-by-one" errors - for interchanged
<versus<=and>versus>= for accidental interchange of && with || or bitwise operators like & and |UPDATED 11.06.2016 Swift compiler ensures that expression evaluated in a condition returns aBoolvalue, hence there’s no possibility not to catch compilation error if one interchanges operators- at operators importance and execution UPDATED 11.06.2016 If you happen a "million" of operators in one expression you’re probably doing something wrong by overcomplicating the solution… 😉
- if dependancy injection is possible (for the sake of unit testing).
- if variable names as verbose as needed
- if method names express what they do
- if a file contains commented out code
- if a file contains a single class (this one is arguable, depends on agreement with your team and company’s guidelines)
- for code duplication, function length and class length < x lines – SwiftLint or codebeat mentioned in issue #11 and issue #10 is an option to point out such a code without your participation
When performing a review, one can also get extra points for pointing out a more efficient implementation of used algorithm .
You should also check for readability. Is the code easy to understand? Do you have to pause frequently during the review to decipher it?
Some swifts
Boom! Time for some loosely coupled Swift code examples that I look for when reviewing Swift code❗️Wait a moment, this exclamation mark looks strangely familiar … ❗️Look out for code that uses it …
Swift

var foo: Object!

print("\(foo.someString)")
Make sure that your peers (and you as well) use the force unwrapping operator wisely in their code.
If you have ever ended up with code like the one below, then probably something went wrong … 
override init(_ objectId: String?,
viewModel1: ViewModel1,
viewModel2: ViewModel2,
viewModel3: ViewModel3,
viewModel4: ViewModel4,
viewModel5: ViewModel5,
viewModel6: ViewModel6,
viewModel7: ViewModel7,
viewModel8: ViewModel8,
viewModel9: ViewModel9,
viewModel10: ViewModel10,
isSomething: Bool = false) { ... }
This is an excerpt from from one of my projects, object types and names are changed . It’s an initialiser of a ‘container’ view model that encapsulates ‘child’ view models used by a container view controller. If you happen to achieve this and there’s no way to change it, probably usage of a configurator facade, default argument values or convenience initialisers are the best solution to live up with your legacy.
class Configurator {
    class func mainViewController() -> MainViewController {
        let dependency1 = Configurator.dependency1()
        let dependency2 = Configurator.dependency2()
        let dependency3 = Configurator.dependency3()
        let dependency4 = Configurator.dependency4()

        return MainViewController(dependency1: dependency1,
            dependency2: dependency2,
            dependency3: dependency3,
            dependency4: dependency4)
    }
}
The off-by-one errors and interchanged greater than & less than were my favourite mistakes at some point of time. I’ve caught myself a few times last year with using if i > array.count instead of if i < array.count ☔️.
Remember local autoreleasepool? For those who answered ‘what!?’ here is some explanation. I pay attention when reviewing body of a loop to check if local autoreleasepool could be used to reduce peak memory footprint.
for i in 1...100
autoreleasepool {
    NSString *superImportantString = "Super \(i)"
    //strange operations take place
    //superImportantString can be released earlier thanks to local autoreleasepool
}
More than a year ago, when Swift was still in its early days, I hated when my team members overused var. It’s ok when needed, but not all the time! Thanks god that now Swift compiler warns about not mutated var.
Another matter is your object’s properties. If it depends on some values, never ever use var. Use let. Always value more immutable state over var! I wonder how many people would argue with me about that☔️. And if your property really have to be mutable, expose it ‘to the public’ as immutable like that:
private(set) var foo: AnyObject
let bar: AnyObject
Swift’s protocols are a great deal – do you prefer composition over inheritance? Is such an inheritance chain ok for you? One superclass would be probably ok, but this becomes an exaggeration:
class ChildViewModel: TableViewModel {}
class TableViewModel: CRUDViewModel {}
class CRUDViewModel: BaseViewModel {}
class BaseViewModel {}
Final thoughts
Kofi Annan, Ghanaian ex-Secretary-General of the United Nations, when in primary school, was attending a weekly lesson in ‘spoken English’. He and his peers were asked by the teacher what did they see at the picture:

All shouted together, that they saw a black dot! Professor stepped back and said ‘So, not a single one saw the white sheet of paper. (…). This is the awful thing about human nature. People never see the goodness of things, and the broader picture. (…)’.
It’s also true for code review. We perceive better differences than loads of new code when using a merge tool. We get a cognitive overload if flooded with more content. Have that in mind and use the first rule – review for less than 90 minutes , take breaks. Remember that:
- new code is more difficult to understand
- not all bugs can be caught during a review
- hot fixes
 without review can happen …
And always – Review your own code first! Before committing a code look through all changes you have made!
Let us know in comments or on Twitter what is on your checklists for code review!
The only true measure of code quality
