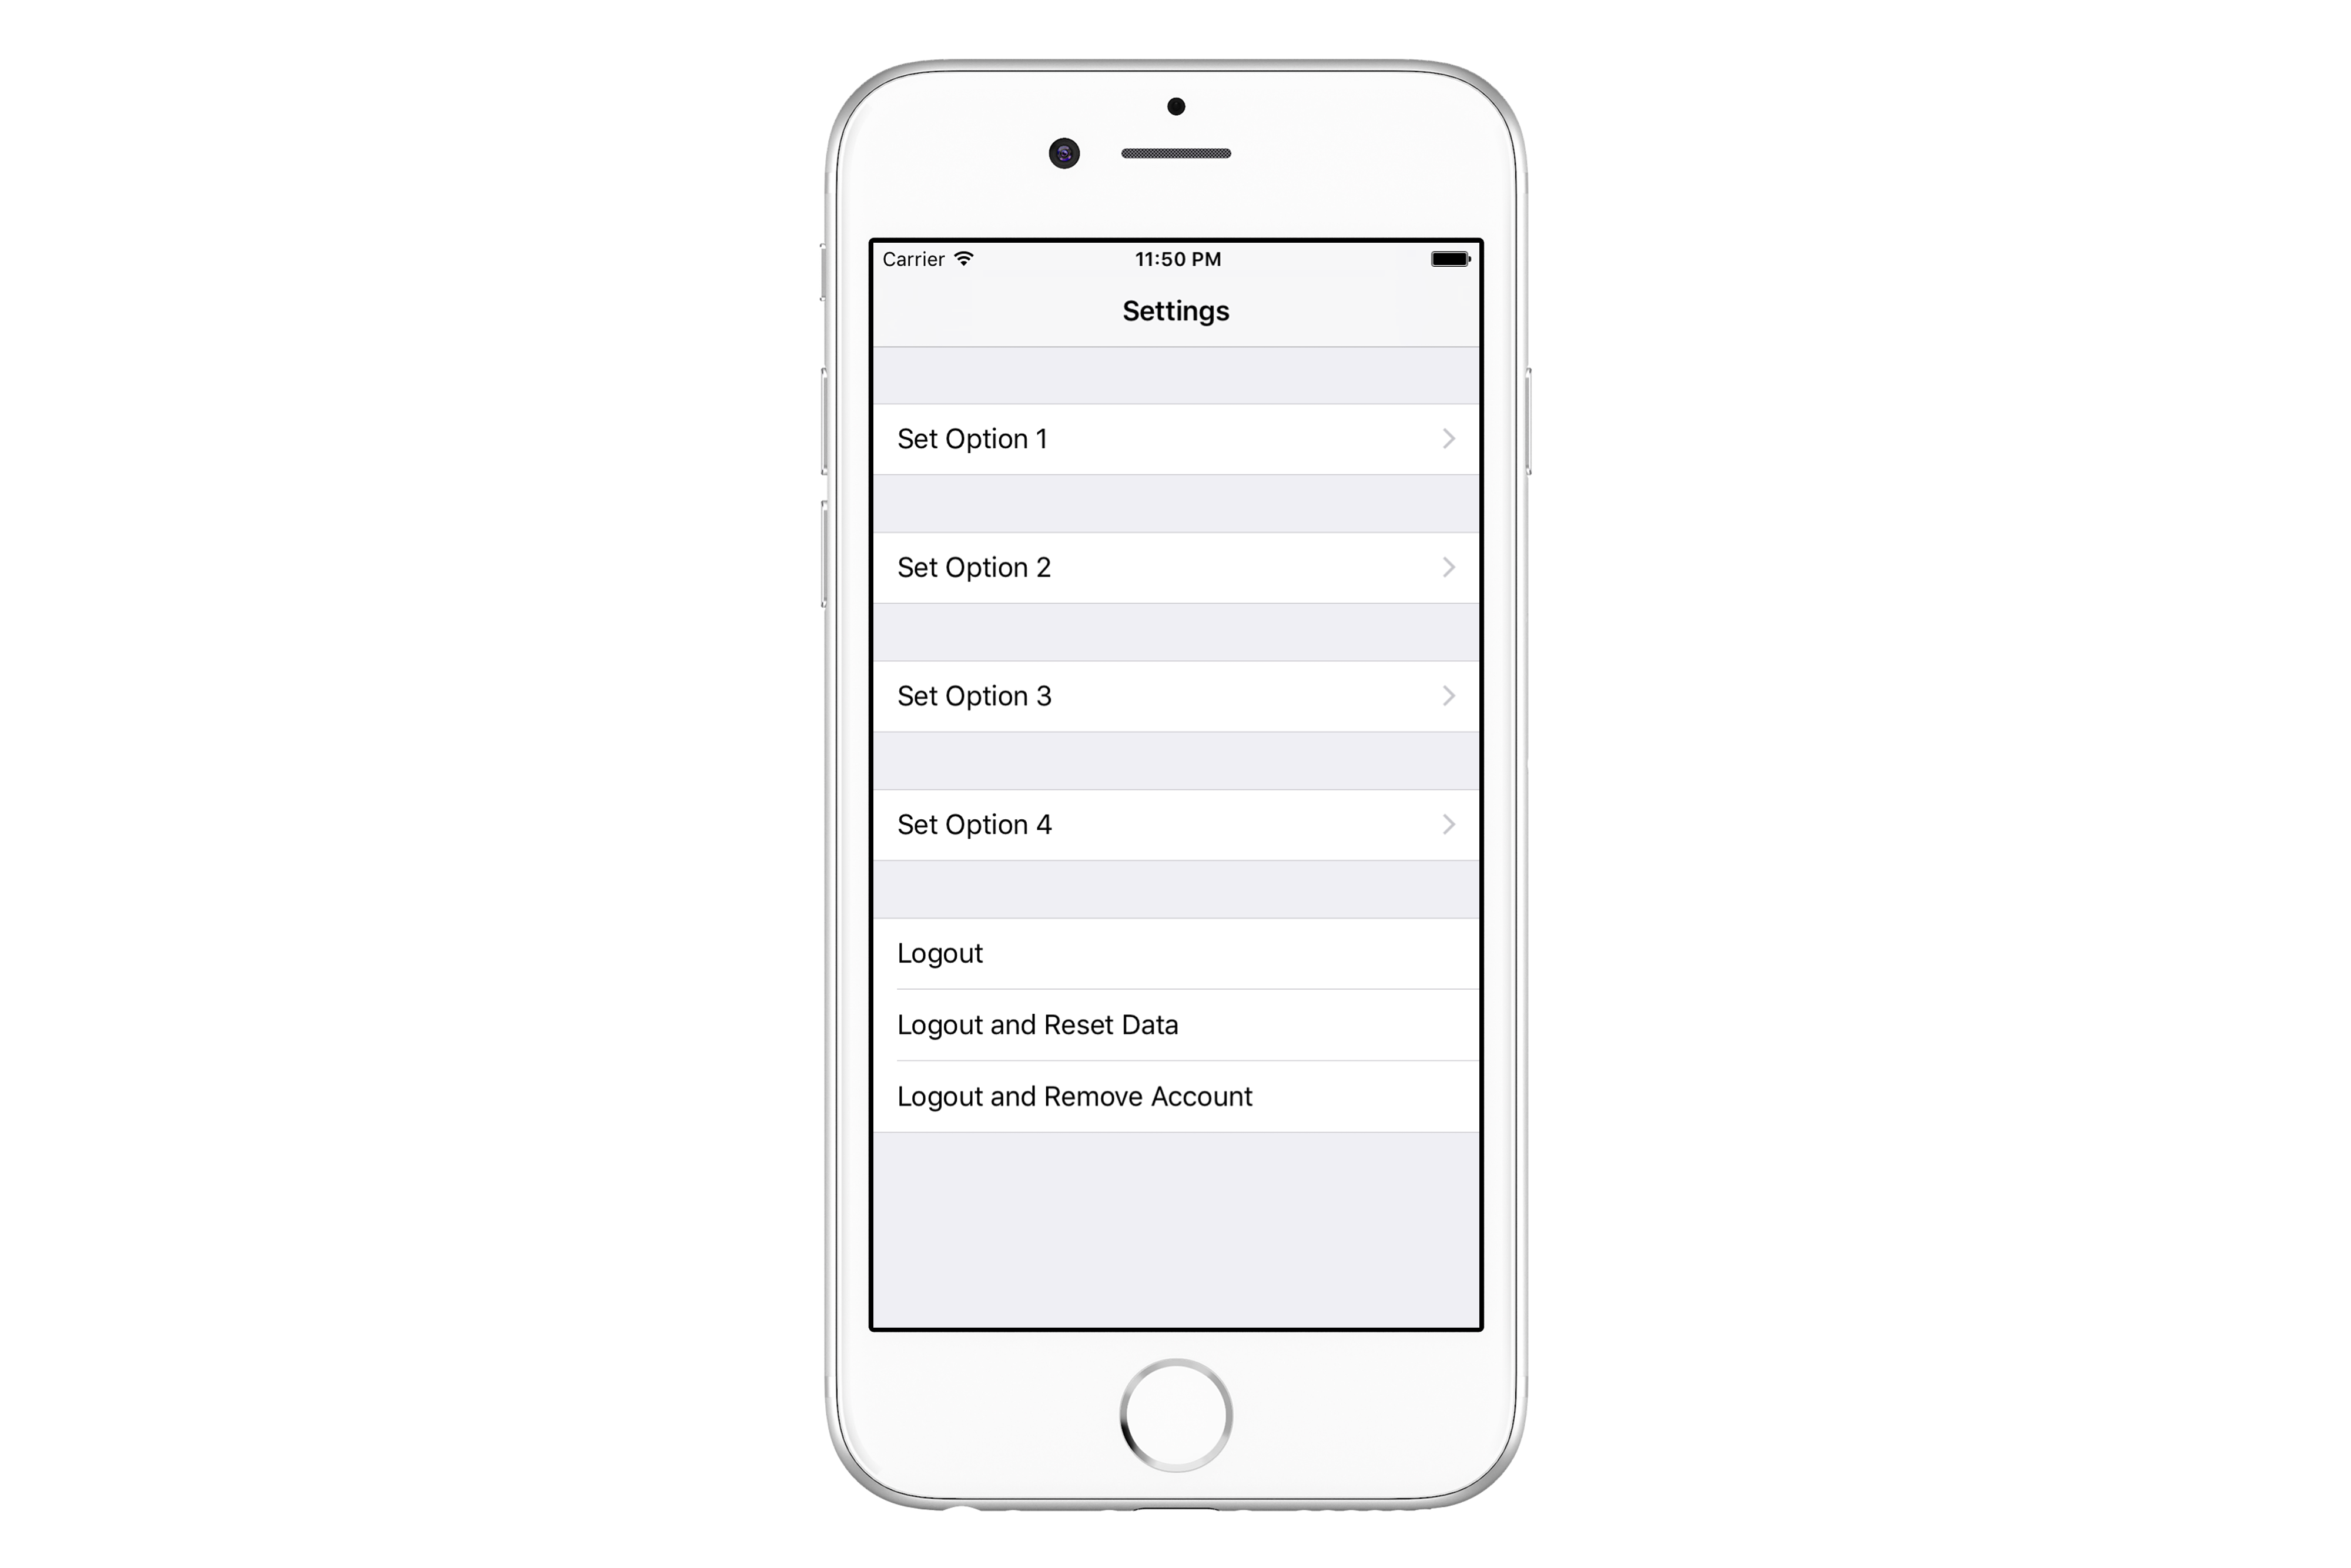
In every project simple screens can happen. Let’s think for example of a simple Settings screen. Customer wanted a Settings screen on which a user would be able to Set Option 1 and 2 and to Logout from the application. It seemed so simple so developers used a UITableView with 1 section, hard-coded text displayed in cell and actions invoked directly from tableView(didSelectRowAtIndexPath:).
But it was ok, after all it was just three options, no big deal. When a few weeks passed by, customer came back and decided that the user has to be able to set another two options in the app and that all non-related options should be visually separated. So developers added those options and separated non-related ones by using multiple sections in a UITableView with .grouped style.
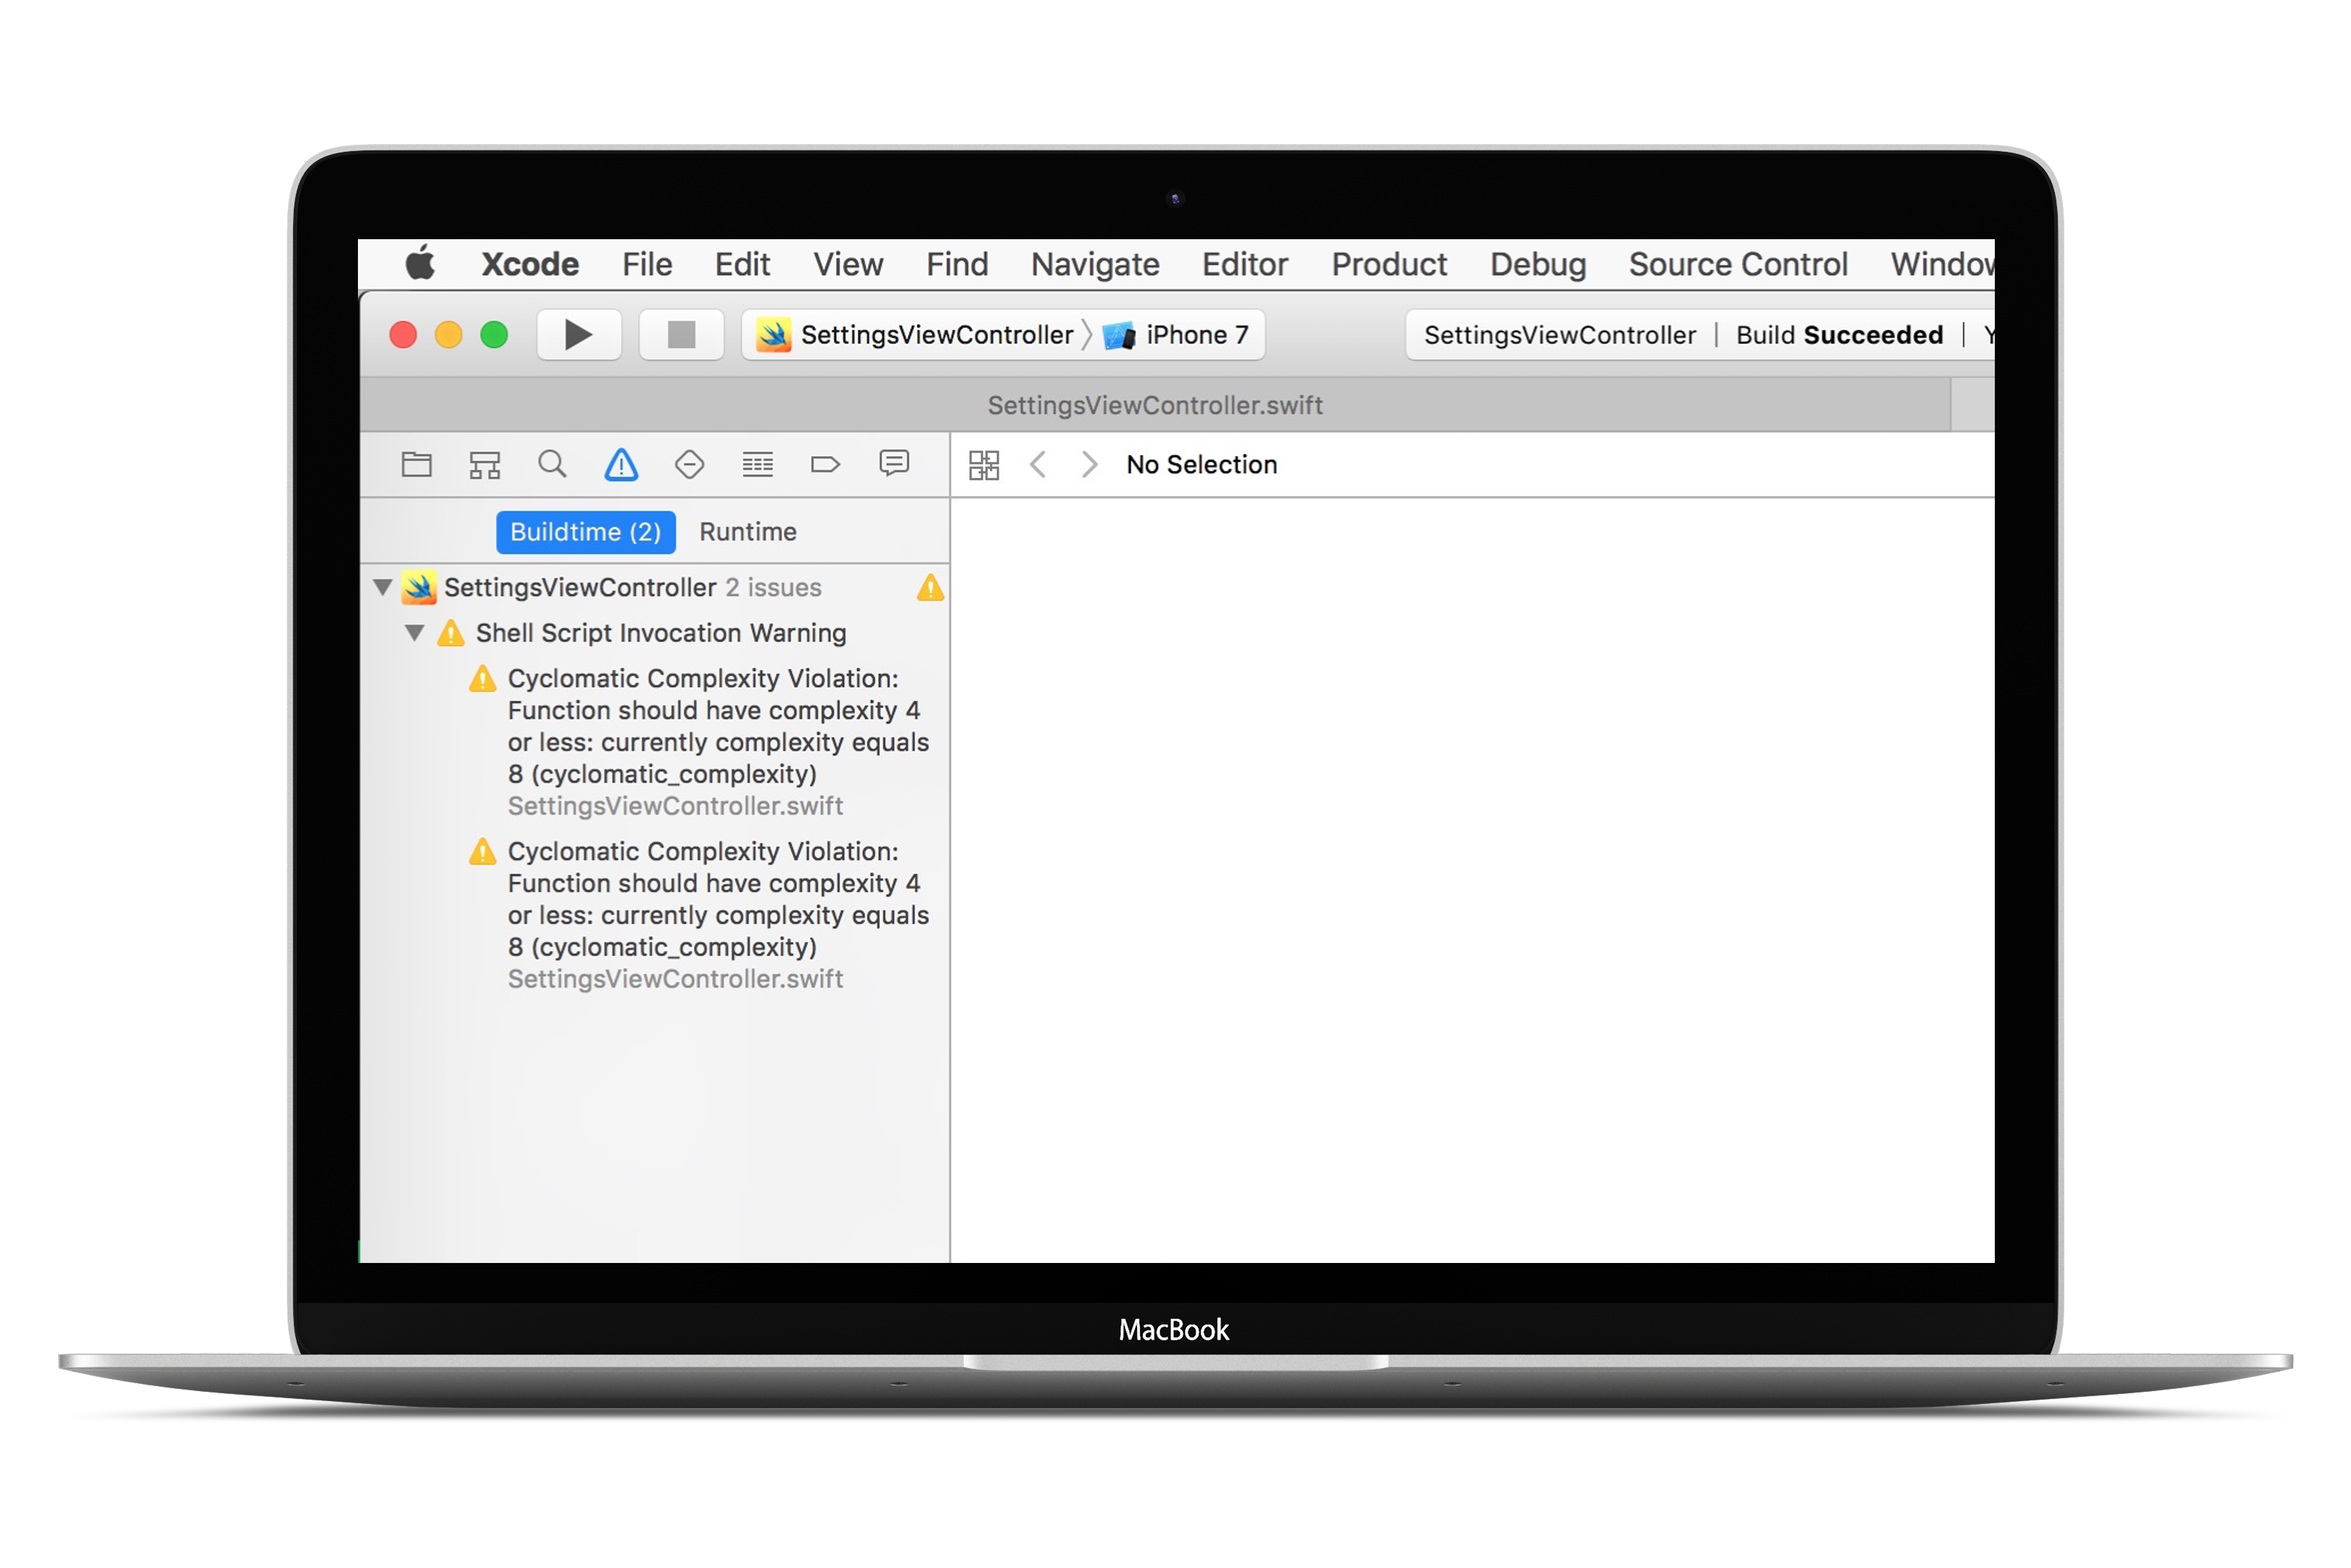
But developers used this long switch statement in many methods that dealt with tableView. They also had been using SwiftLint (a tool for code quality mentioned in issue #11 and issue #26) that indicated that their cyclomatic complexity limits for those methods were overreached.
Wait! Cyclo-what?!
Cyclomatic complexity
Documentation for codebeat (another tool for code quality assurance) mentioned by us in issue #10 has a great explanation of what cyclomatic complexity is:
The cyclomatic complexity of a section of source code is the number of linearly independent paths within it. For instance, if the source code contained no control flow statements (conditionals or decision points), such as if statements, the complexity would be 1, since there is only a single path through the code. If the code had one single-condition if statement, there would be two paths through the code: one where the if statement evaluates to true and another one where it evaluates to false, so complexity would be 2 for a single if statement with a single condition. Two nested single-condition ifs, or one if with two conditions, would produce a cyclomatic complexity of 4. (…)
OK, now when we know what cyclomatic complexity is, we can see some code and resolve its problems!
Cyclomaticly Complex Settings View Controller
So in the end, developers ended up with tableView(:cellForRowAtIndexPath:) method implementation that looked like this:
func tableView(_ tableView: UITableView, cellForRowAt indexPath: IndexPath) -> UITableViewCell {
        let cell = tableView.dequeueReusableCell(withIdentifier: cellIdentifier, for: indexPath)
        let section = indexPath.section
        let row = indexPath.row
        switch (section, row) {
        case (0, 0):
            cell.textLabel?.text = .SetOption1
            cell.accessoryType = .disclosureIndicator
        case (1, 0):
            cell.textLabel?.text = .SetOption2
            cell.accessoryType = .disclosureIndicator
        case (2, 0):
            cell.textLabel?.text = .SetOption3
            cell.accessoryType = .disclosureIndicator
        case (3, 0):
            cell.textLabel?.text = .SetOption4
            cell.accessoryType = .disclosureIndicator
        case (4, 0):
            cell.textLabel?.text = .Logout
        case (4, 1):
            cell.textLabel?.text = .LogoutAndResetData
        case (4, 2):
            cell.textLabel?.text = .LogoutAndRemoveAccount
        default:
            fatalError("Wrong number of sections")
        }
        return cell
    }
Their UITableView had 5 sections, 4 of them contained only 1 row and navigated to a different screen, 1 of them had 3 rows with different option to logout from the app.
The developers had set rigid cyclomatic complexity rule that will invoke a warning when the rule reaches 5 possible paths of execution through the method.
SettingsViewController.swift:58:5: warning: Cyclomatic Complexity Violation: Function should have complexity 4 or less: currently complexity equals 8 (cyclomatic_complexity)

SettingsViewController.swift:90:5: warning: Cyclomatic Complexity Violation: Function should have complexity 4 or less: currently complexity equals 8 (cyclomatic_complexity)
There is also tableView(:didSelectRowAtIndexPath:) method with high complexity. You can check this example project to see full source code.
Cyclomaticly Simple Settings View Controller
OK, but how can we design source code to resolve complexity issues?
This one simple trick can clean up our code and simplify complex methods. We can use a ViewModel struct to represent cell’s looks and behaviour.
fileprivate struct ViewModel {
    let name: String
    let indicator: UITableViewCellAccessoryType
    let action: () -> Void
}
For the Settings View Controller, the struct contains a name and an accessory indicator to be displayed in a cell. It also stores an action to be performed when user taps the cell. For first row in Settings View Controller we would write such a code:
ViewModel(name: .SetOption1, indicator: .disclosureIndicator, action:
    { [unowned self] in
        self.push(SetOption1ViewController())
})
Since method called in action closure is defined in Settings View Controller (self), there is a problem. First of all, a capture list has to be used. Secondly, we cannot construct let viewModel: [[ViewModel]] property before initialization of superclass, because the closure uses self.
To solve that problem, the property can be declared as fileprivate var viewModel: [[ViewModel]] = [] and filled with appropriate data after init of a superclass or in viewDidLoad() method:
fileprivate func setupViewModel() {
        viewModel = [
            [ViewModel(name: .SetOption1, indicator: .disclosureIndicator,
                       action: { [unowned self] in self.push(SetOption1ViewController()) })],
            [ViewModel(name: .SetOption2, indicator: .disclosureIndicator,
                       action: { [unowned self] in self.push(SetOption2ViewController()) })],
            [ViewModel(name: .SetOption3, indicator: .disclosureIndicator,
                       action: { [unowned self] in self.push(SetOption3ViewController()) })],
            [ViewModel(name: .SetOption4, indicator: .disclosureIndicator,
                       action: { [unowned self] in self.push(SetOption4ViewController()) })],
            [ViewModel(name: .Logout, indicator: .none,
                       action: { [unowned self] in self.showLogoutPrompt() }),
             ViewModel(name: .LogoutAndResetData, indicator: .none,
                       action: { [unowned self] in self.showLogoutAndResetDataPrompt() }),
             ViewModel(name: .LogoutAndRemoveAccount, indicator: .none,
                       action: { [unowned self] in self.showLogoutAndRemoveAccountPrompt() })],
        ]
    }
Now implementation of tableView(:cellForRowAtIndexPath:) is as simple as that:
func tableView(_ tableView: UITableView, cellForRowAt indexPath: IndexPath) -> UITableViewCell {
    let cell = tableView.dequeueReusableCell(withIdentifier: cellIdentifier, for: indexPath)
    let section = indexPath.section
    let row = indexPath.row
    guard let model = viewModel[safe: section]?[safe: row] else { return cell }
    cell.textLabel?.text = model.name
    cell.accessoryType = model.indicator
    return cell
}
You can find full sample project here.
TL;DR;
Simple screens with naive implementation can grow fast through time and turn into complexity burden. It’s good to have a code quality guard to warn you by saying Fix it!. If you don’t have a clue how to fix an issue, ask your colleagues, switch your thinking from switch statement to some abstraction, watch Swift Talks and read blog posts to be more creative in problem solving!
References
]]>- SonarQube
- Checkmarx
Concentrating on some basics, best practices, tips and just personal feelings about each one.
Important: if you would like to learn more about SwiftLint I recommend visiting our previos post about SwiftLint.
Ready?

Let’s start!
SwiftLint
A tool to enforce Swift style and conventions, loosely based on GitHub’s Swift Style Guide.
Basics
- Current version: 0.12
- 38 rules available here
- It’s free
- Developed and supported by Realm
- 76 Contributors
What’s new in 0.12 version?
New version has a few new rules, options and fixes. For example:
- MARK Rule – MARK comment should be in valid format (to enforce //MARK: syntax):

- Private Outlet Rule – IBOutlets should be private to avoid leaking UIKit to higher layers:

- Vertical Whitespace Rule: Limit vertical whitespace to a single empty line:

- Private Unit Test Rule: Unit tests marked private are silently skipped:

-
Legacy NSGeometry Functions Rule – Struct extension properties and methods are preferred over legacy functions (available for SDK: macOS 10.10+)
-
New junit report option:
swiftlint lint --report junit
In result we can get a report like the one below:
...warning: Line:16 ... warning: Line:20
It can be very useful for continuous integration system like Bamboo where you can have online dashboard of SwiftLint results:
Lessons learned
After almost one year of using it, personally I think it’s a very great tool! Below are main thougts about my experience:
- Use it from the start of your project. Every single build will correct your tiny mistakes and will inform you about violations.
- Meet with your iOS team and establish your own rules (according to your company guidelines).
- Experiment with values for different rules and change it during development of your project, because sometimes very strict rules can change your coding into a fight with a tool:/.
- It’s very useful especially when you work in a big iOS team to have consistent codebase.
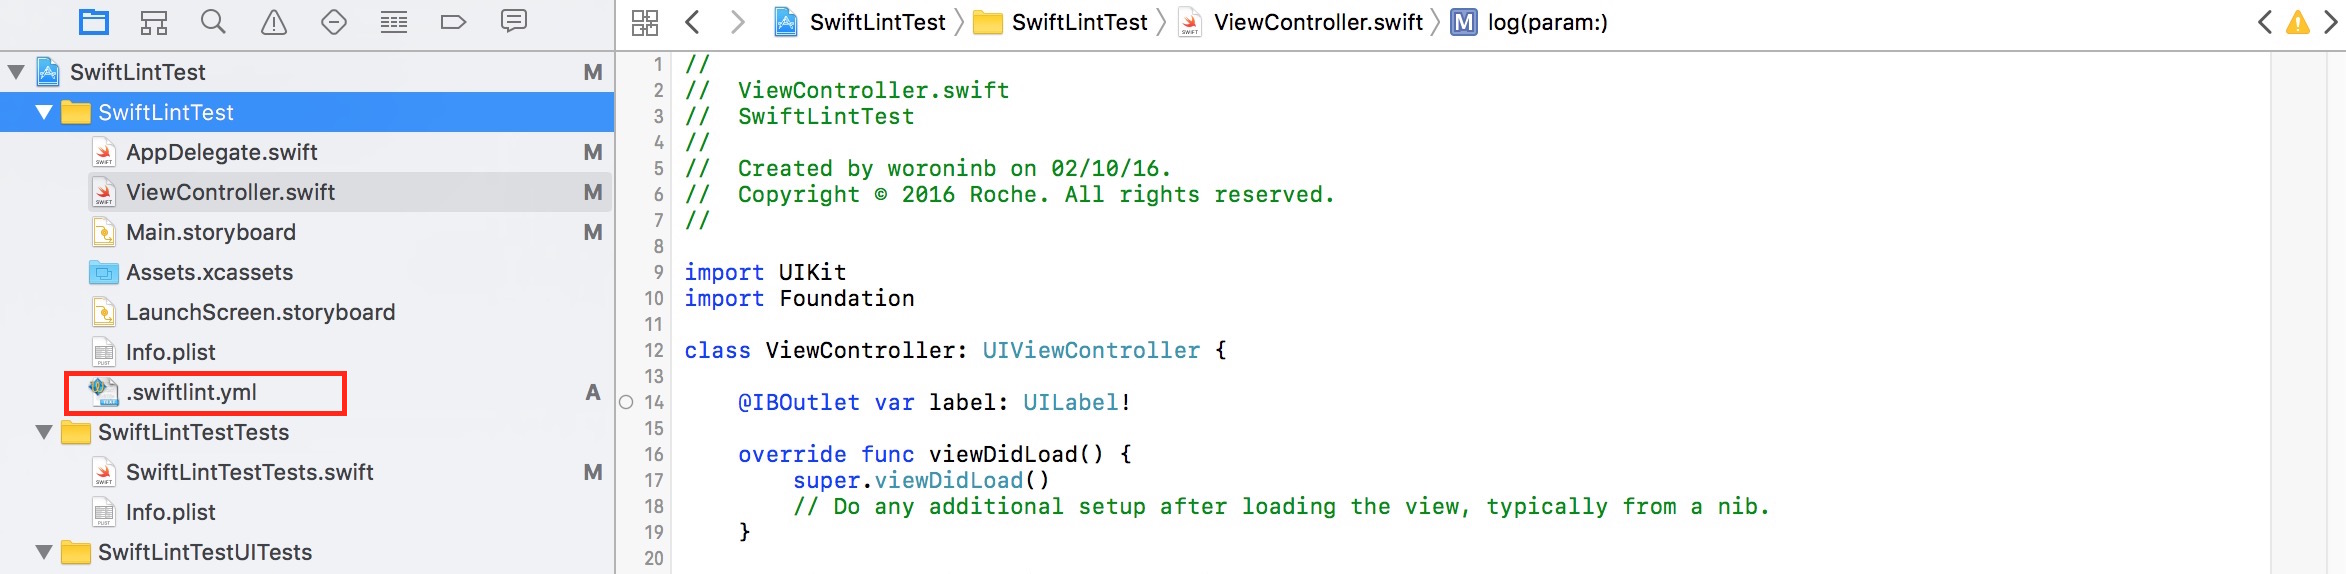
- Very easily configurated in just one file: .swiftlint.yml.
- Can be integrated with continuous integration systems (like Bamboo or Jenkins).
Tips
- You can also integrate SwiftLint with your Xcode by using SwiftLintXcode plugin (unfortunately it doesn’t have seamless installation process for Xcode 8):

- Move .swiftlint.yml configuration file to Xcode project file structure:
In this way you can configure it very easily.
SonarQube
SonarQube is an open source platform for continuous inspection of code quality. Supports more han 20 languages: Java, C/C++, Objective-C, C#, PHP, Flex, Groovy, JavaScript, Python, PL/SQL, COBOL, Swift, etc. Unfortunately plugins for some of the languages are commercial, as is the plugin for Swift. Additionally it has available more than 50 plugins.
Basics
Sonar at this moment has 92 rules for Swift, which are divided into three groups:

They can be marked in aspect of severity as:
Blocker, Critical, Major, Minor, Info:
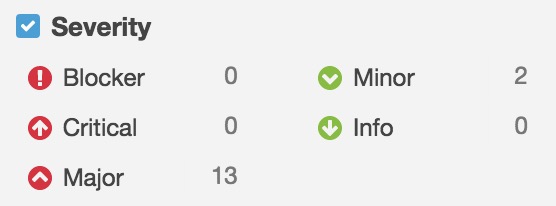
Some examples below:
- Bugs:
- URIs should not be hardcoded (Critical)
- Optionals should not be force-unwrapped (Major)
- Functions and closures should not be empty (Major)
- Vulnerabilities:
- Credentials should not be hard-coded (Critical)
- IP addresses should not be hardcoded (Major)
- Access control should be specified for top-level definitions (Major)
- Code smells:
- Files should not have too many lines (Major)
- Source files should not have any duplicated blocks (Major)
- "self" should only be used when required (Minor)
Metrics
Sonar uses following metrics:
- Security: Number of vulnerabilities.

- Maintability: Number of code smells.

- Reliability: Number of bugs.

- Duplications: Number of duplicated blocks of lines.

- Complexity: It is the complexity calculated based on the number of paths through the code.

- Documentation: Number of lines containing either comment or commented-out code.

What we can also see is:
- Technical debt:
Wikipedia: "Technical debt is a concept in programming that reflects the extra development work that arises when code that is easy to implement in the short run is used instead of applying the best overall solution. Technical debt is commonly associated with extreme programming, especially in the context of refactoring"
In Sonar technical debt is calculated based on algorithm below:
Debt(in man days) = cost_to_fix_duplications + cost_to_fix_violations +
    cost_to_comment_public_API + cost_to_fix_uncovered_complexity +
    cost_to_bring_complexity_below_threshold

Lessons learned
- SonarQube has a Web dashboard which can be easily shared and custiomized to your needs in development team
- Has a lot of rules
- Establish rules and their severity with your team
- Can be really helpful in a situation when you work on a legacy code to check its quality
- Can be integrated with continuous integration systems
- A lot of plugins (SwiftLint)
- But unfortunately it is quite expensive: 5,000 euro per year
If you would like to test SonarQube by yourself before buying it, you can visit this demo website
Checkmarx
Checkmarx is a security platform providing several tools for introducing advanced static security analysis into applications written in C#, Java, jscript, native C/C++ or APEX.
Basics
Checkmarx scanner interprets Swift to Objective-C in the backend before scanning the code. As a result, Checkmarx scans Swift code for over 60 quality and security issues, including twelve of the most severe and most common issues that cannot be left unfixed.
On Checkmarx website you can find a lot of interesting articles dedicated to mobile application, for example:
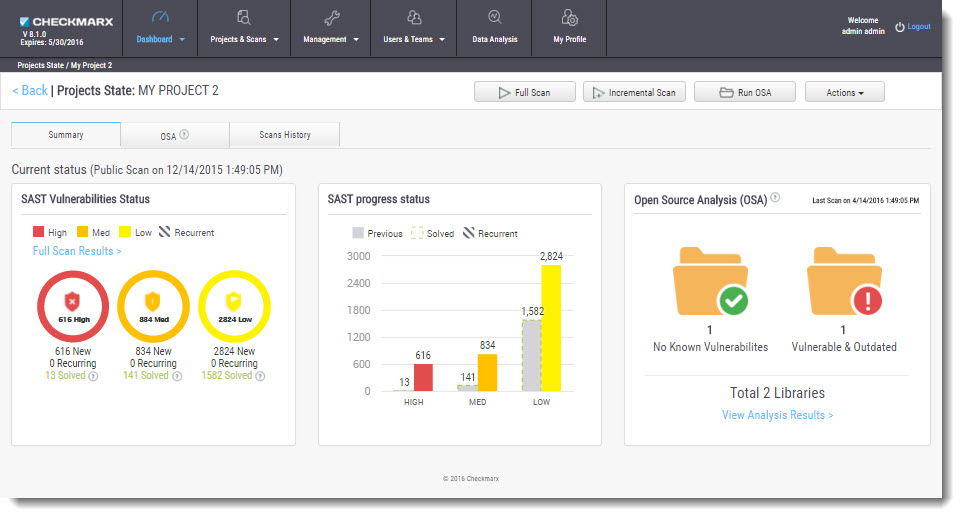
Checkmarx offers a Web dashboard on which you can find summary for all vulnerabilities found in your projects:
Lessons learned
Checkmarx misses rules typical for Swift. I think that it is because Swift is a new and rapidly changing language. For sure there are still a lot of possibilities for defining new rules like they did for the others languages.
Other frameworks
At this moment there are not many different libraries for linting Swift. I have only found this one:
I hope that in the future we will see much more alternatives.
Summary
In my opinion static code analyzers can make your codebase more consistent, and for sure can really help during your daily coding and speed up the process. Of course we should remember about golden mean in using such libraries. It would be good not to turn our job into a nightmare by using very strict rules:)!
]]> Swift code.
General Tips 
It is said that a review goes best when conducted on less than 400 lines of code at a time. You should do a proper and slow review, however, don’t spend on it more than 90 minutes  – you definitely will get tired after that time. It’s tiring to write and understand your own code and it’s even more tiring to understand someone’s. Other tips from the Internet are:
After some years of experience in software development you know what common programming mistakes are. You also do realise what solutions to common problems are most efficient. It’s a good practice to write it down and to check code being reviewed against a checklist ✅ – it leads improved results. Checklists are especially important for reviewers because, if the author forgets a task, the reviewer is likely to miss it too.
In the git flow mentioned in issue #13, code can get merged after receiving agreed number of approvals for a pull request. The number should depend on your team size, but it’s good to get at least 1️⃣ !
When you recommend fixes to the code, suggest their importance  . Maybe some of them could be postponed and extracted as separate tasks. Before approving a pull request, verify that defects are fixed
 .
.
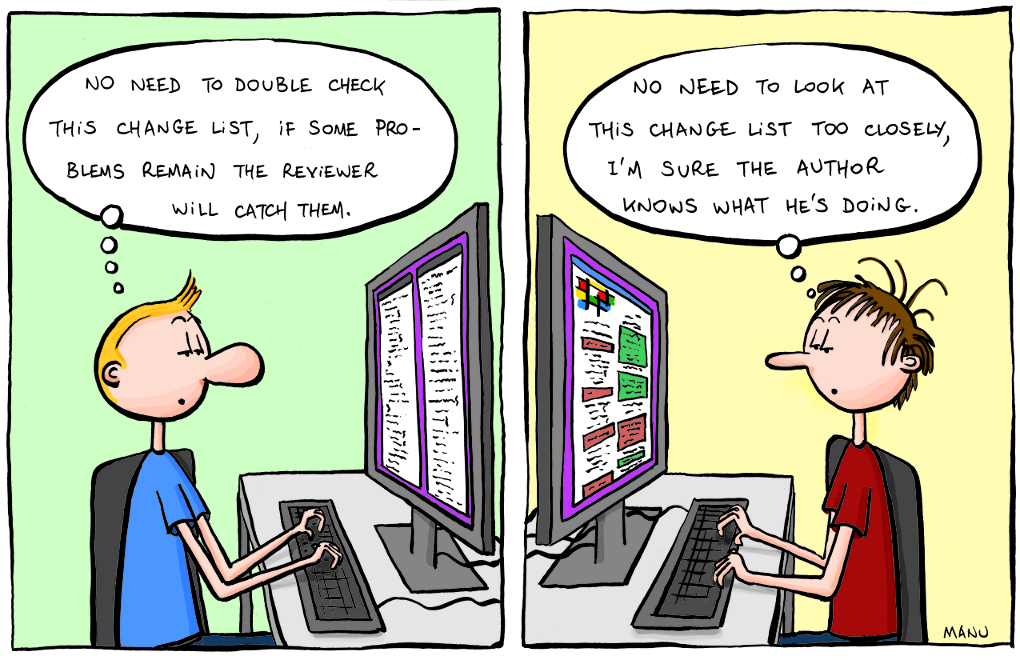
Foster in your company a Good Code Review Culture in which finding defects is viewed positively . The point of software code review is to eliminate as many defects as possible, regardless of who "caused" the error. Few things feel better than getting praise from a peer. Reward developers for growth and effort. Offer as many positive comments as possible. I always try to put a line saying that a solution is good and clever (if it really is  ).
).
You can also benefit from The Ego Effect  . The Ego Effect drives developers to write better code because they know that others will be looking at their code and their metrics. No one wants to be known as the guy who makes all those junior-level mistakes. The Ego Effect drives developers to review their own work carefully before passing it on to others.
And don’t bother with code formatting style …
… there are much better things on which to spend your time, than arguing ☔️ over the placement of white spaces.
Looking for bugs and performance issues is the primary goal and is where the majority of your time should be spent.
So, what to review?
Much better things to look for should be a part of your checklist. When I scrutinise a piece of code I look especially:
- at
ifconditions,forandwhileloops for "off-by-one" errors - for interchanged
<versus<=and>versus>= for accidental interchange of && with || or bitwise operators like & and |UPDATED 11.06.2016 Swift compiler ensures that expression evaluated in a condition returns aBoolvalue, hence there’s no possibility not to catch compilation error if one interchanges operators- at operators importance and execution UPDATED 11.06.2016 If you happen a "million" of operators in one expression you’re probably doing something wrong by overcomplicating the solution… 😉
- if dependancy injection is possible (for the sake of unit testing).
- if variable names as verbose as needed
- if method names express what they do
- if a file contains commented out code
- if a file contains a single class (this one is arguable, depends on agreement with your team and company’s guidelines)
- for code duplication, function length and class length < x lines – SwiftLint or codebeat mentioned in issue #11 and issue #10 is an option to point out such a code without your participation
When performing a review, one can also get extra points for pointing out a more efficient implementation of used algorithm .
You should also check for readability. Is the code easy to understand? Do you have to pause frequently during the review to decipher it?
Some swifts
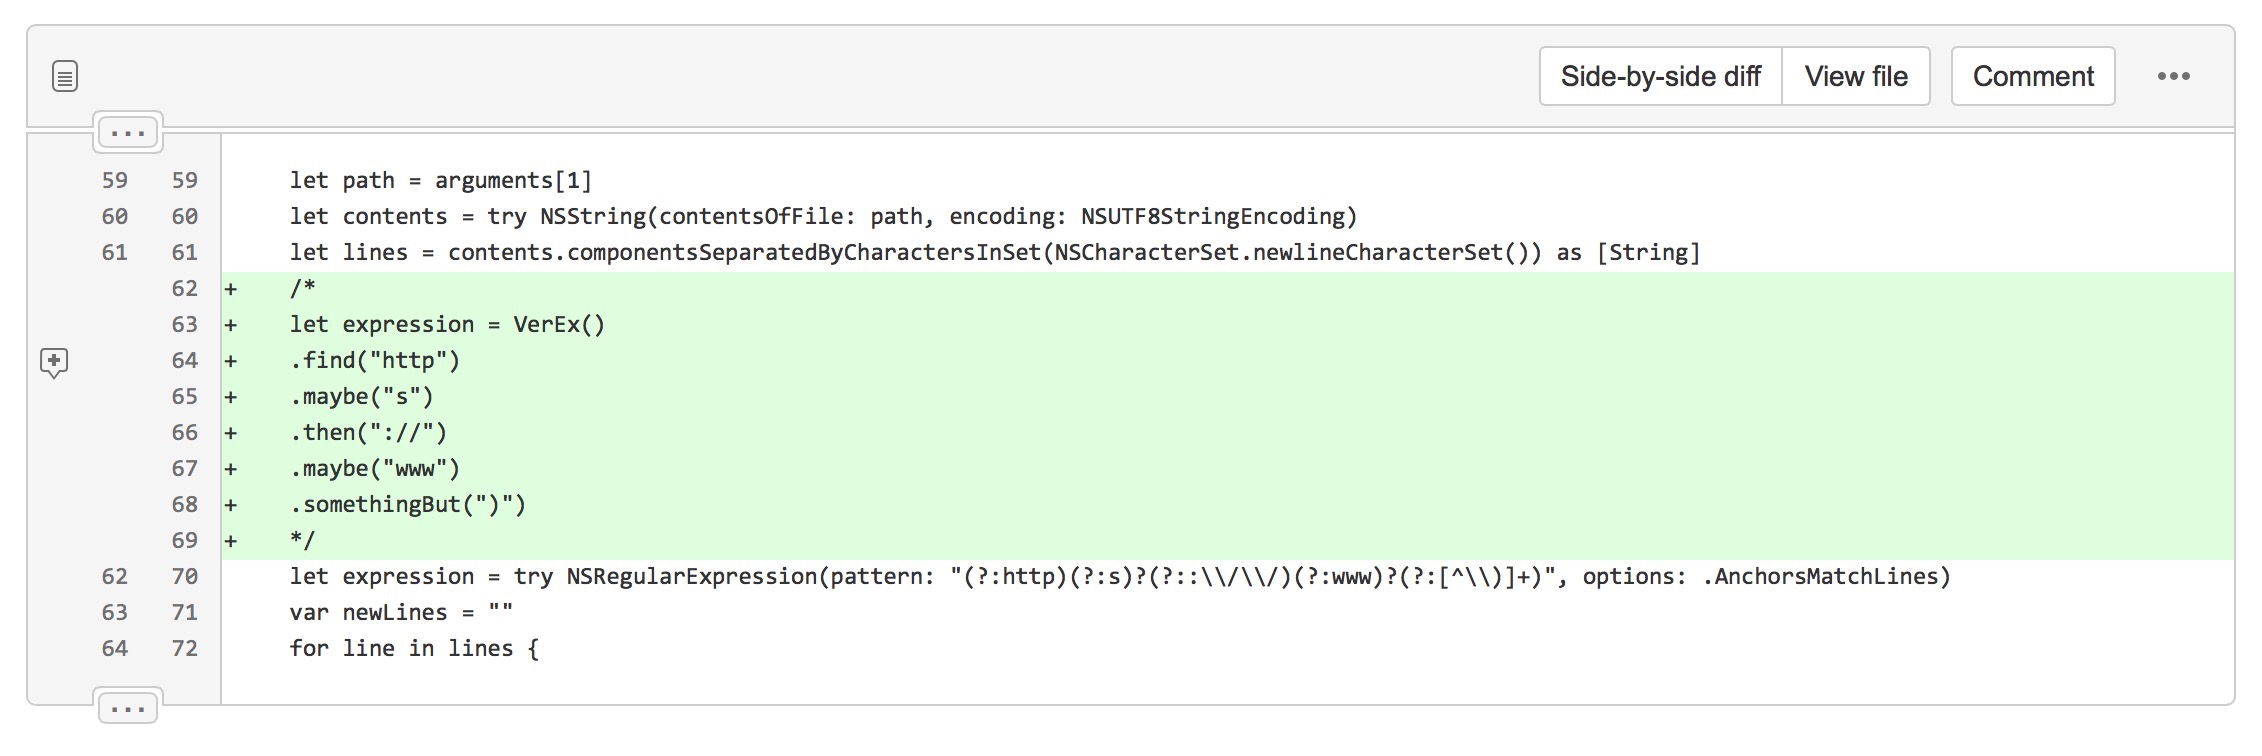
Boom! Time for some loosely coupled Swift code examples that I look for when reviewing Swift code❗️Wait a moment, this exclamation mark looks strangely familiar … ❗️Look out for code that uses it …
Swift

var foo: Object!

print("\(foo.someString)")
Make sure that your peers (and you as well) use the force unwrapping operator wisely in their code.
If you have ever ended up with code like the one below, then probably something went wrong … 

override init(_ objectId: String?,
viewModel1: ViewModel1,
viewModel2: ViewModel2,
viewModel3: ViewModel3,
viewModel4: ViewModel4,
viewModel5: ViewModel5,
viewModel6: ViewModel6,
viewModel7: ViewModel7,
viewModel8: ViewModel8,
viewModel9: ViewModel9,
viewModel10: ViewModel10,
isSomething: Bool = false) { ... }
This is an excerpt from from one of my projects, object types and names are changed . It’s an initialiser of a ‘container’ view model that encapsulates ‘child’ view models used by a container view controller. If you happen to achieve this and there’s no way to change it, probably usage of a configurator facade, default argument values or convenience initialisers are the best solution to live up with your legacy.
class Configurator {
    class func mainViewController() -> MainViewController {
        let dependency1 = Configurator.dependency1()
        let dependency2 = Configurator.dependency2()
        let dependency3 = Configurator.dependency3()
        let dependency4 = Configurator.dependency4()

        return MainViewController(dependency1: dependency1,
            dependency2: dependency2,
            dependency3: dependency3,
            dependency4: dependency4)
    }
}
The off-by-one errors and interchanged greater than & less than were my favourite mistakes at some point of time. I’ve caught myself a few times last year with using if i > array.count instead of if i < array.count ☔️.
Remember local autoreleasepool? For those who answered ‘what!?’ here is some explanation. I pay attention when reviewing body of a loop to check if local autoreleasepool could be used to reduce peak memory footprint.
for i in 1...100
autoreleasepool {
    NSString *superImportantString = "Super \(i)"
    //strange operations take place
    //superImportantString can be released earlier thanks to local autoreleasepool
}
More than a year ago, when Swift was still in its early days, I hated when my team members overused var. It’s ok when needed, but not all the time! Thanks god that now Swift compiler warns about not mutated var.
Another matter is your object’s properties. If it depends on some values, never ever use var. Use let. Always value more immutable state over var! I wonder how many people would argue with me about that☔️. And if your property really have to be mutable, expose it ‘to the public’ as immutable like that:
private(set) var foo: AnyObject
let bar: AnyObject
Swift’s protocols are a great deal – do you prefer composition over inheritance? Is such an inheritance chain ok for you? One superclass would be probably ok, but this becomes an exaggeration:
class ChildViewModel: TableViewModel {}
class TableViewModel: CRUDViewModel {}
class CRUDViewModel: BaseViewModel {}
class BaseViewModel {}
Final thoughts
Kofi Annan, Ghanaian ex-Secretary-General of the United Nations, when in primary school, was attending a weekly lesson in ‘spoken English’. He and his peers were asked by the teacher what did they see at the picture:

All shouted together, that they saw a black dot! Professor stepped back and said ‘So, not a single one saw the white sheet of paper. (…). This is the awful thing about human nature. People never see the goodness of things, and the broader picture. (…)’.
It’s also true for code review. We perceive better differences than loads of new code when using a merge tool. We get a cognitive overload if flooded with more content. Have that in mind and use the first rule – review for less than 90 minutes , take breaks. Remember that:
- new code is more difficult to understand
- not all bugs can be caught during a review
- hot fixes
 without review can happen …
And always – Review your own code first! Before committing a code look through all changes you have made!
Let us know in comments or on Twitter what is on your checklists for code review!
The only true measure of code quality

Additional links
]]>What is a code review?
The good old Wikipedia once wrote:
Code review is systematic examination (often known as peer review) of computer source code.

It is intended to find and fix mistakes overlooked in the initial development phase,

improving both the overall quality of software and the developers' skills.
Far enough. I want to do it! Wait, but …
How to do it?
Reviews can be done in various forms such as pair programming, informal walkthroughs, and formal inspections. The most known is probably this one – show me your code (aka informal review)! Simply ask your peer to have a look at your code.
Formal code reviews can be performed by using e.g. Atlassian’s Crucible/Fisheye (I don’t like this tool, bad UX, hard to navigate and even start a review) or a pull request on Stash/BitBucket/GitHub or whatever you use. Thanks to those tools you get a nice visualisation of what changes were made to source code, you can comment on them, ask author some questions and they can explain their code in return. It’s like a conversation you would have in real life, but documented – what has been agreed should be performed before merging into develop. Wait, what merging?! We were just talking about a review …
Git flow
When developing different parts of an application at work we use Git and Git Flow to merge all changes into a parent branch. Once a feature of an app is finished we create a pull request that contains changes to be added to a predecessor branch (usually develop). The best picture showing the flow comes, in my opinion, from GitHub. I still don’t get what the squirrel on it represents… ⁉️
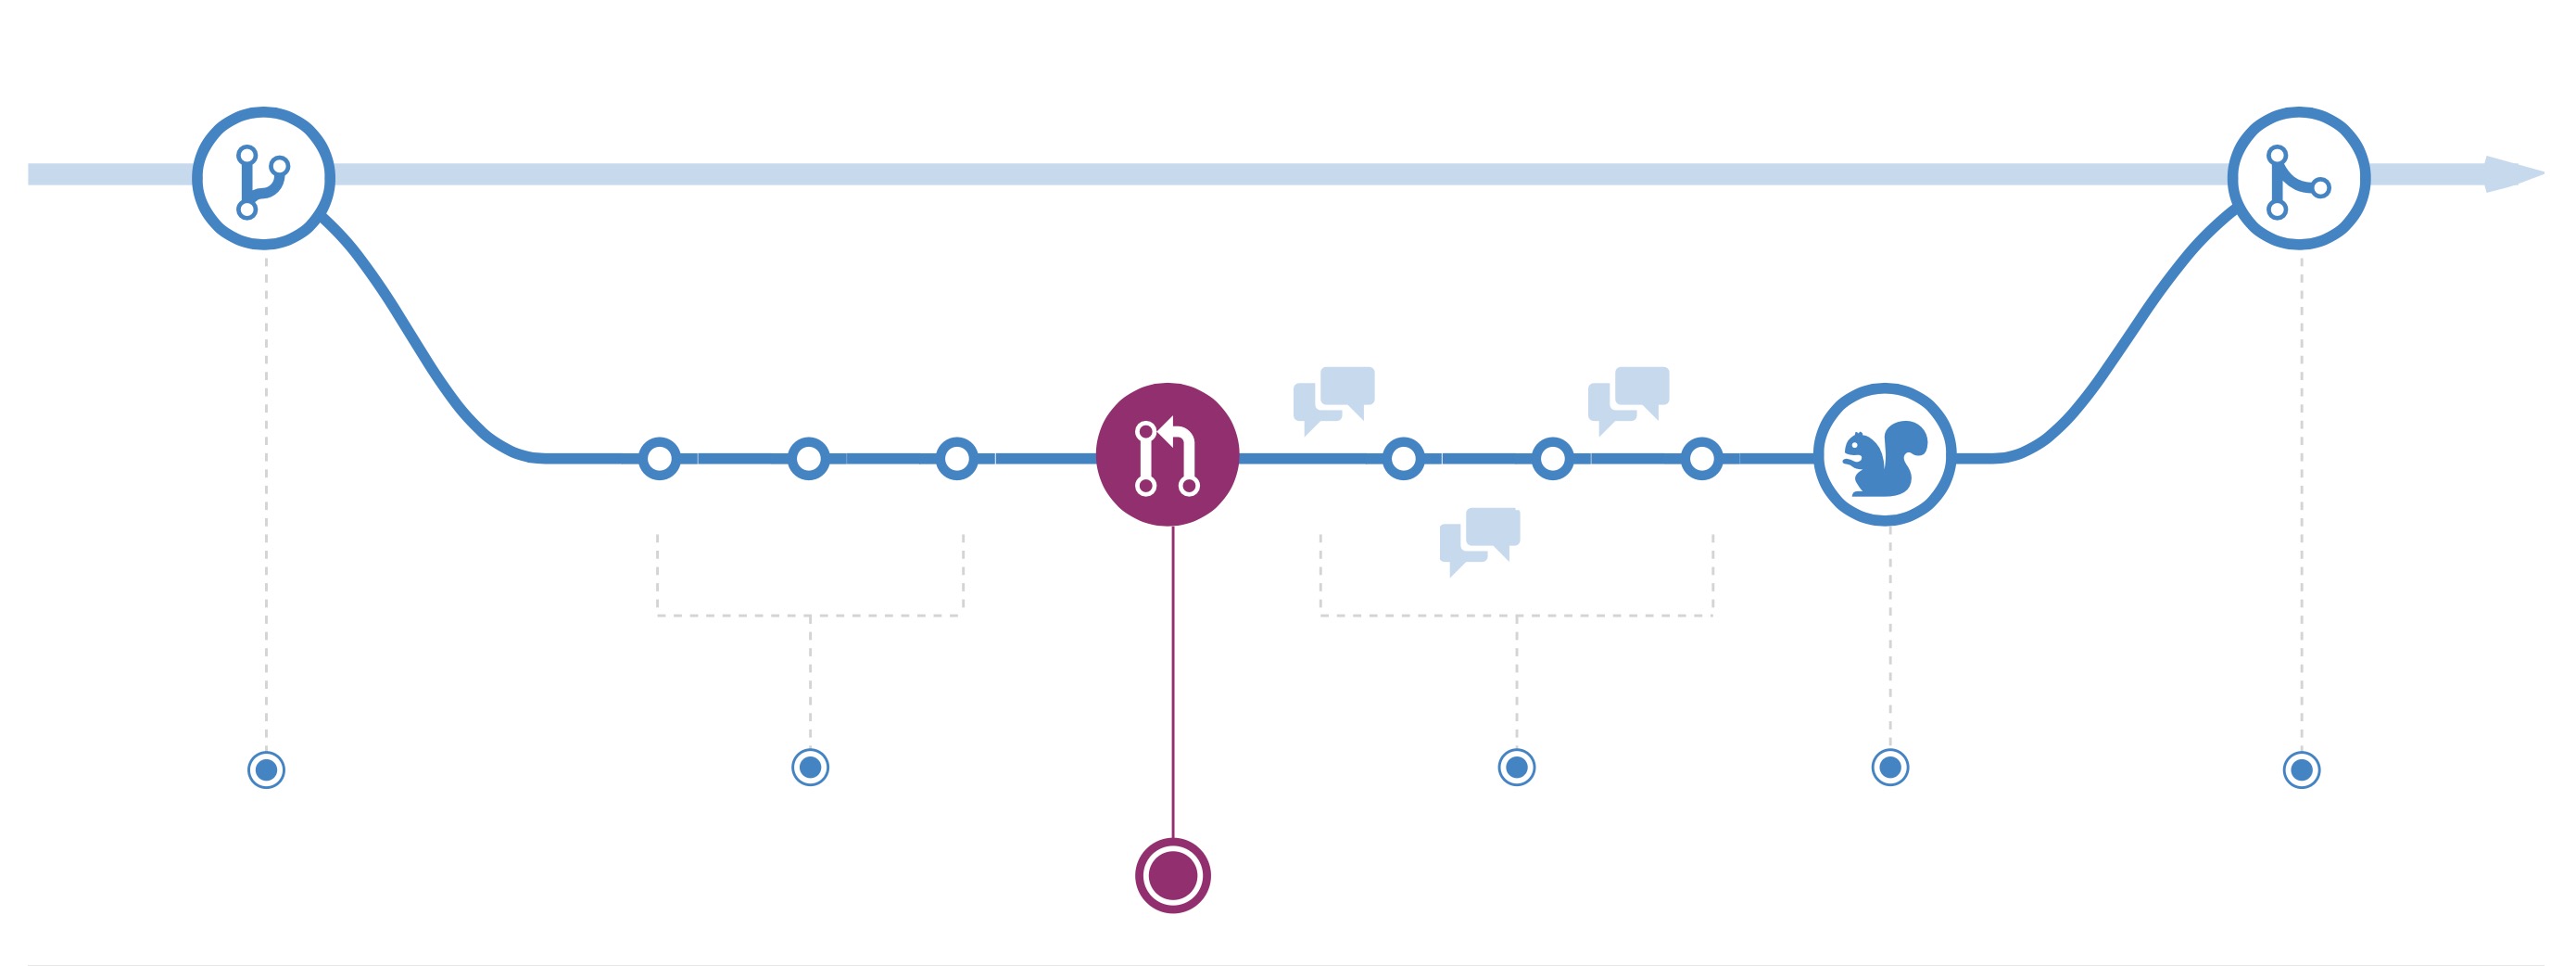
The flow goes like this:
- create a branch from e.g. develop
- apply your changes to the source code
- create a pull request to be merged into e.g. develop
- discuss changes with your peers, explain your point of view & apply suggested improvements
- a squirrel⁉️ approves your changes (or your peers, depends on the setup of your team and agreements, could be a squirrel in some cases … )
- merge your code into source branch
What to consider when doing a review?
You definitely should check code integrity – does the style match previous solutions, does it follow agreed conventions? Are features implemented correctly, does the old source code work correctly after changes?
Why to tap into code review in your development process?
For sure because it ensures code integrity , catches what others’ eyes didn’t see. It allows to learn and share your knowledge and expertise, strengthens communication in the team and builds good relationships due to conversations about what you have in common – code and programming skills ;)!
Unfortunately, from my experience, unit tests and code review are first things that get removed from project scope  . It takes too much time and there’s no budget for that. Do you encounter the same problems?
Consider code review as an investment into the future. If you don’t catch bugs now you will definitely have to conquer them in the future.
What if you didn’t perform code reviews
Imagine a company X. It delivers mobile app solutions for multiple clients. Their team is small and at some point they cannot meet clients’ demands. So they decide to outsource some of the work to an external company. They give project requirements to this company and meet again after 3 months to receive app source code. But the app is useless – it freezes at network calls, CoreData.ConcurrencyDebug flag crashes all the time. The project is delayed for a few months, team has to start from a scratch. The wish they had reviewed outsourced code on a daily basis…
How to start the process at your place?
Code review culture wasn’t common for mobile teams at my workplace. It still isn’t for some of the due to rapid development and short lifecycle of some of the mobile apps. However, I wanted to improve myself by learning from others. I’ve started with a prank. I’ve developed changes on a branch and have created a pull request for my colleagues. And it got the ball rolling. Now all mobile projects within my division embed code review in their development process.
Do you want to perform code reviews?
This is usually the question that gets lack of enthusiasm from the audience :(. But really, are we too busy to improve??

This was an introduction to code review. In the upcoming weeks we’ll get deeper into the process. Stay tuned  !
!