
The main idea behind this app is to refactor its code to fit MVVM, VIPER and VIP architectures. But first, let’s dive into app functionalities.
My Cards
The app is intended for storing photos of loyalty cards. No one wants carrying tons of plastic in their wallets, so taking a photo of a card and showing it to a shop assistant might be useful for potential users. Of course, there are such solutions on the market, but we wanted to build something more fancy than a simple to-do list (as probably majority of examples show).
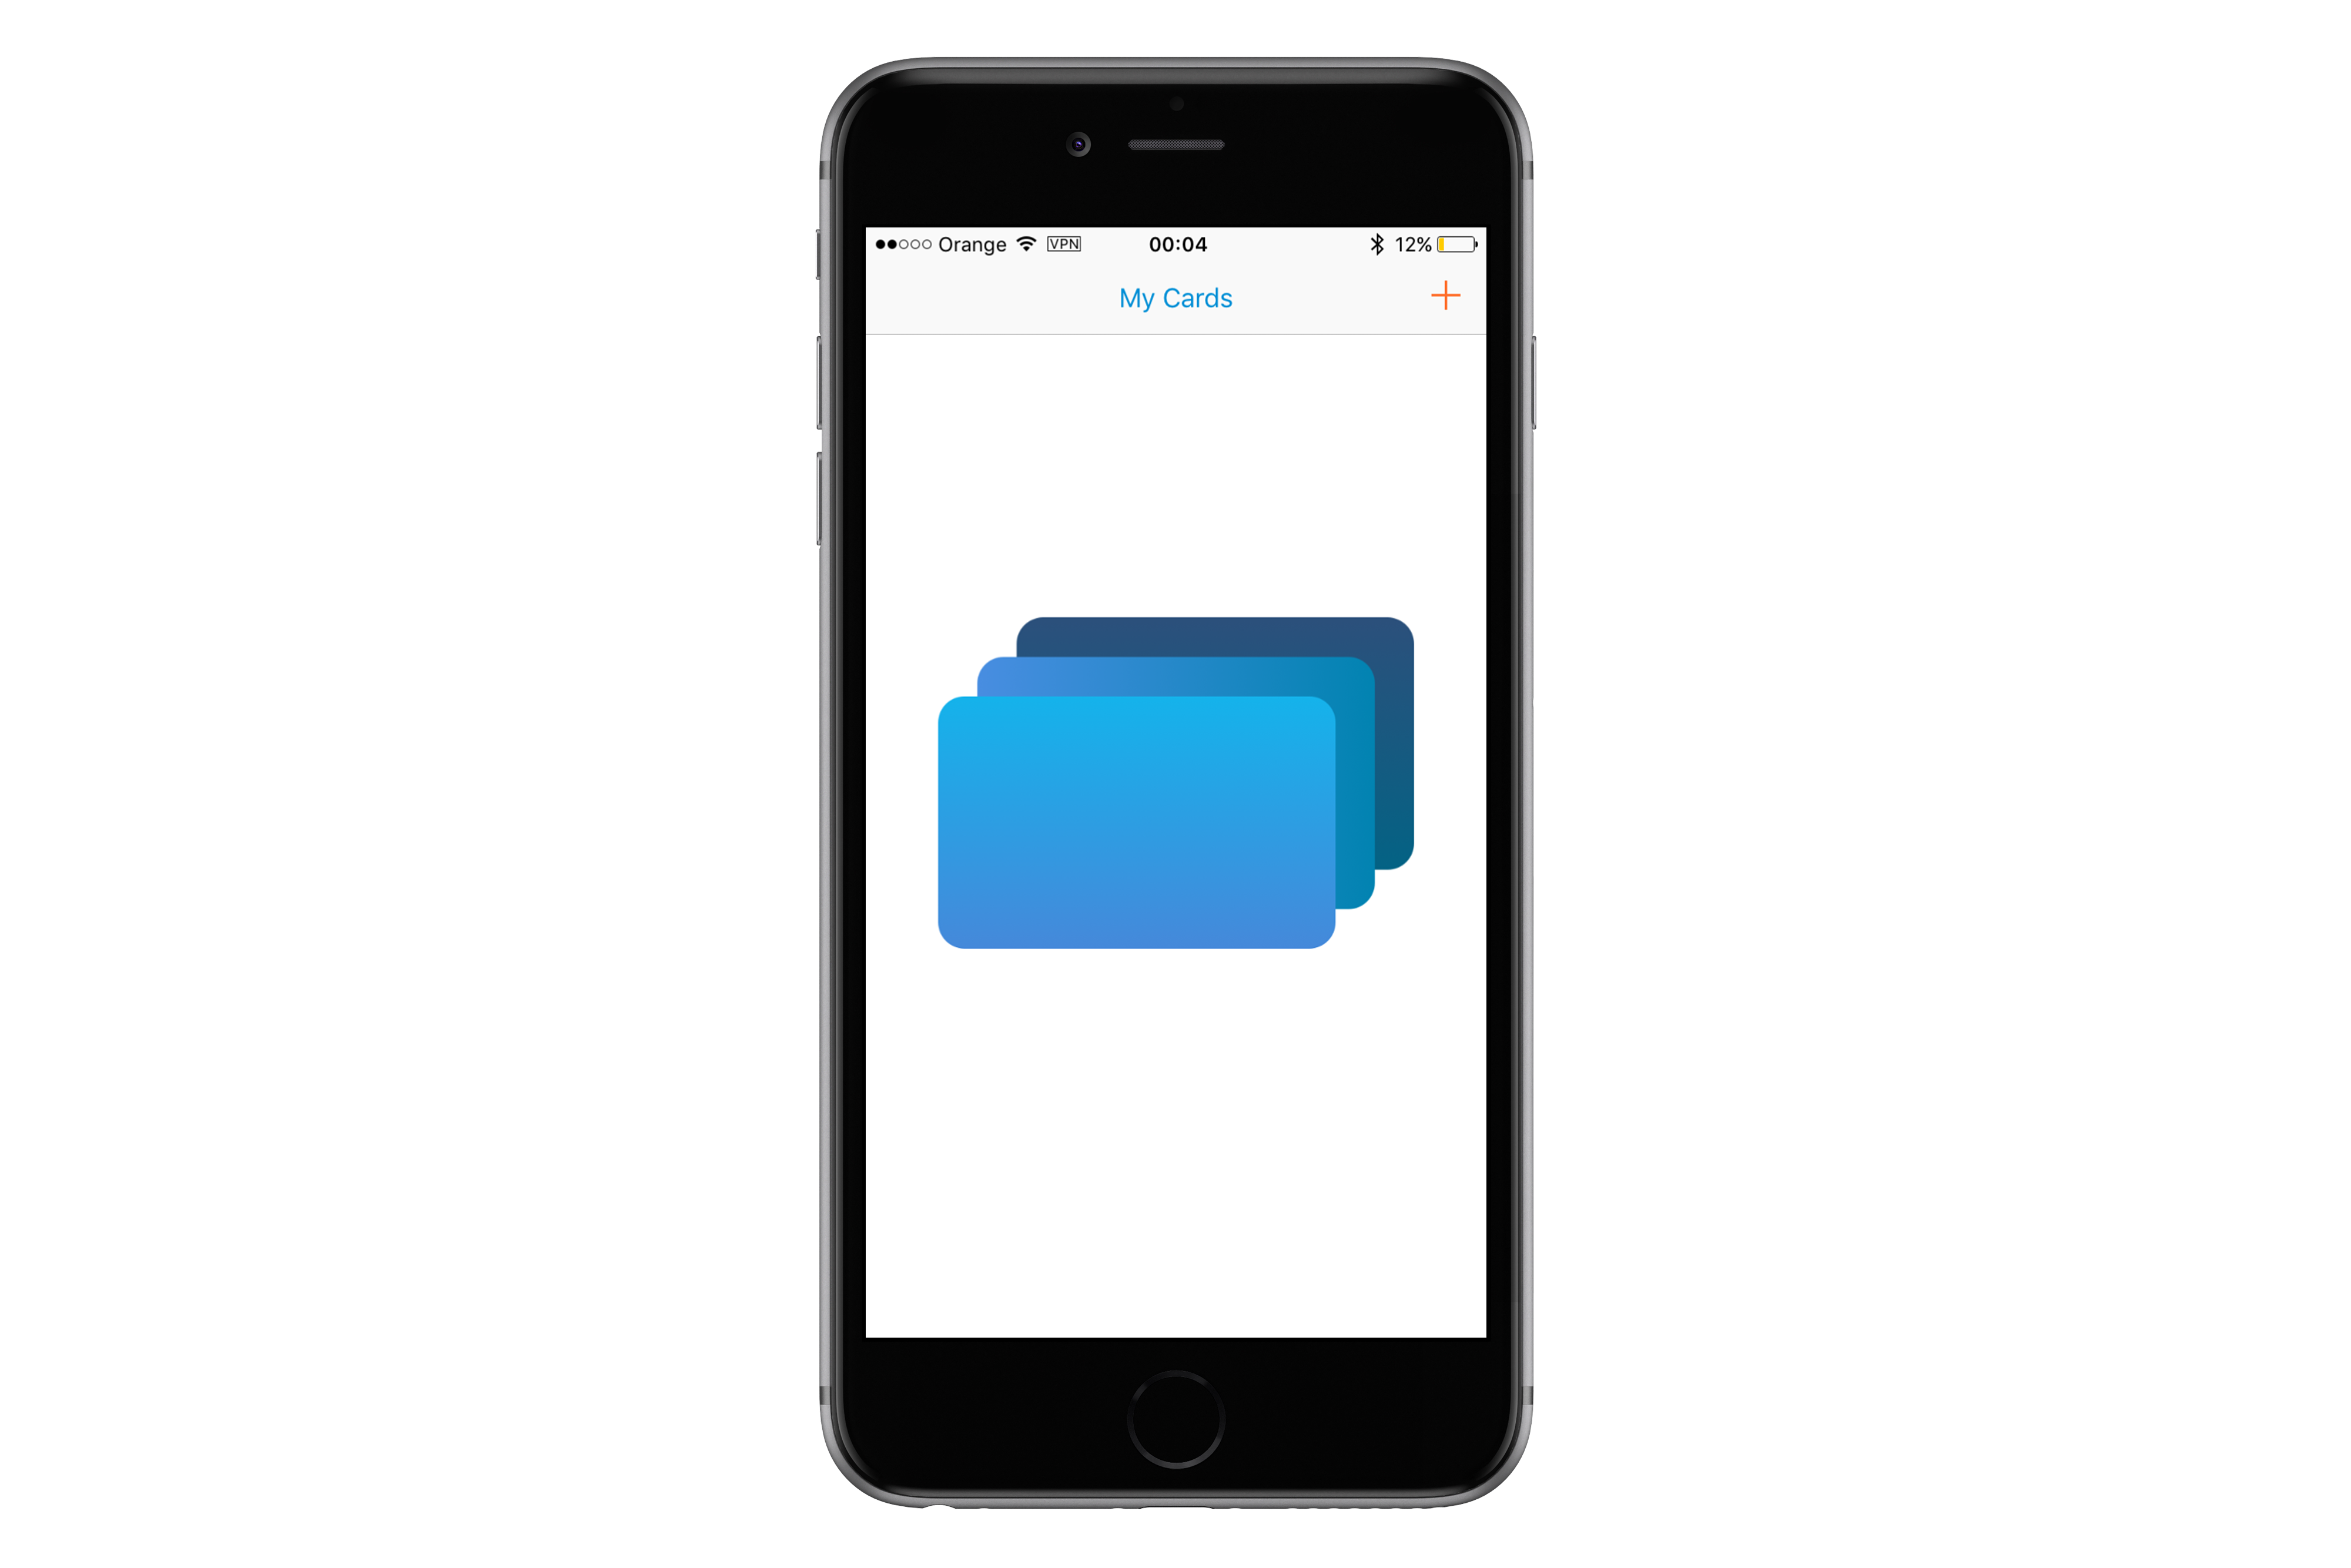
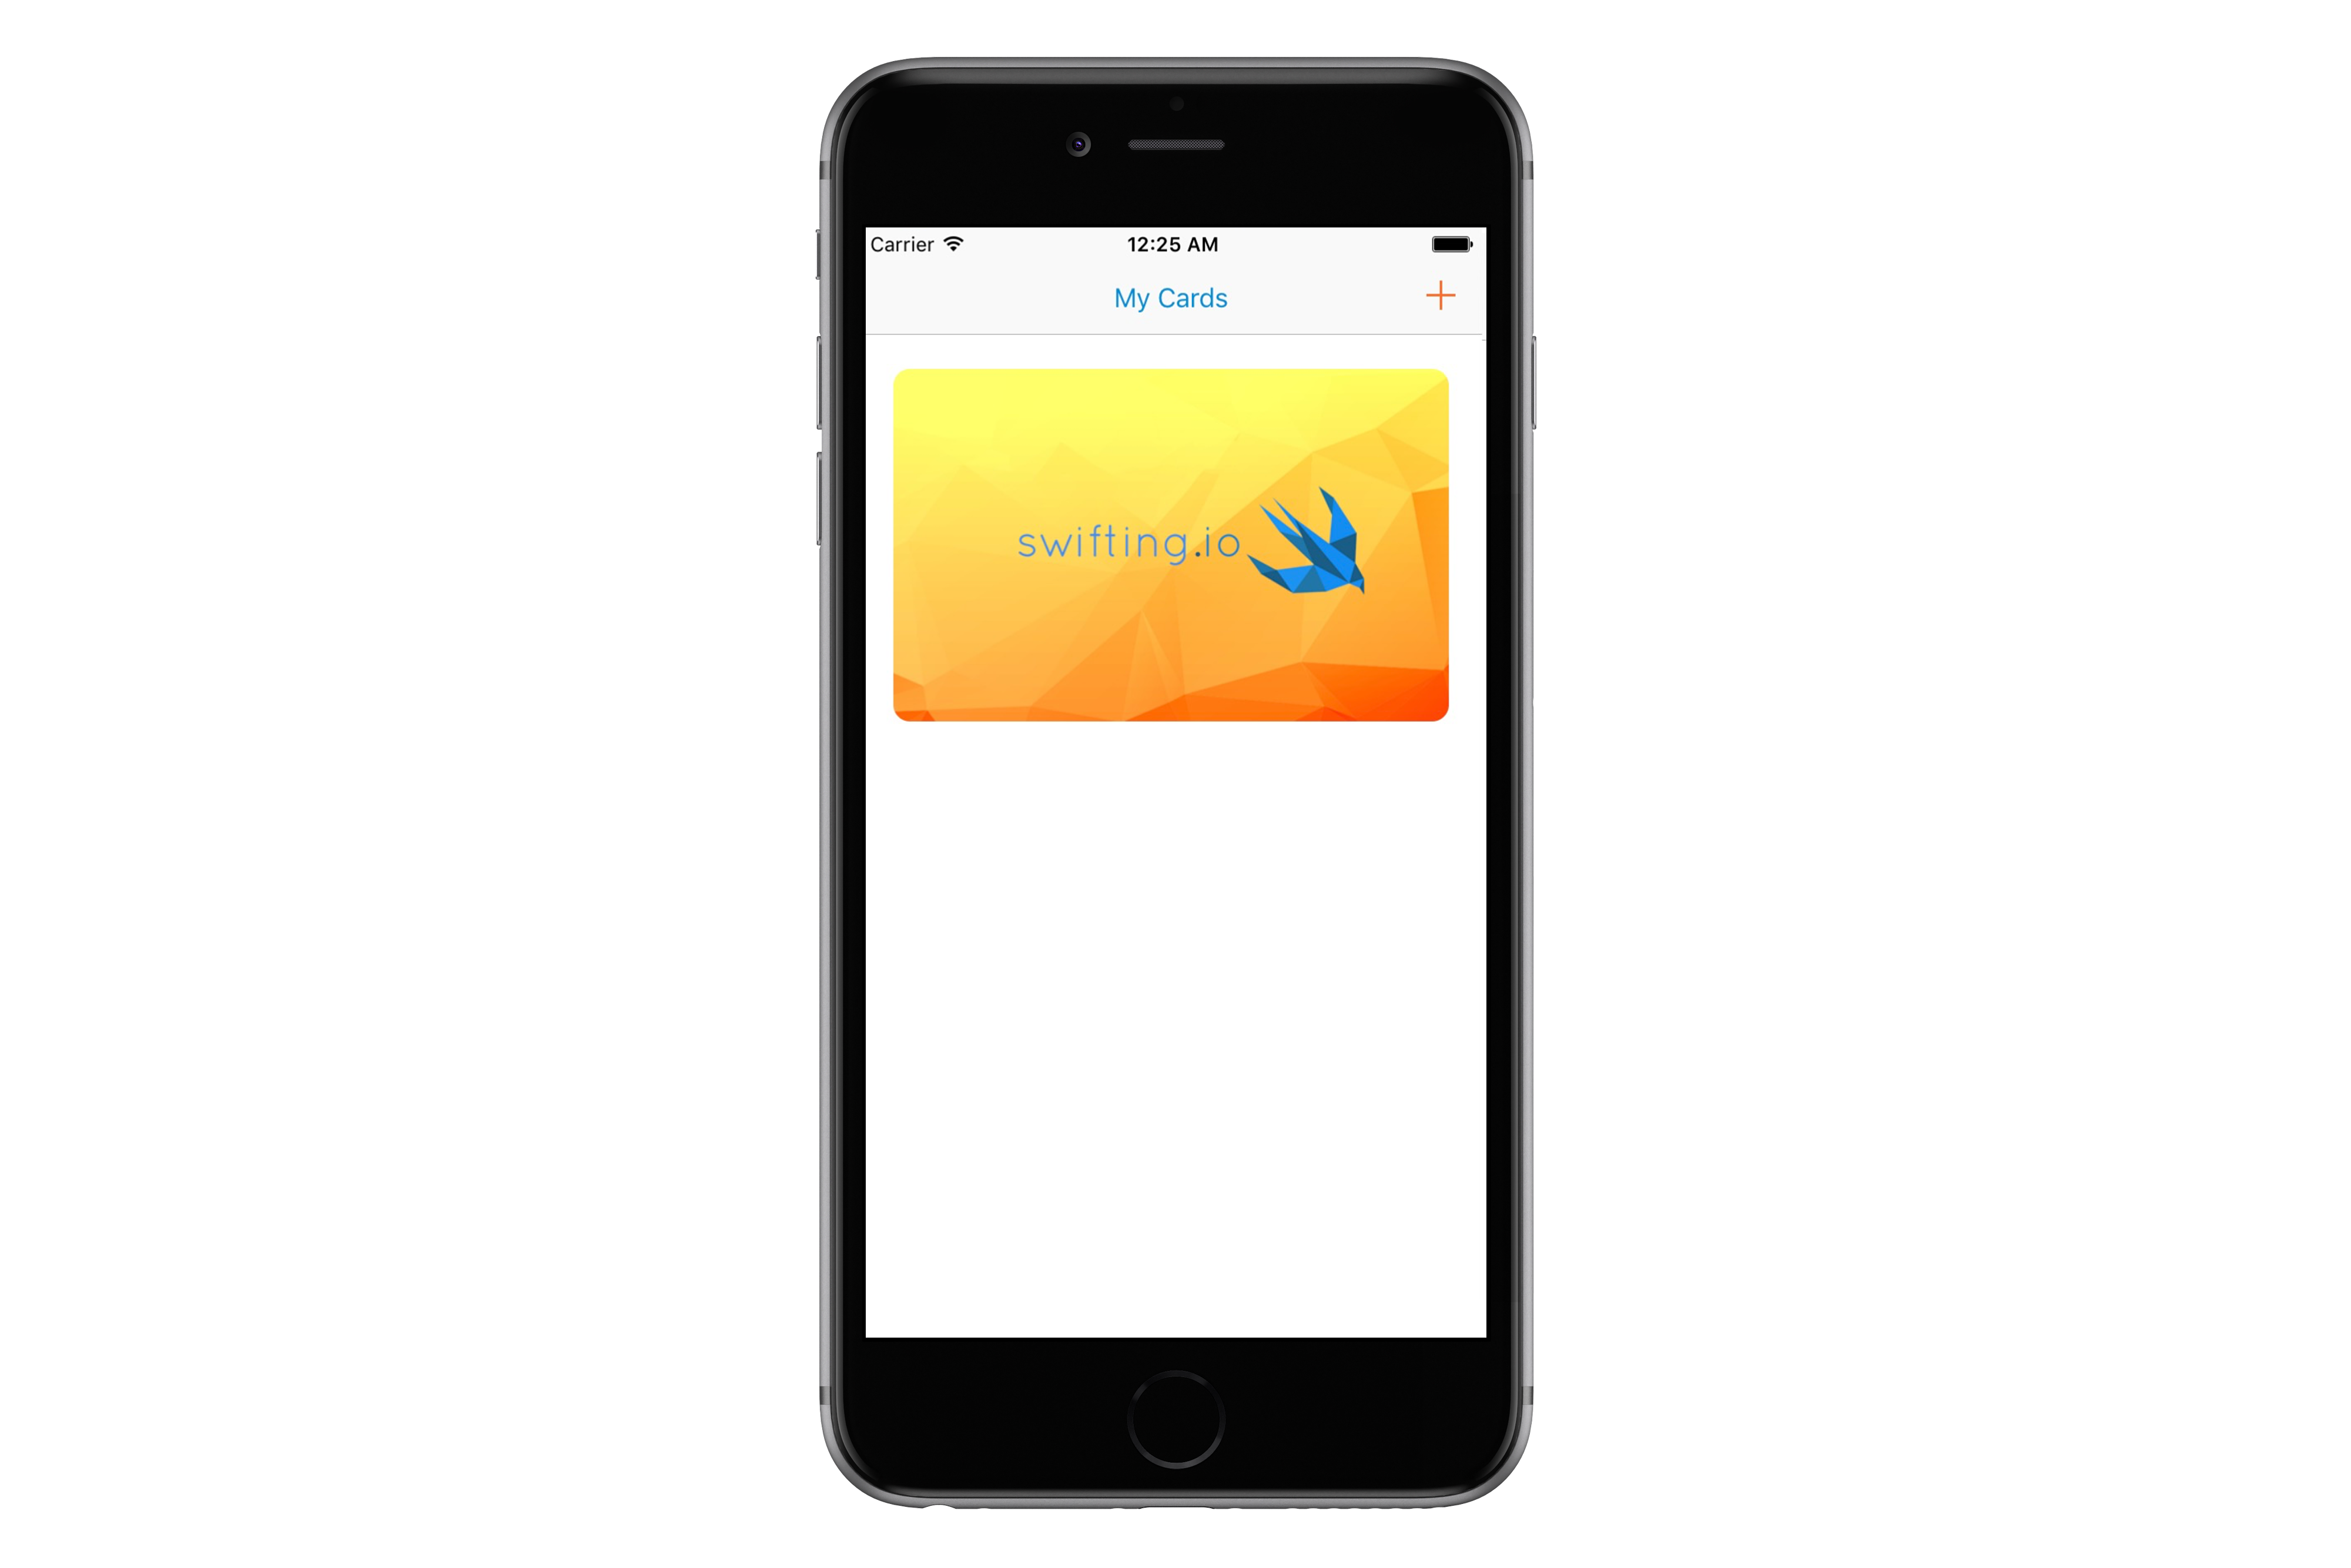
User begins with an empty list. In the meantime application tries to download cards from a backend (mocked in our example). If it succeeds a card will be displayed on the list.
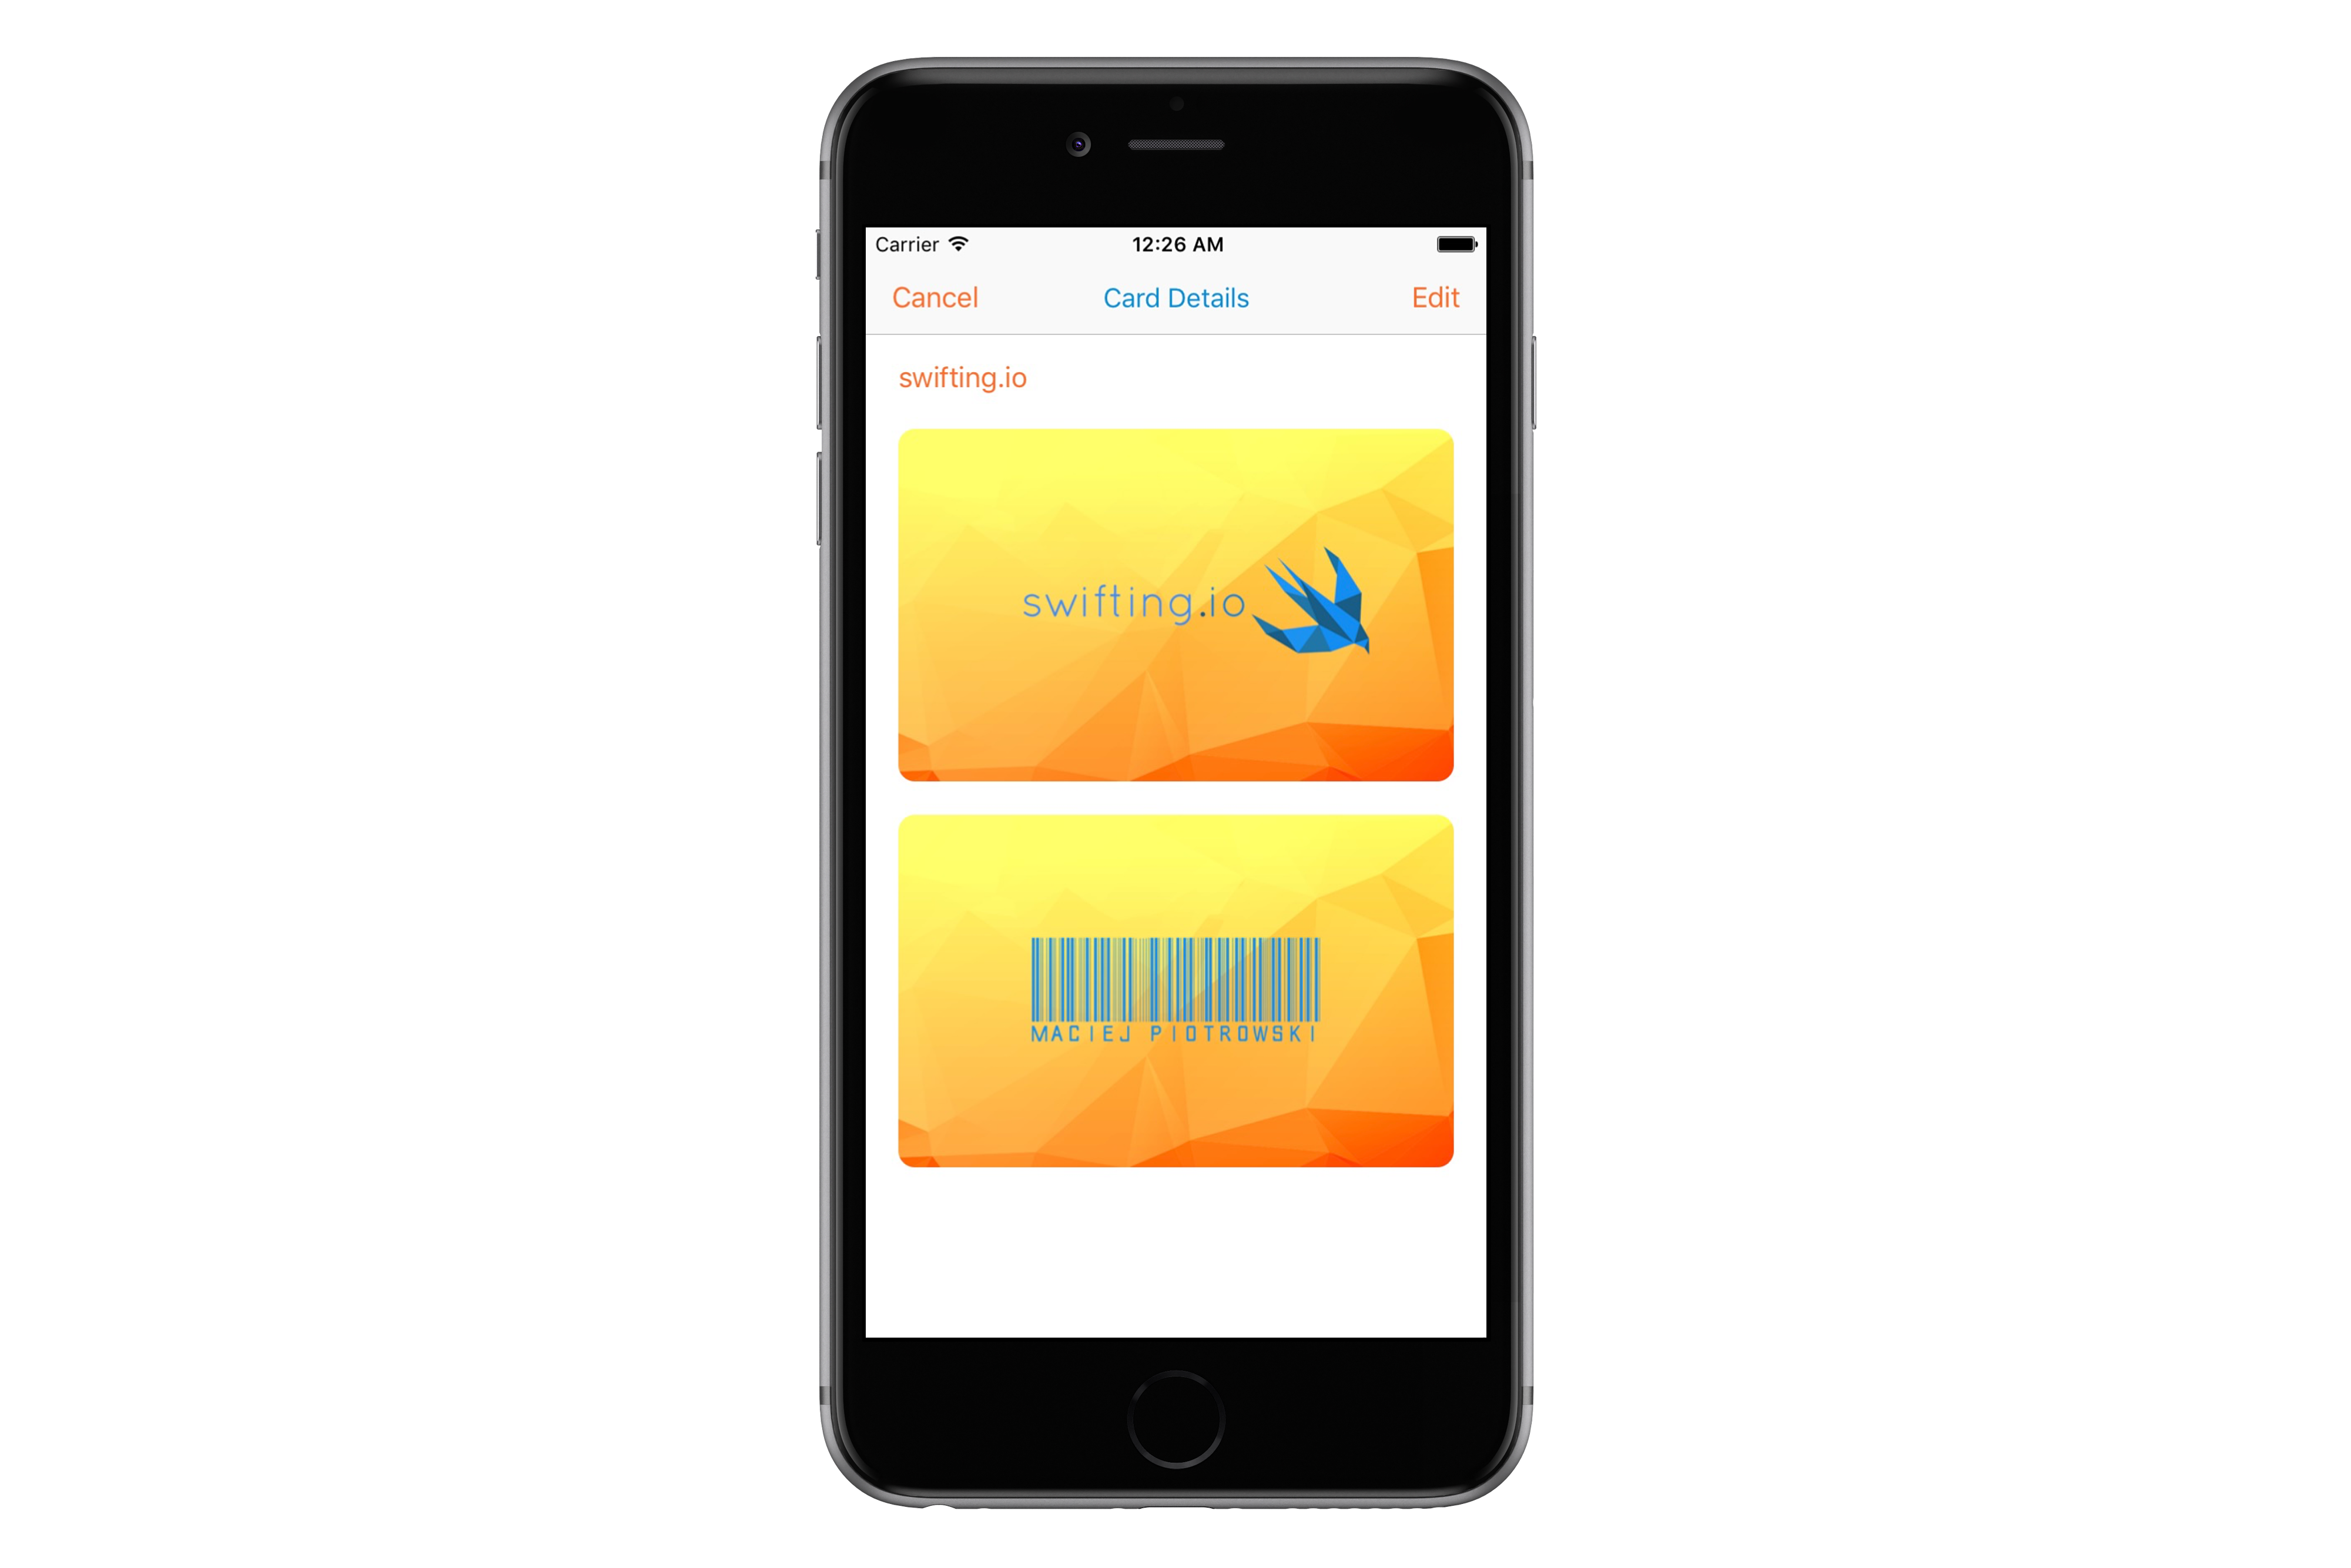
By tapping on a card, its details are shown – a card name, a front and a back photos.
Those can be edited by taping on an Edit button. Person can change photos, name or delete the card entirely.
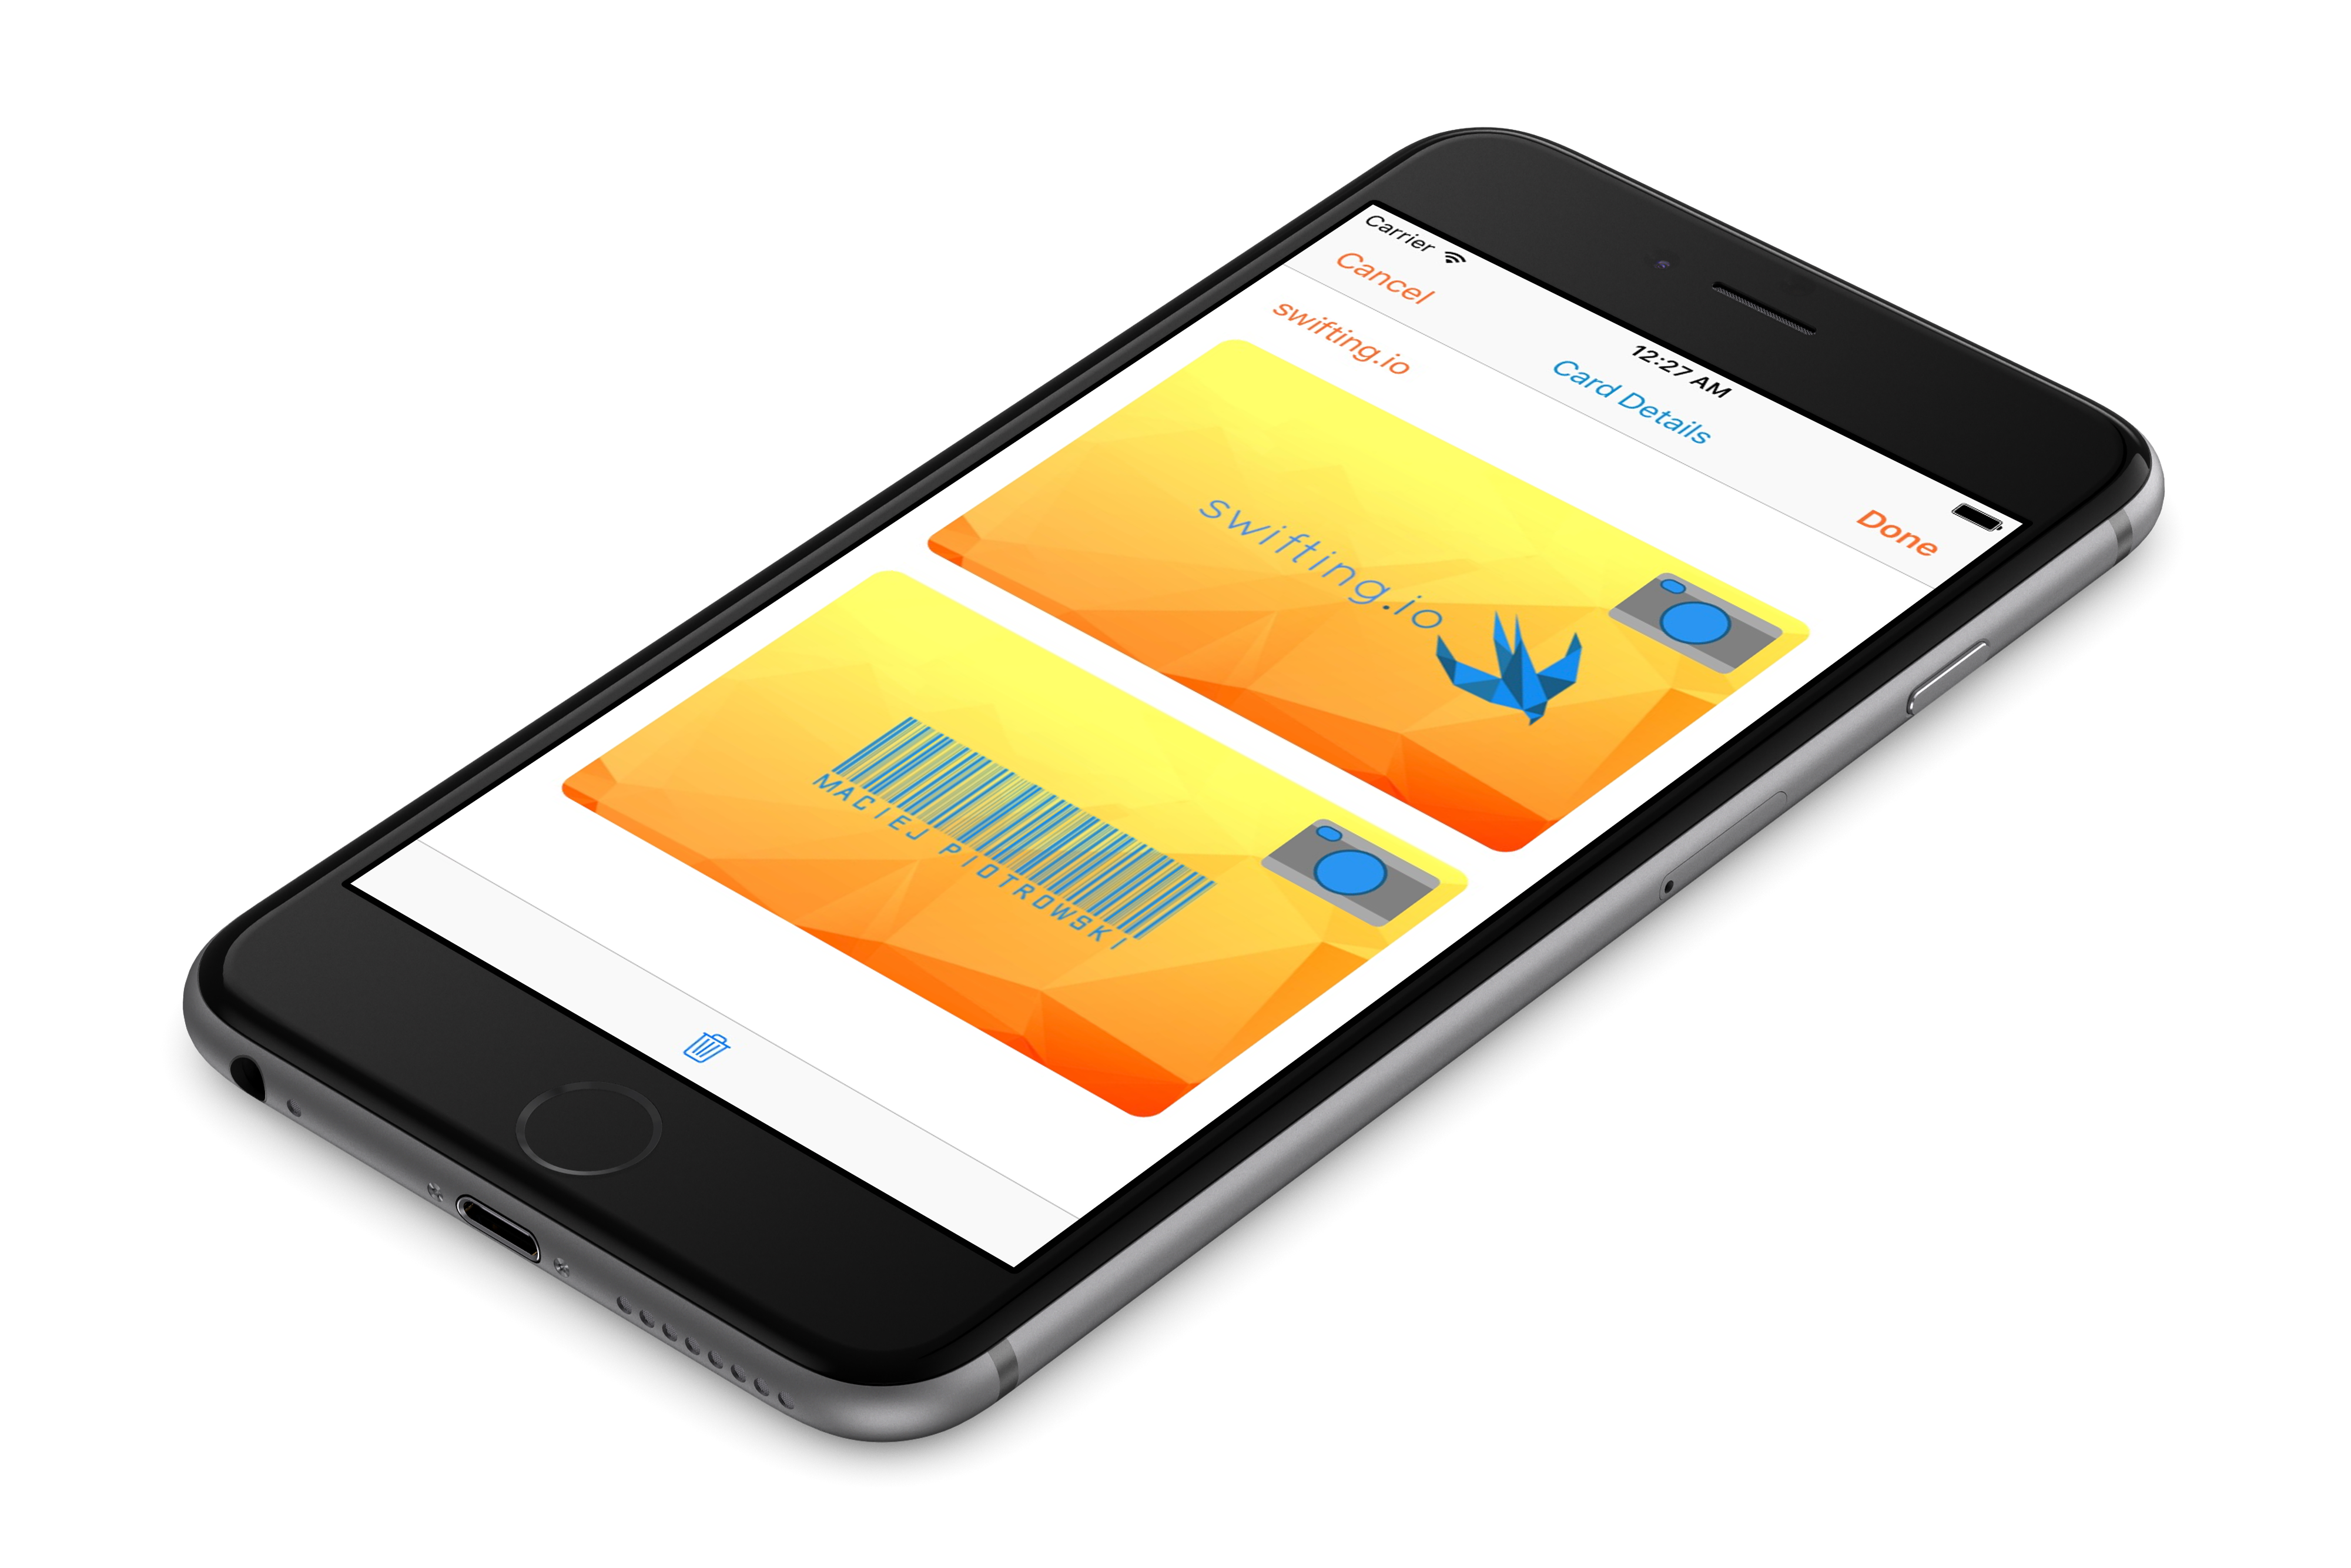
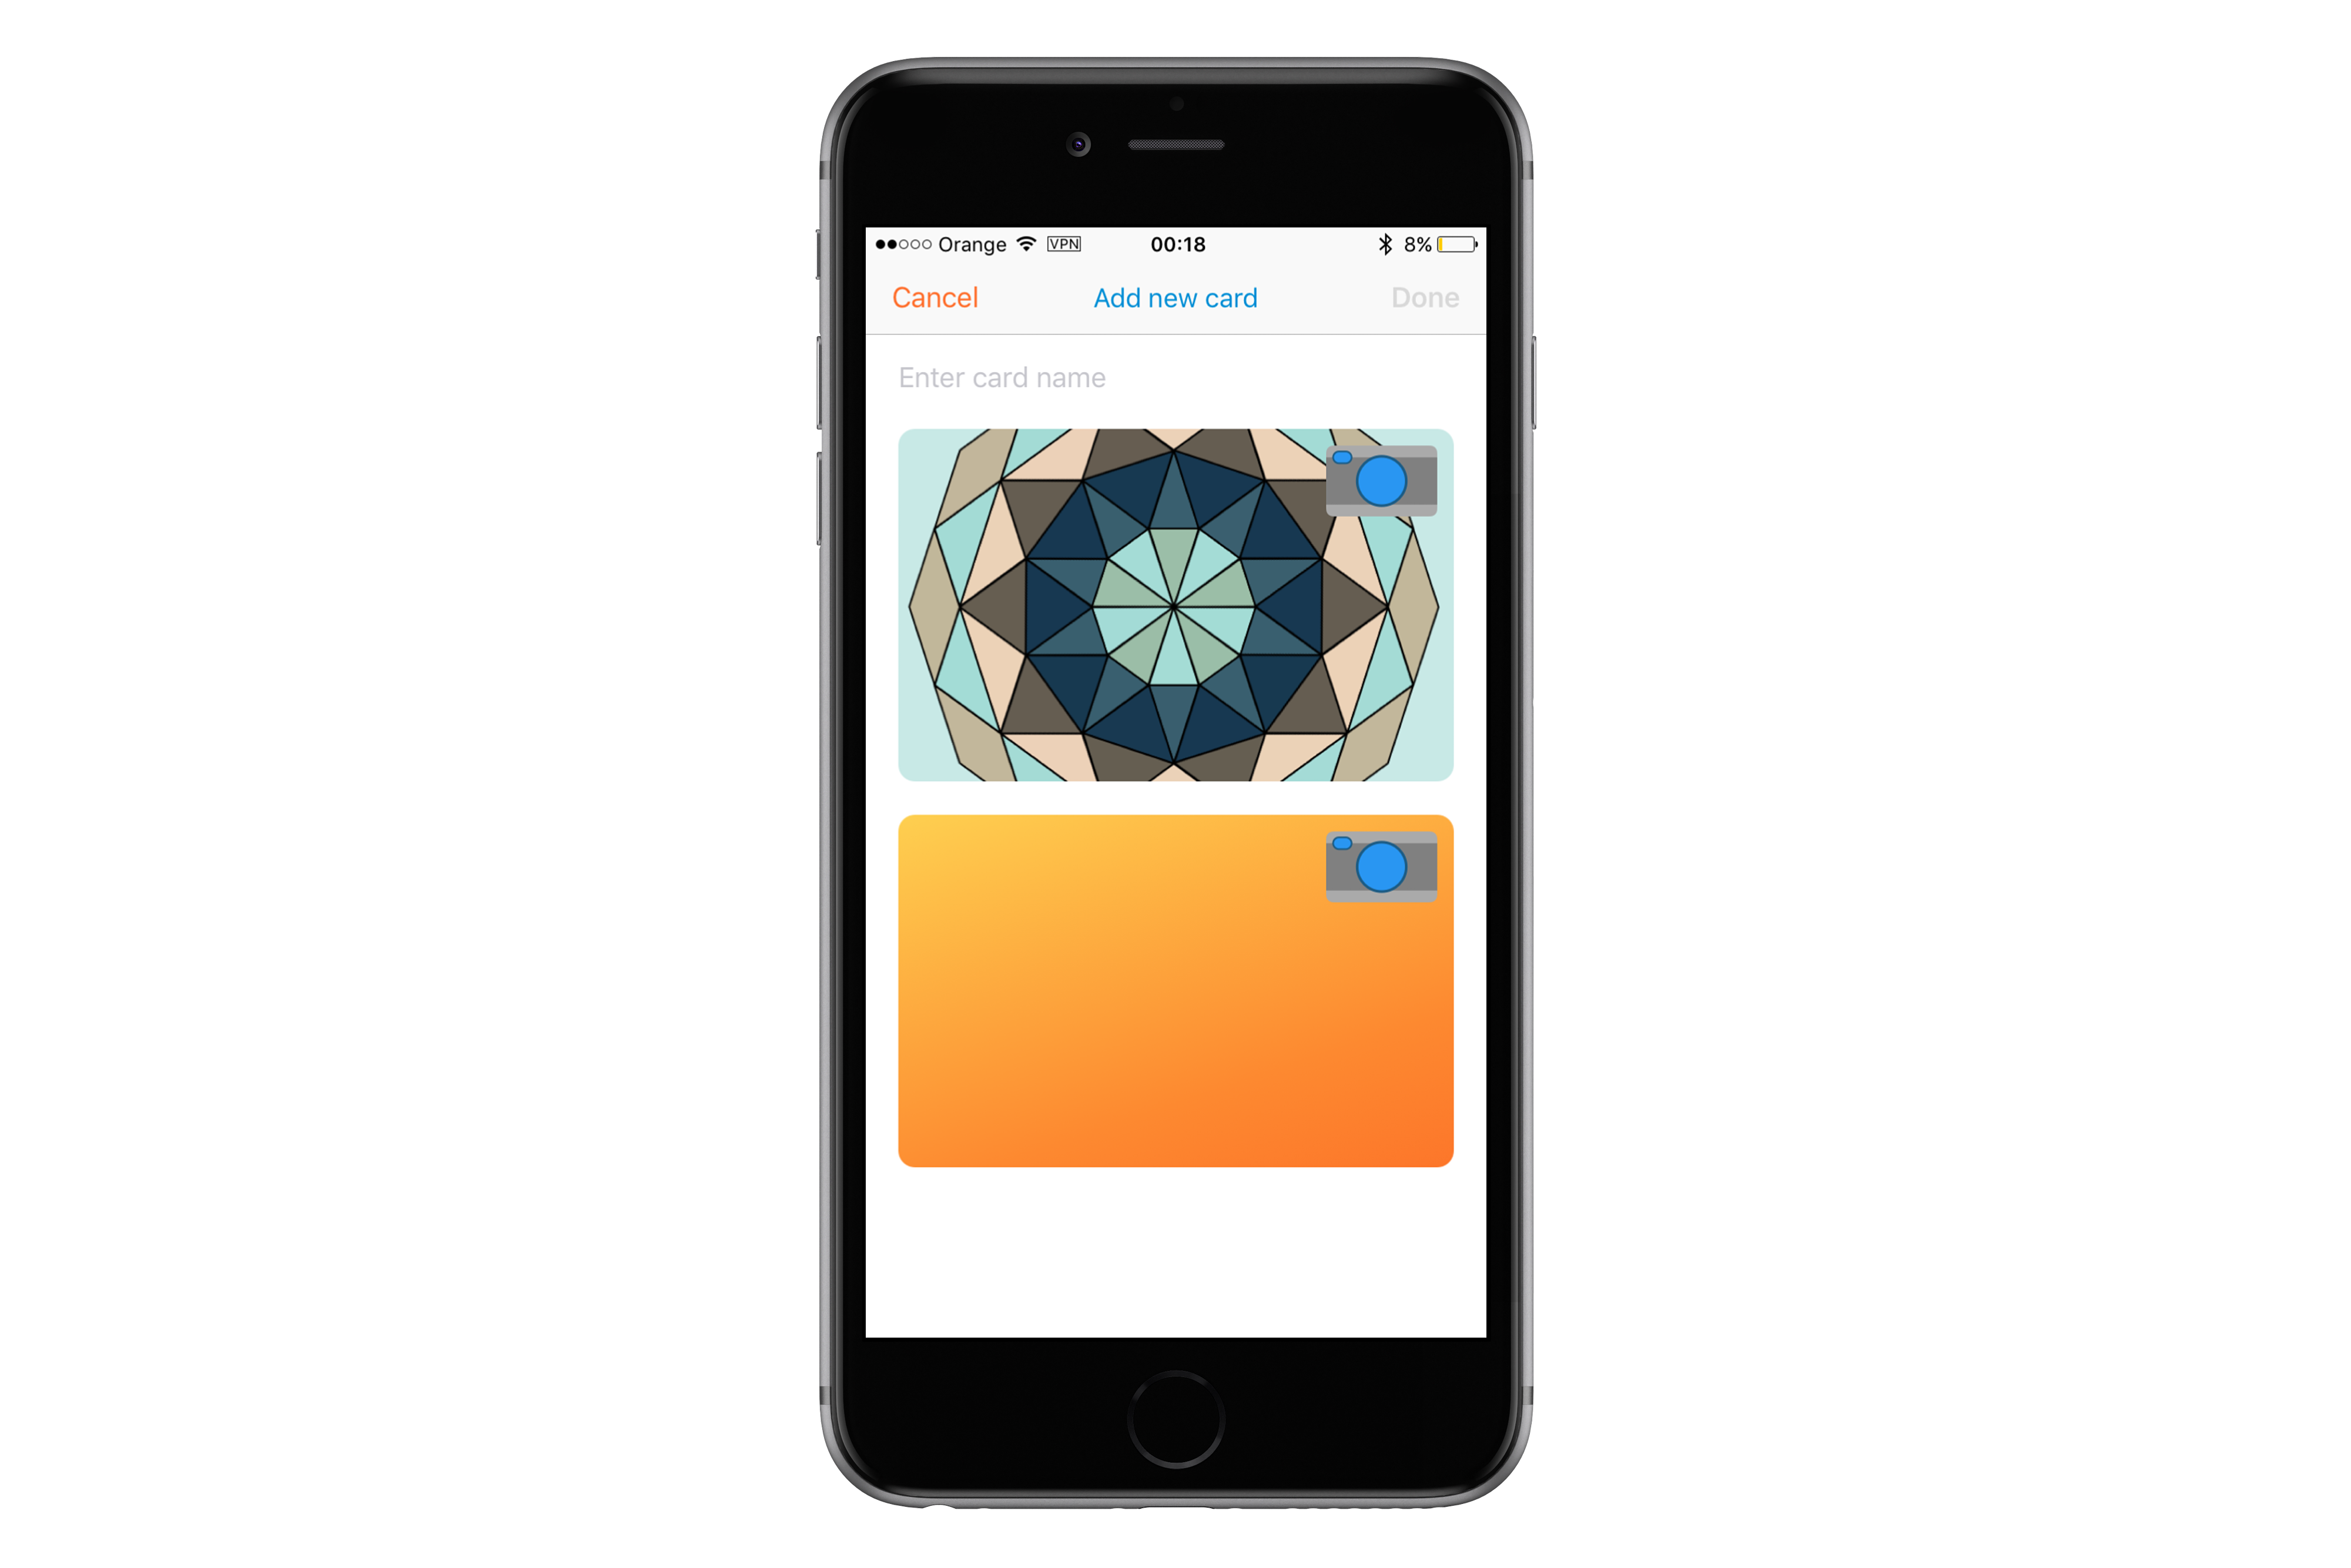
From the list of cards one can add a new one. New name and photos need to be selected.
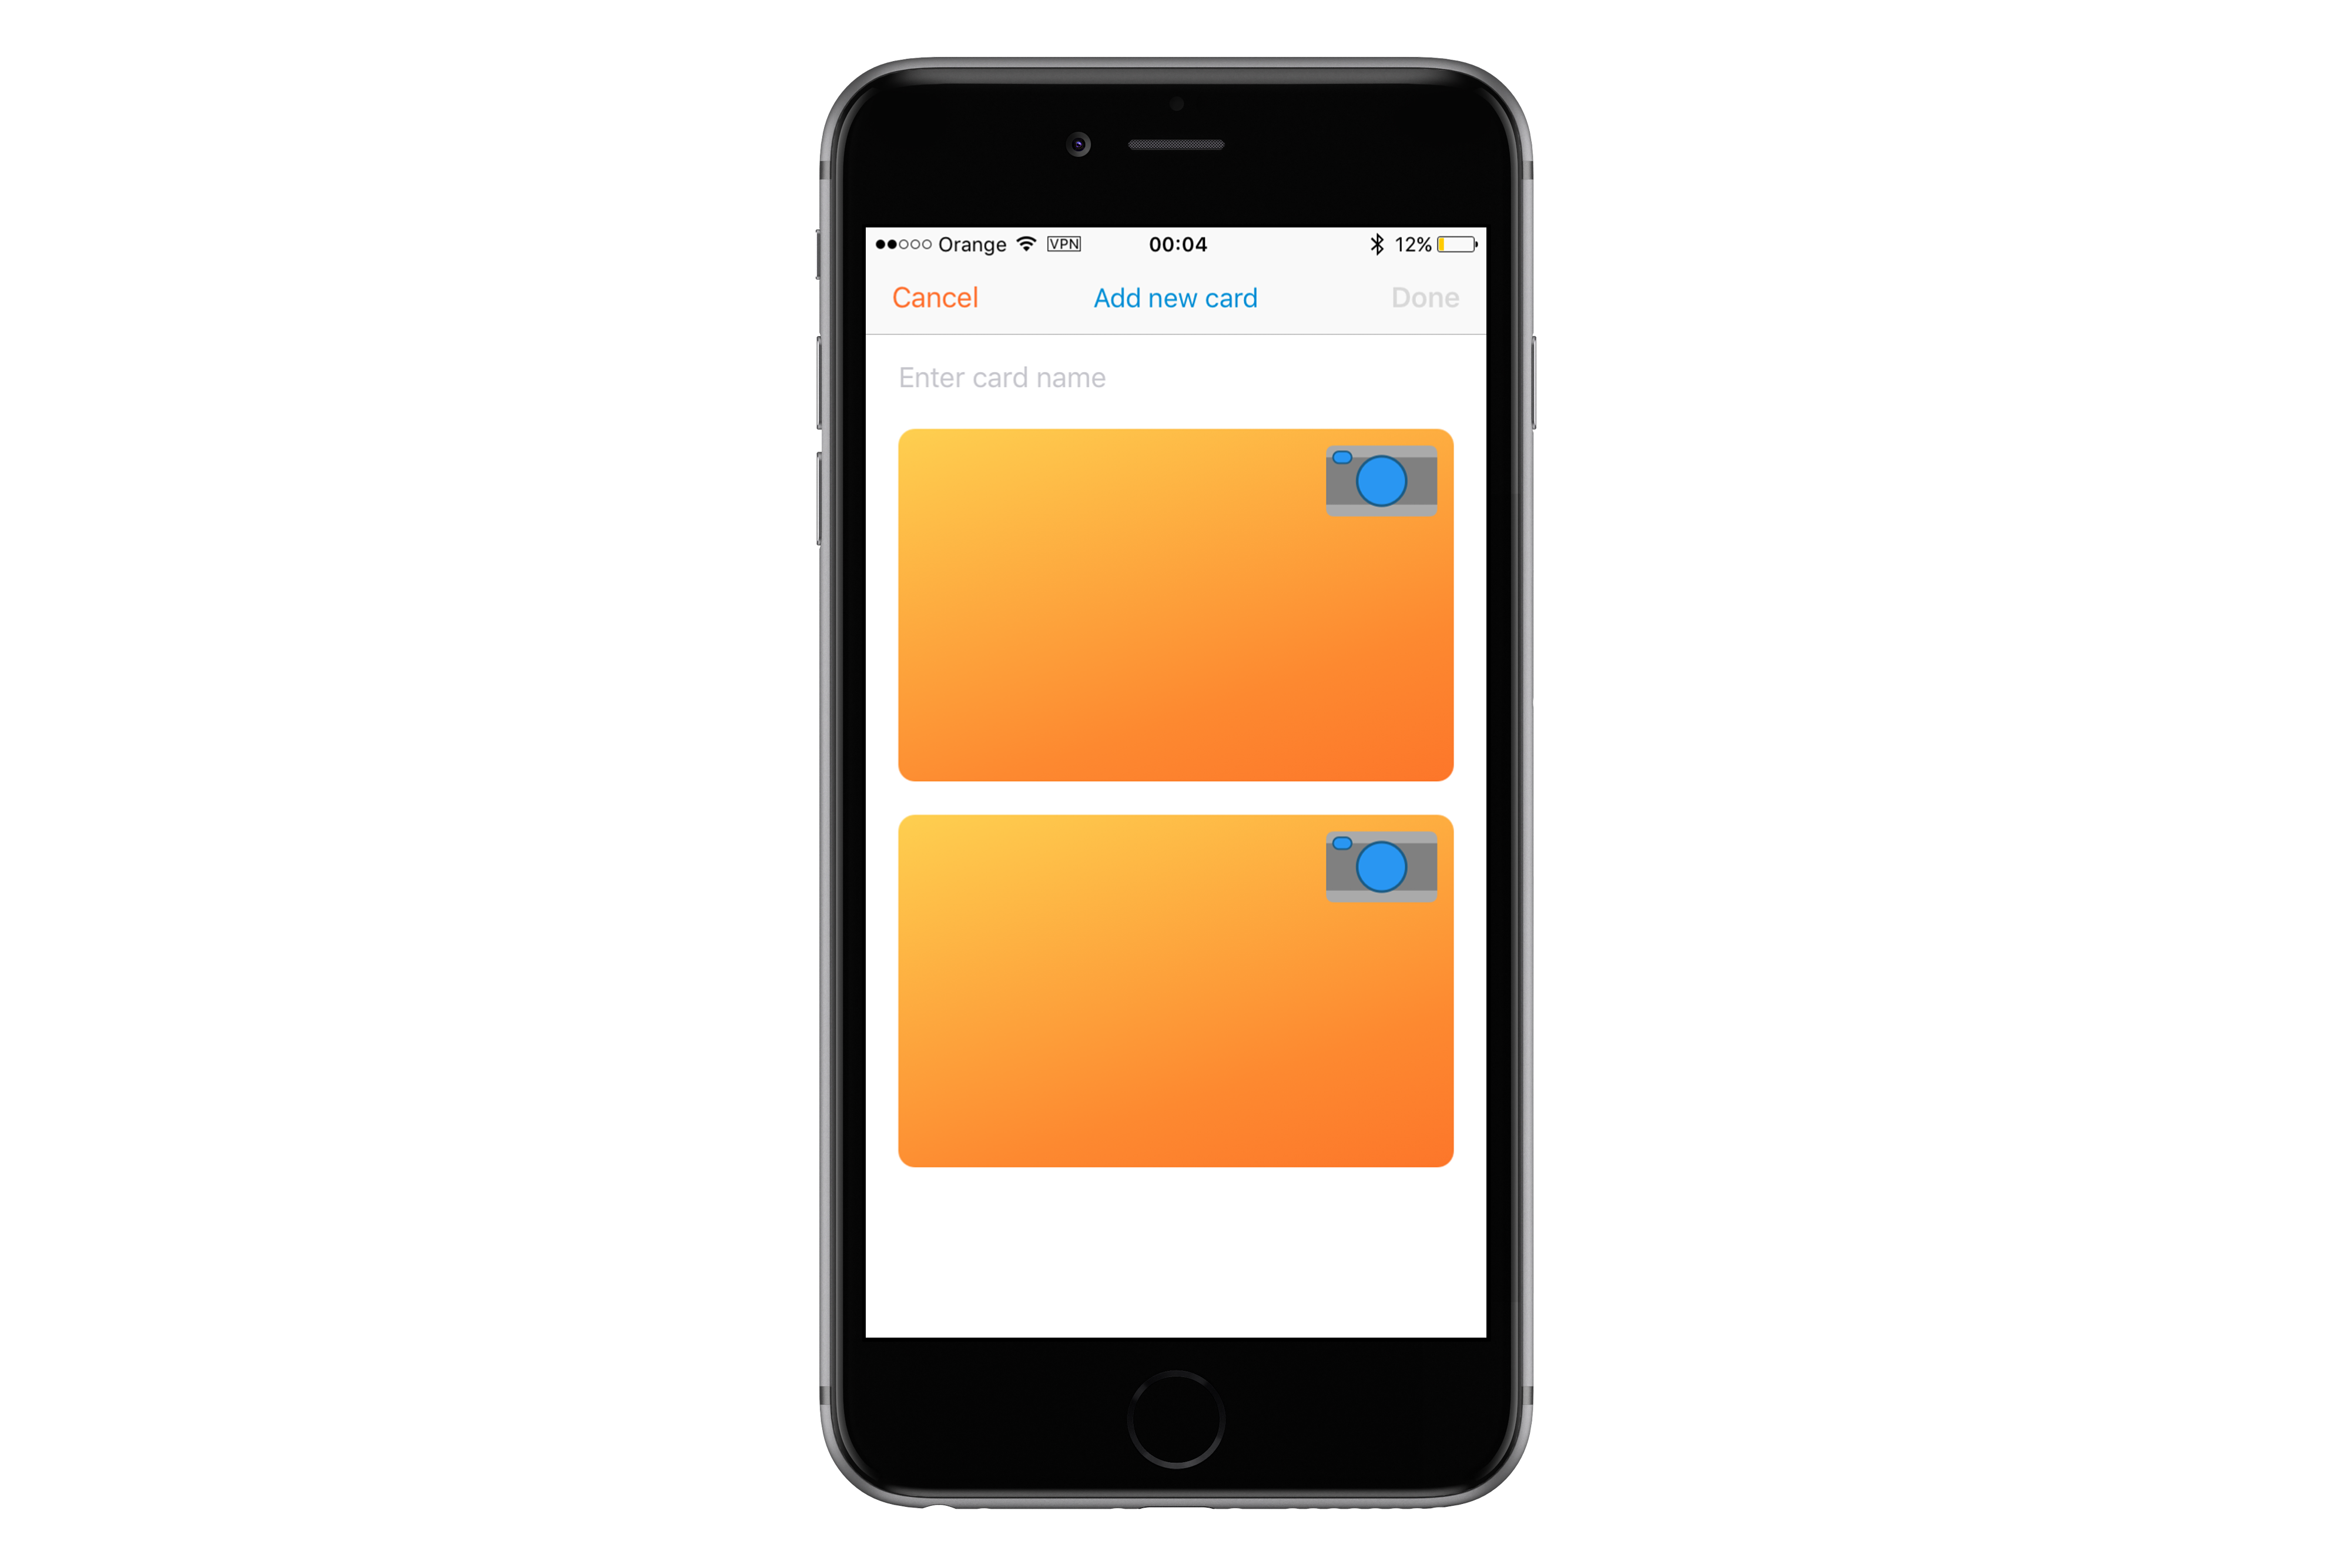
Application allows to take a picture of a card or to select a pic from a library with built-in image picker.
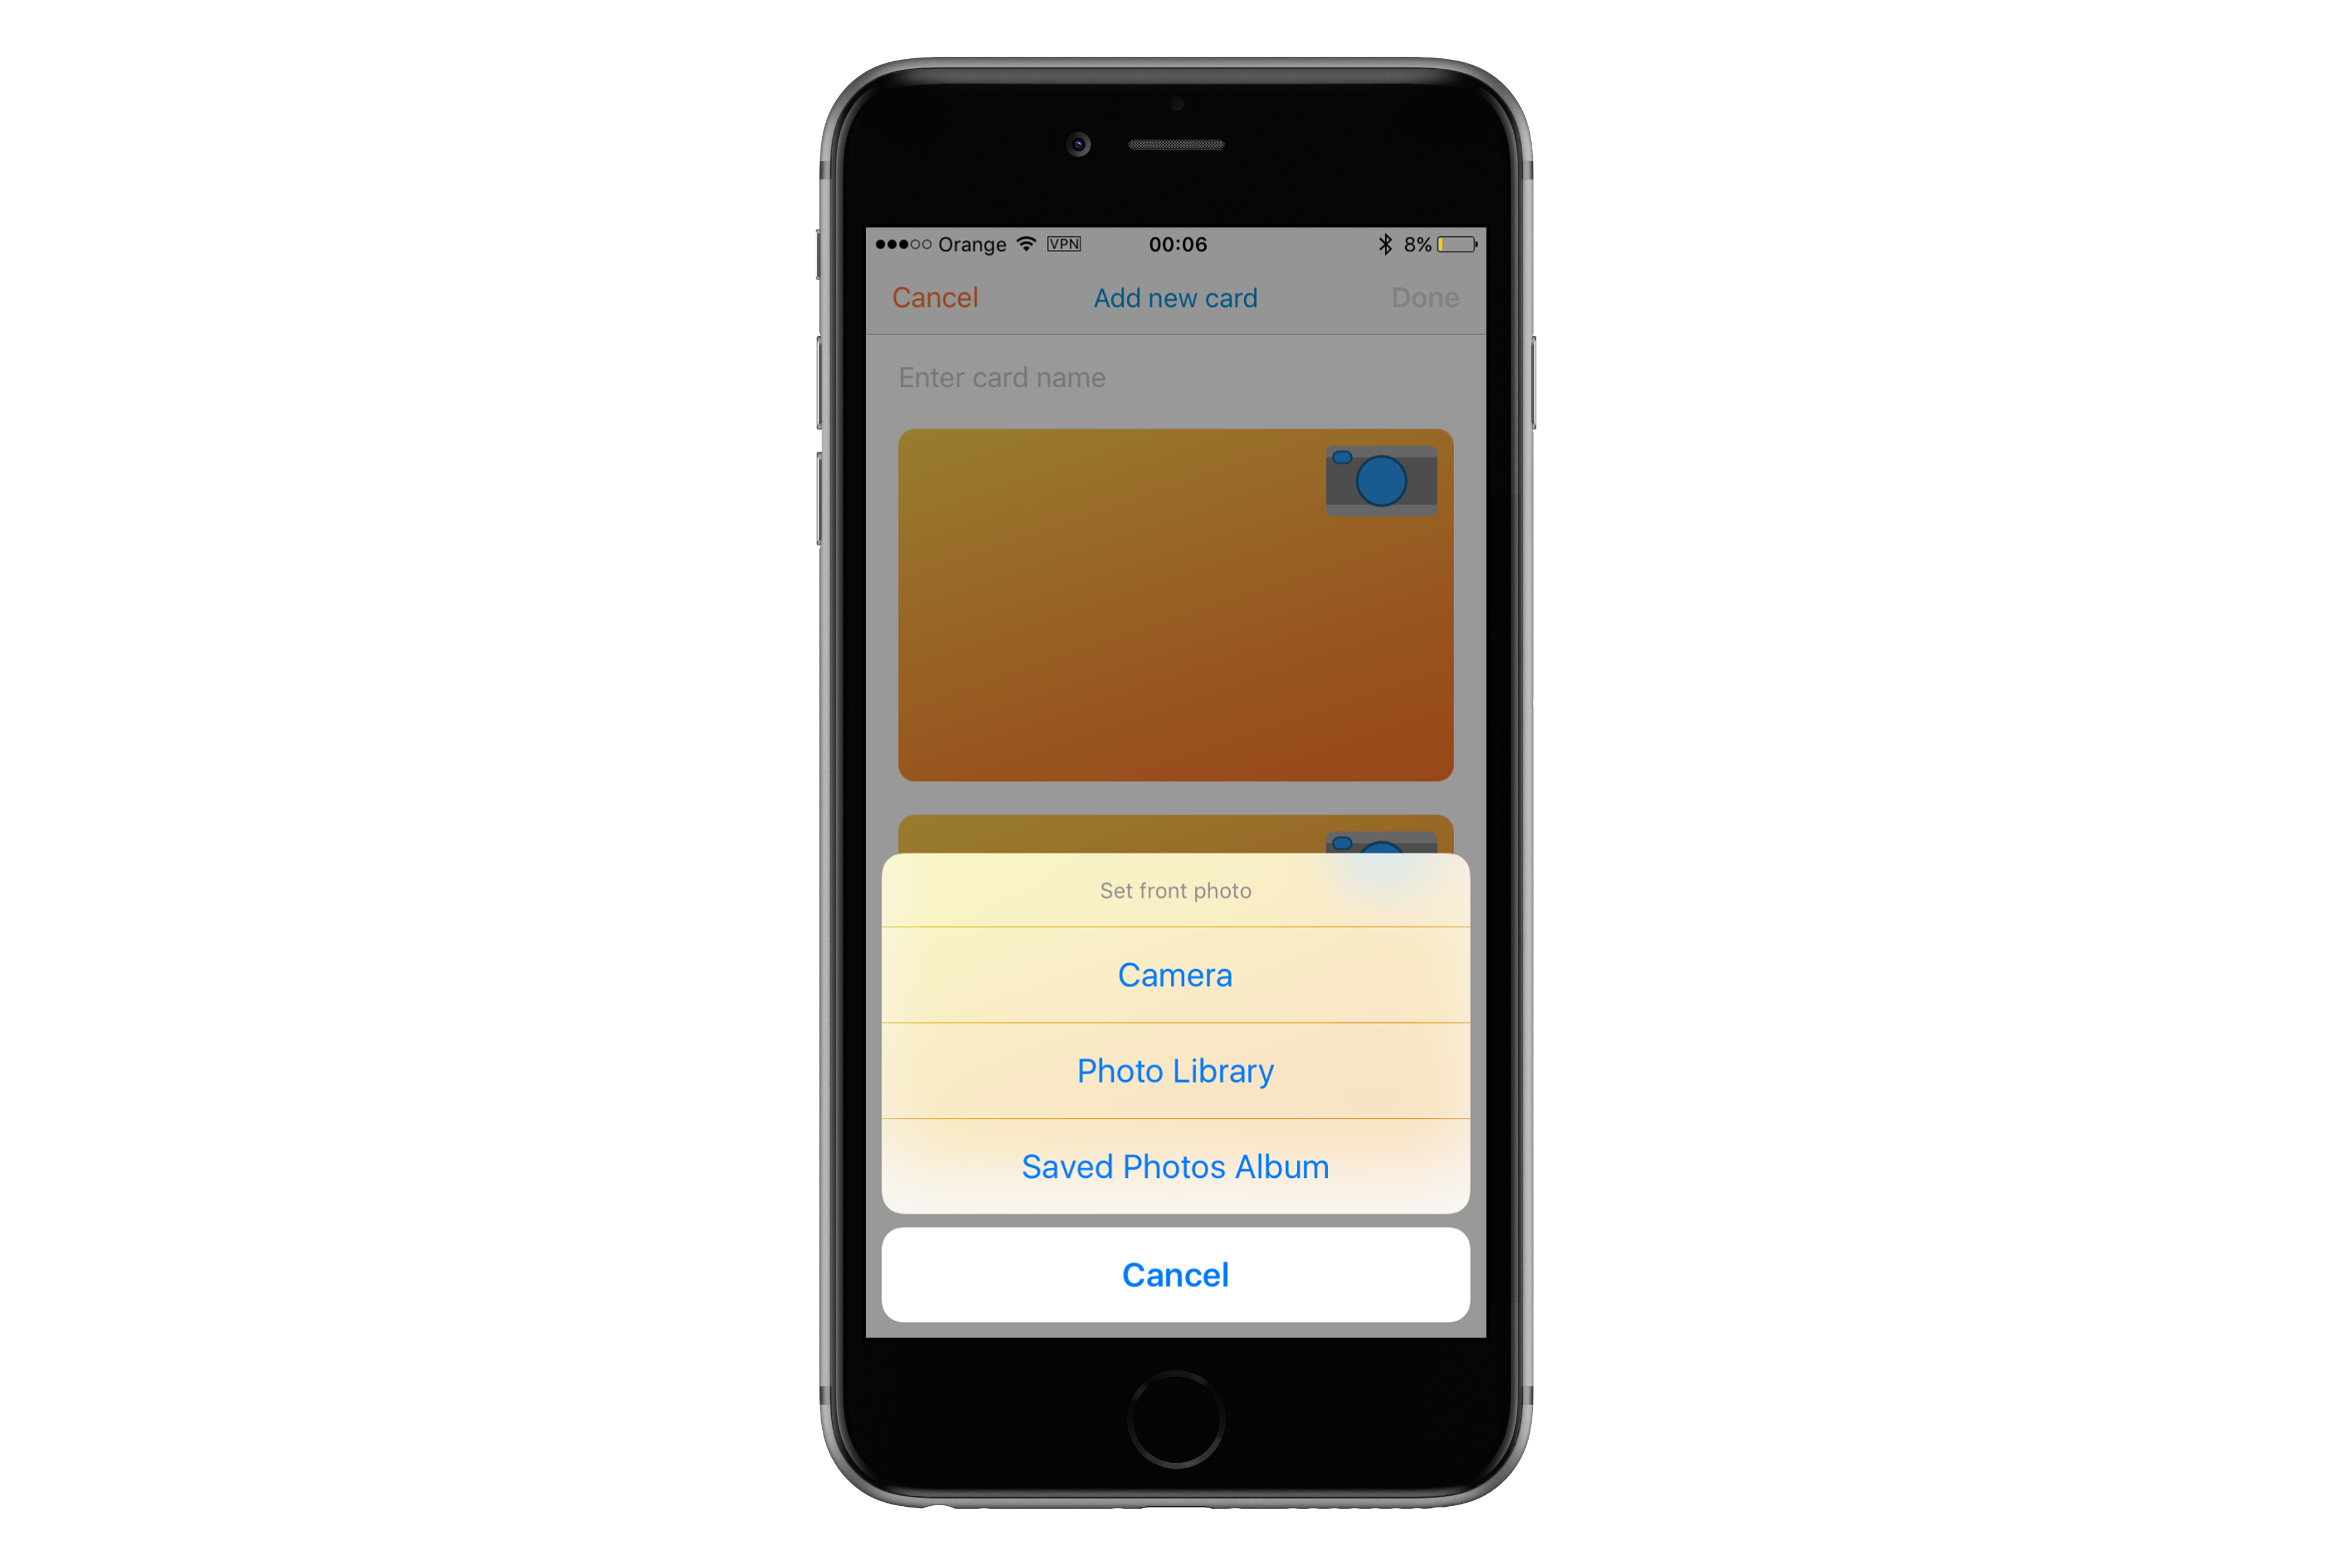
Photo camera shows card outline, so it is easier to take pics. Photos are taken by tapping on a camera button.

If one wants to select a pic from the library, the pic needs to be adjusted to fit card outline.


After filling in all details card can be saved. It is stored locally, but the app tries to send a card to the backend.
And actually that’s it! No more functionalities needed at the moment 😉
MVC
Model – View – Controller architecture is the most common architecture in Cocoa Touch world. The basic concept of it is that an object called Controller responds to events triggered by a View. It can update a Model upon an action, and update the View when the Model changes. A View Controller in Cocoa Touch, deals with animations, data persistence and network calls. Some of the logic can be extracted into separate objects, such as Core Data (Persistence) and Network services, so that an app architecture can look like this:
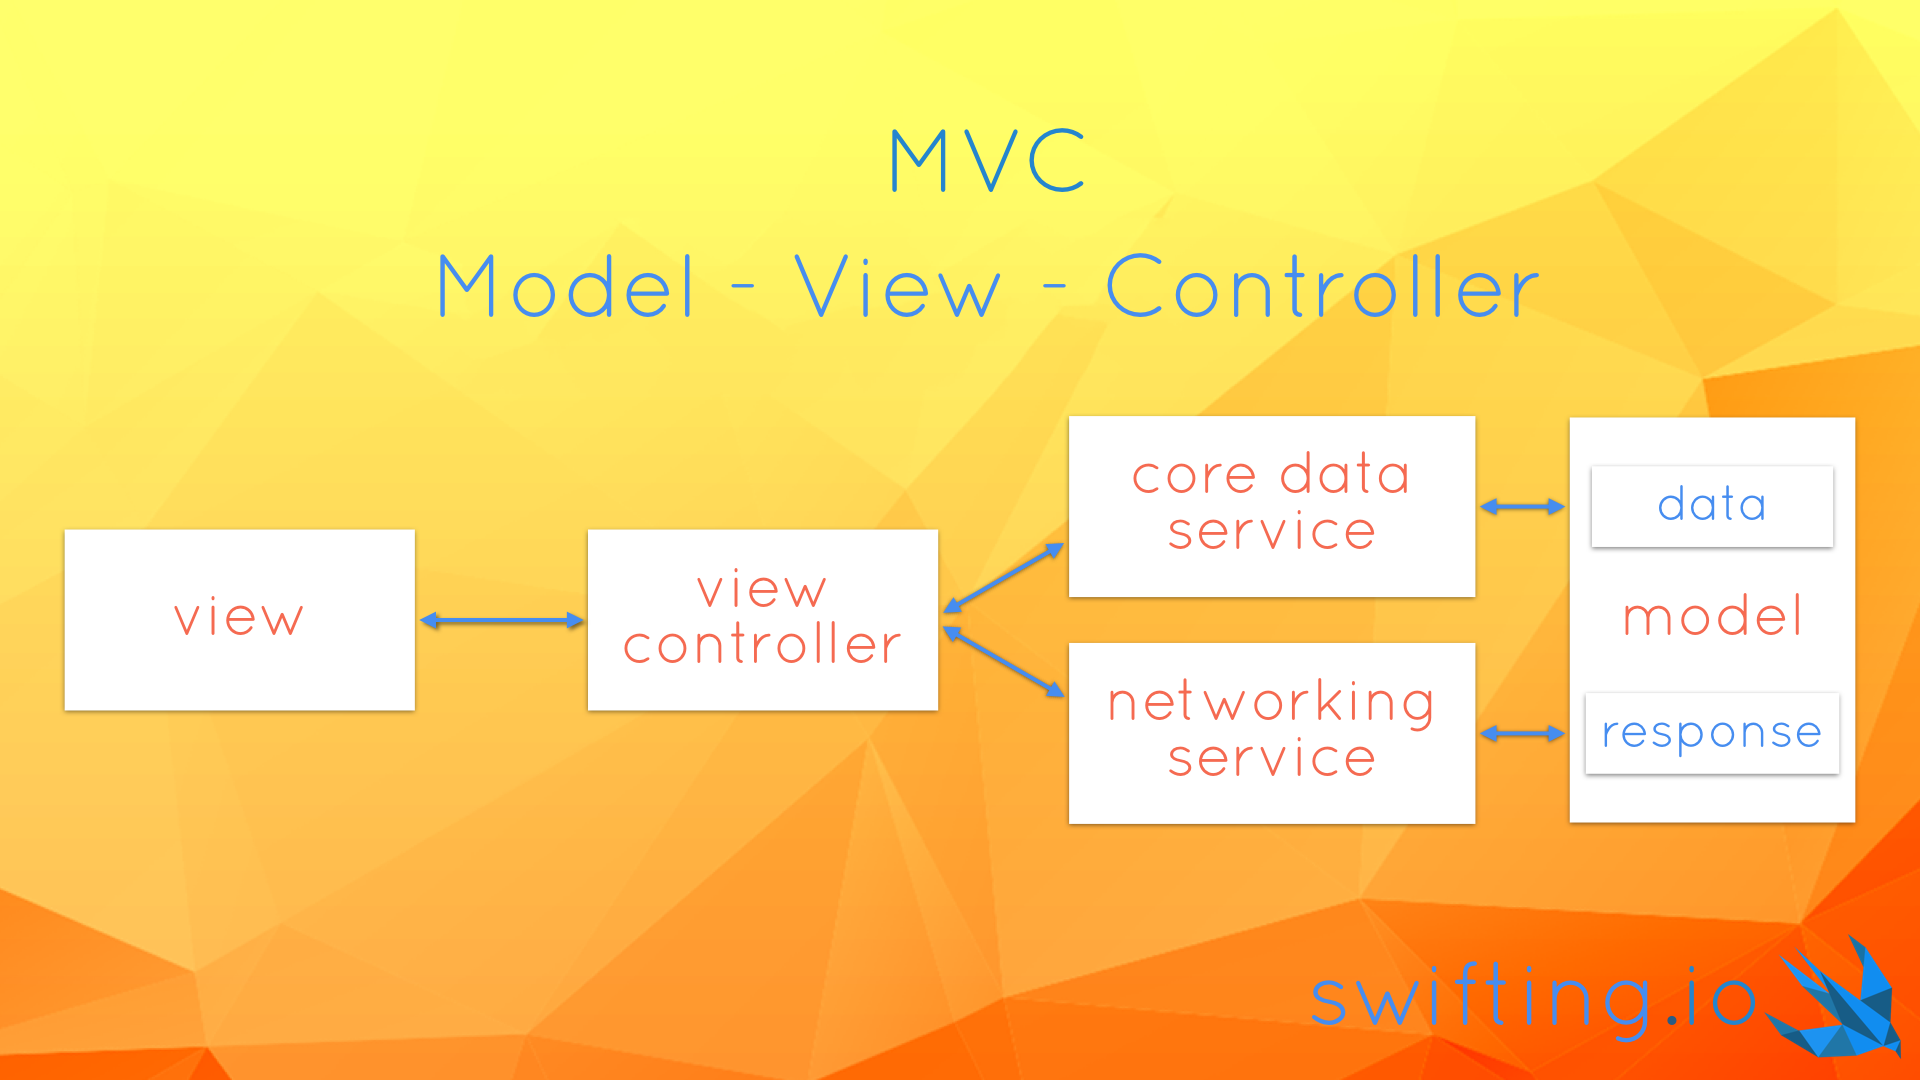
Let’s have a look on all components in the MyCards app!
View Controllers
Thanks to the following command that I had used in Terminal I was able to extract the number of lines in each file and the total is 2592.
find . "(" -name "*.swift" ")" -print0 | xargs -0 wc -l
Not so bad, after all we used our good friend codebeat and received an A grade. The project consists of a few view controllers:
CardsViewController– downloads data from the Internet, saves it to a persistent store and displays a list of cards from the persistent storeCardDetailsViewController– displays a card details and saves changes to the persistent store and to the Internet. It operates in normal (just display card), edit (modify data), or create (add a new card) modes.CardPhotoViewController– displays card photo in fullscreenPhotoCaptureViewController– takes a photoCropViewController– crops a photo to fit a card outlineImagePickerController– aUIImagePickerControllersubclass used to distinguish side of a card of which photo is being takenHiddenStatusBarViewController– a superclass for view controllers that require status bar to be hidden (i.e. all shown fullscreen for taking a photo, cropping an image or displaying a picture)
Models
A loyalty card in the application is represented by a Card struct.
struct Card {
    let identifier: String
    let name: String
    let front: UIImage?
    let back: UIImage?
}

extension Card {
    var isValid: Bool {
        guard
            let _ = front,
            let _ = back,
            !name.isEmpty,
            !identifier.isEmpty
            else { return false }
        return true
    }
}
The Card contains an identifier, which should be unique. It is useful for backend or persistent store saves. Card also contains a name and optional front and back images. The struct contains an isValid property that validates whether a card can be saved or not. E.g. it used by the CardDetailsViewController to check if data provided by a user is correct and if the controller should proceed with saving it.
A CardMO class is an NSManagedObject subclass that mirrors the Card in the Core Data. The difference between both is that Managed Object of the card stores front and back photos as binary data (NSData).
In the app the user can take or select a photo for the front or the back of a loyalty card. To distinguish for which side user chooses a photo a Card.Side enum is used.
enum Side {
    case front
    case back
}
When displaying details of a loyalty card with CardDetailsViewController one can also edit card information. The view controller knows whether it is in .edit or .normal mode because of a mode property of type CardDetailsViewController.Mode. The view controller is also used for creating a new loyalty card, hence .create mode exists.
enum Mode {
    case normal
    case edit
    case create
}
Views
Among standard UIKit components application UI uses some custom views:
-
TappableView– can be considered an animatable button, with custom subviews added to its content view. A button tap is forwarded to a delegate to act upon. -
CloseButton– is a subclass of theTappableView. Its content view displays anXsign.

-
PhotoCamera– is a view that shows a photo camera icon. Its view is drawn withUIBezierPaths
-
PreviewView– consists of aforementionedCloseButton,PhotoCameraand a card outline. It contains also anAVCaptureVideoPreviewLayerto show input from phone’s camera.

If we’re talking about views it’s worth mentioning a few patterns used in the app. First of all, we’re using a Builder protocol to set app all properties on views used in a view controller to display its data. It looks like this:
fileprivate lazy var collectionView: UICollectionView = UICollectionView(frame:
        .zero, collectionViewLayout: self.layout).with {
        $0.dataSource = self
        $0.delegate = self
        $0.backgroundColor = .clear
        $0.register(CardCell.self)
        $0.alpha = 0.0
    }
What it allows us to do is calling with(configure:) method in which we get the instance we can configure. We wanted to extract view configuration from viewDidLoad method to avoid having a massive method and a large ABC metrics in Codebeat. Properties using this pattern are marked as lazy properties. Thanks to that compiler doesn’t complain if we initialize UICollectionView with self.layout property  . Btw., if the way we register a cell for reuse seems strange to you, check out our issue #40.
We ❤️ auto layout. Due to that fact, we have a special helper that initializes a view with a .zero frame and sets translatesAutoresizingMaskIntoConstraints to false. You just need to call constrained() method on a UIView subclass in order to tap into it. Unfortunately it won’t work with classes such as UICollectionView or UITableView due to their designated initializers, but you can use the Builder protocol to do it by yourself.
Constraints for a view or for view controller’s views are created in configureConstraints() method. We use anchors API to create NSLayoutConstraint relations between views and we activate them in bulk using a class method.
func configureConstraints() {
    var constraints: [NSLayoutConstraint] = []
    //...
    constraints.append(closeButton.heightAnchor.constraint(equalToConstant: 40))
    constraints.append(closeButton.widthAnchor.constraint(equalToConstant: 40))

    //...
    NSLayoutConstraint.activate(constraints)
}
Services
Additionally, a view controller can be supported by some services:
CoreDataWorkerNetworkLoader
CoreDataWorker
CoreDataWorker is a pattern presented in issue #28 Better CoreData with Swift Generics, which is used for fetching data from and saving data to a persistent store.
NetworkLoader
NetworkLoader – is a class conforming to a set of protocols that enable downloading and uploading data from and to a backend. It is underlaid by an NSURLSession instance.
A NetworkLoader is initialized with an URL to a backend. A shared instance is created in a separate file in an extension, in order to be easily replaced with a new URL.
extension NetworkLoader {
    static let shared: NetworkLoader = NetworkLoader(URL(string: "http://localhost:8000")!)
}
A SimpleHTTPServer in Python is used as a backend for the application. After downloading our project just run this command from ./MyCards/MyCards/ directory:
python -m SimpleHTTPServer 8000
The directory contains the cards.json file which consists of a card data. The data can be converted into model layer by using a Parser.
The NetworkLoader class conforms to a set of protocols that describe interfaces for downloading and uploading data. The ParsedDataDownloading protocol and its download(from: parser:callback:) method uses a Parser to transform a downloaded JSON file into a struct that corresponds to data from the file. The JSONConvertibleDataUploading protocol also uses a JSONDataConverting parser that is able to translate a model type into a valid JSON to be sent to a backend. Both methods expect a service endpoint to be passed as an argument. The endpoint is used to create a URL along with a URL passed to initialize the NetworkLoader.
protocol ParsedDataDownloading {
    func download(from endpoint: String, parser: Parser, callback: @escaping (Any?) -> Void)
}

protocol JSONConvertibleDataUploading {
    func upload(object: Any, to endpoint: String, parser: JSONDataConverting, callback: @escaping (Any?) -> Void)
}
In our project the CardParser class conforms to the Parser protocol and is able to convert the cards.json content into an array of Card instances. It also conforms to the JSONDataConverting protocol to convert an array of Cards back to a JSON.
Taking a photo with AVFoundation
The most unusual part of this application is taking a photo. On iOS you are allowed to use a built in UIImagePickerController to select a picture from the Photo Library, the Saved Photos Album or to capture a photo. Using the UIImagePickerController didn’t let us build a seamless user experience so we decided to built our own PhotoCaptureViewController that uses AVFoundation components. Let’s have a look how to display an input from camera in a view and how to take a picture.
First of all, when view loads, we have to check whether our application is allowed to take pictures/videos. We can do that by calling a method on the AVCaptureDevice class:
AVCaptureDevice.authorizationStatus(forMediaType: AVMediaTypeVideo)
If the method returns .notDetermined value we can request an access with another class method:
AVCaptureDevice.requestAccess(forMediaType: AVMediaTypeVideo) {
    granted in
    // completion
    guard granted else { return }
}
The main object that allows communication with a photo camera is of AVCaptureSession type. In order not to have any delays on the main thread we can use a DispatchQueue to perform tasks related to a session.
fileprivate let session = AVCaptureSession()
fileprivate let queue = DispatchQueue(label: "AV Session Queue", attributes: [], target: nil)
When all views are loaded we can configure a session using the queue. First of all the configuration process consists of checking the authorization status and getting an object representing a back camera (extension on AVCaptureDevice used in the code below). When both conditions are satisfied, we can beginConfiguration() of the session . We can set a quality for the picture by using the sessionPreset property of the session. The AVCaptureSessionPresetPhoto means that we use capture settings suitable for high resolution photo quality output. Then we can try to create an AVCaptureDeviceInput with the back camera and then to add it as an input to the session. We can also add an AVCapturePhotoOutput to the session. Our output is a property on the PhotoCaptureViewController. The output captures in high resolution and does not enable Live Photo.
fileprivate func configureSession() {
    queue.async {
        guard .authorized == authorizationStatus else { return }
        guard let camera: AVCaptureDevice = AVCaptureDevice.backVideoCamera else { return }
        defer { session.commitConfiguration() }

        session.beginConfiguration()
    session.sessionPreset = AVCaptureSessionPresetPhoto

        do {
            let input = try AVCaptureDeviceInput(device: camera)
            guard session.canAddInput(input) else { return }
            session.addInput(input)
        } catch { return }

        guard session.canAddOutput(output) else { return }
        session.addOutput(output)
    }
}
We want to start our session when the view controller’s view appears and stop it when the view disappears. This can be done by calling the startRunning() and stopRunning() methods on the session.
fileprivate func startSession() {
    queue.async {
        guard self.authorizationStatus == .authorized else { return }
        guard !self.session.isRunning else { return }
    self.session.startRunning()
    }
}

fileprivate func stopSession() {
    queue.async {
        guard self.authorizationStatus == .authorized else { return }
        guard self.session.isRunning else { return }
        self.session.stopRunning()
    }
}
Once we know how to setup and start/stop a session, let’s have a look on how to take a photo  . In our view controller the
 takePhoto() method is used for that purpose. Once again job is executed on the queue created for session-related tasks. Taking a photo is done by calling the capturePhoto(with:, delegate:) method on the output. The first argument of the method is an object representing settings for the photo. In our case those are set to auto-flash mode and high-res picture.
fileprivate func takePhoto() {
    queue.async { [unowned self] in
        let photoSettings = AVCapturePhotoSettings()
        photoSettings.flashMode = .auto
        photoSettings.isHighResolutionPhotoEnabled = true
        self.output.capturePhoto(with: photoSettings, delegate: self)
    }
}
When a photo is taken a AVCapturePhotoCaptureDelegate‘s method gets called. It has a long name you can lookup below, I won’t dare repeating it in the text . From a photoSampleBuffer that is provided as an argument we try to create a JPEG photo. Things wouldn’t be interesting if we didn’t have to play with the photo. Our interface displays a card outline that a user can use to center a card in this rounded rectangle. We have to process and crop the photo based on that. This is what the process(_:) method actually does. If we are successful with processing the photo, the method returns a UIImage we can further use in our app.
func capture(_ captureOutput: AVCapturePhotoOutput,
                         didFinishProcessingPhotoSampleBuffer photoSampleBuffer: CMSampleBuffer?,
                         previewPhotoSampleBuffer: CMSampleBuffer?,
                         resolvedSettings: AVCaptureResolvedPhotoSettings,
                         bracketSettings: AVCaptureBracketedStillImageSettings?,
                         error: NSError?) {

    guard let sample = photoSampleBuffer,
              let data = AVCapturePhotoOutput.jpegPhotoDataRepresentation(
                  forJPEGSampleBuffer: sample,
                  previewPhotoSampleBuffer: previewPhotoSampleBuffer),
        let photo = process(data)
    else { print("Error capturing photo: \(error)"); return }
    //Do something with the photo
}
And actually that’s all it takes to take a basic photo with AVFoundation!
Summary
We hope you are enjoying our app. We strongly encourage you to dive into the whole project and point out improvements for our implementation. As mentioned at the beginning, we wanted to build a non-trivial application that will be the foundation for porting the source code from a standard MVC architecture to MVVM, VIPER and VIP architectures. In the last section you can find links to articles describing some patterns we used in the project. Stay tuned, architecture wars are not over!
May the force be with you!
Links
]]>Have you ever had a feeling, as I have had many times, that the design of your app seemed so brilliant at first, but suddenly adding more and more features to it made your source code more complicated and eventually, unmaintainable. Presumably you hadn’t written unit tests because there hadn’t been time for that. You wish you hadn’t chosen standard MVC approach, but MVVM or VIPER instead, that you had heard so many times about. After all they’re so brilliant, so shiny and bright and give A New Hope to all developers. They’re so cool and they’re so many other things… Or are they?
What is this all about?
For a few years of my professional career I have been creating apps in different architectures (MVC, MVVM, VIP) and have been searching for the best one. Recently at work, I have been having a roaring discussion about architecture used in the current project. My team and I had decided to try out VIP (a.k.a Clean-Swift) architecture and after two months of development we have argued about its pros and cons.
This blog post is an initial comparison of all architectures that the swifting.io team has used in the past in their applications. In this issue, I will explain basic concepts of MVC (does it even need to be explained ?), MVVM, VIPER and VIP (a.k.a. Clean-Swift) and point out their advantages and drawbacks.
I hope you will find these thoughts useful and helpful, wether you’re about to fight your own battles in Architecture Wars at your workplace or you just want to select right solution for your own app  !
!

MVC
Probably many developers started their adventure with iOS applications with the CS193P Stanford course on iTunes U, as I did. In the course, one can get to know basic Cocoa Touch concepts, as long as the Model – View – Controller architecture hailed by Apple.
The basic concept of it is that an object called Controller responds to events triggered by a View. It can update a Model upon an action, and update the View when the Model changes. In the worst-case scenario, the Controller, or rather the View Controller in Cocoa Touch, deals with animations, data persistence and network calls, growing into a so called Massive View Controller. If we extracted some of the logic into separate objects, such as Core Data (Persistence) and Network services, the architecture would look as follows:
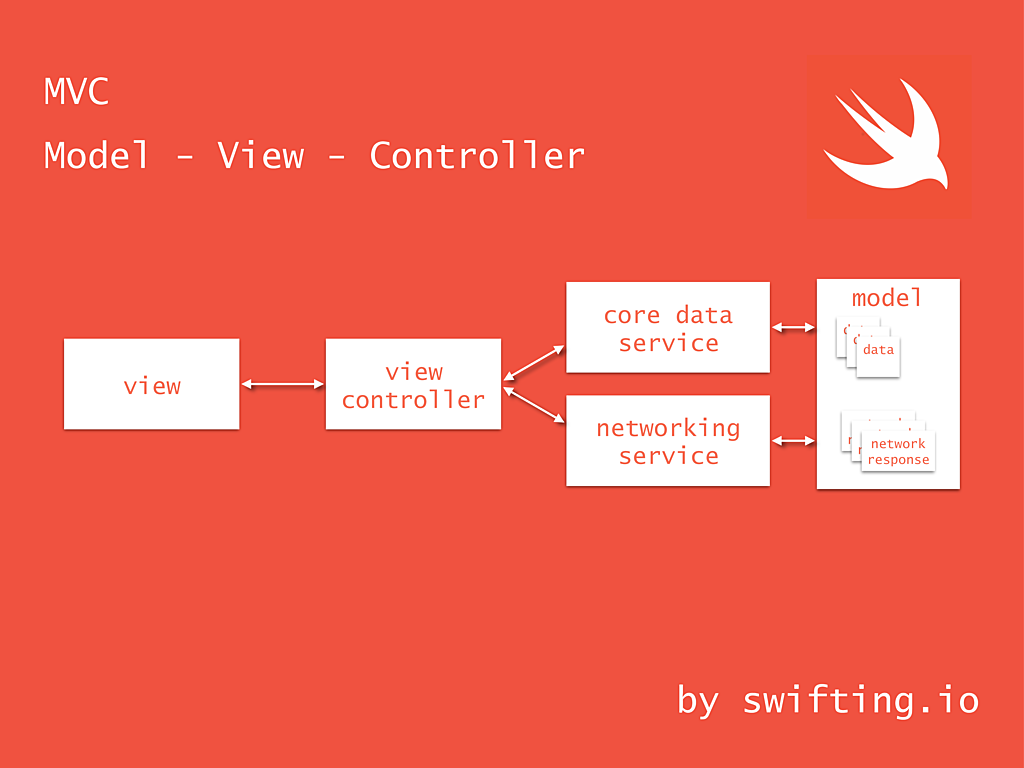
The MVC architecture is used all the time by Apple and the majority of developers follow the lead. When for Apple it’s the easiest way to explain their API concepts, for developers it’s the fastest way to develop an application. I think that Apple knows that Massive View Controllers are a problem, so to improve testability of MVC components Apple mentioned dependency injection as a good practice on WWDC 2016’s Improving Existing Apps with Modern Best Practices session. I interpret this as if they said "Hey, it’s not good to put all of the code to a View Controller, inject some dependency objects that do certain things and test interactions with them" .
MVVM
MVC is not the only valid app architecture. There are also other, and amongst them there is a Model – View – View Model. It assumes existence of a View Model, which is an additional layer that a View Controller communicates with. It contains business logic and to tackle with it, it can contain other objects, such as e.g. Network and Core Data services. It exposes a Model as formatted data in its properties, so that the View Controller can bind the data to a View. Usually the View Controller observes changes in those properties and updates its View on a property change.
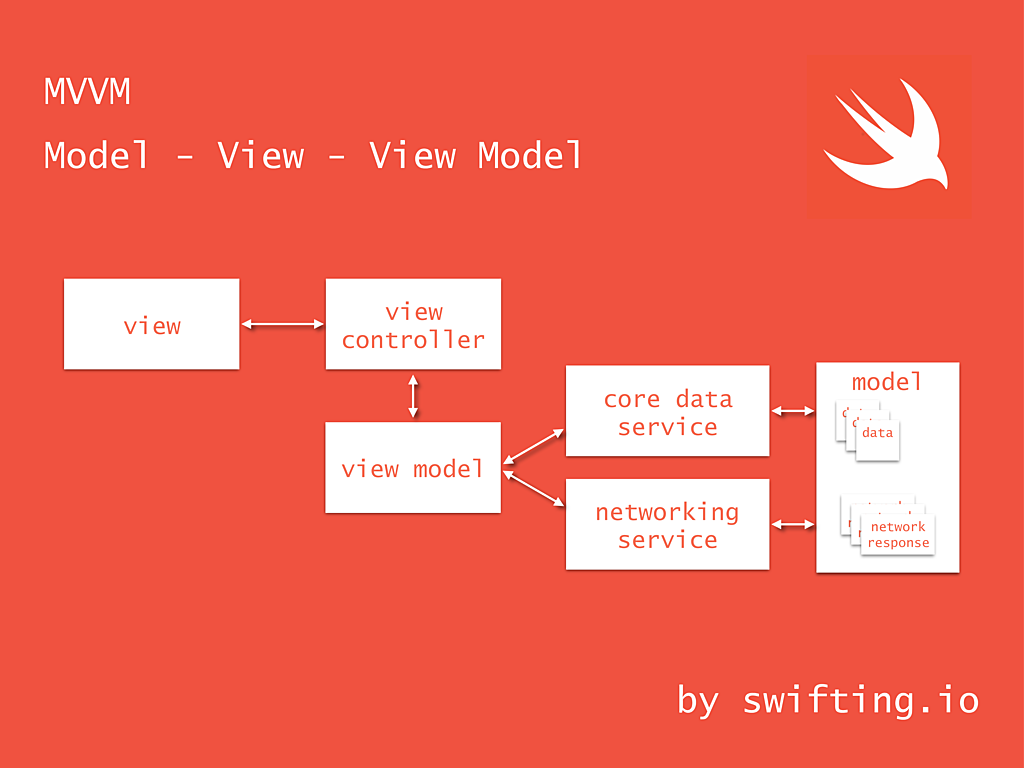
As every approach to application design, MVVM has its drawbacks. In our project, proverbial 1000 lines of View Controller became 1000 lines of View Model. Of course, View Controller got rid of other responsibilities than responding to View events and animations, but enormously huge business logic made our View Model to swell a lot.
With MVVM you can also use some reactive extensions, that allow to observe changes in View Model’s properties and act upon those changes. You can either bind a View Model’s property to a View directly or put a block of code that executes when property value changes and bind its output to a View. I have used Swift Bond for that, which contains extensions for UIKit objects that simplify binding View Model properties to views. It is no longer maintained, but you can tap into ReactiveKit, which is a successor of Swift Bond.
There is also a more known framework called RxSwift, which is a part of ReactiveX family. It contains RxCocoa, which are reactive extensions for Cocoa and CocoaTouch. What’s great about RxSwift is that if you have created an Rx app in the past in other language, the rules, operators, functions and keywords in RxSwift are the same. You can check RxMarbles website to get familiar with Rx operators and functions.
VIPER
We’ve already written the whole issue about View – Interactor – Presenter – Entity – Router. It is another way of setting up your app’s architecture. VIPER divides View Controller’s responsibility in standard MVC to different objects. A View Controller sets data from its Presenter to a View. Presenter formats data from Interactor and asks Router to perform navigation to a different module. Interactor contains business logic on data manipulation, performs network requests and saves Entities (model) to a persistent store via proxy objects. View, Interactor, Presenter, Entity and Router components of a View Controller, along with it, are called a module.
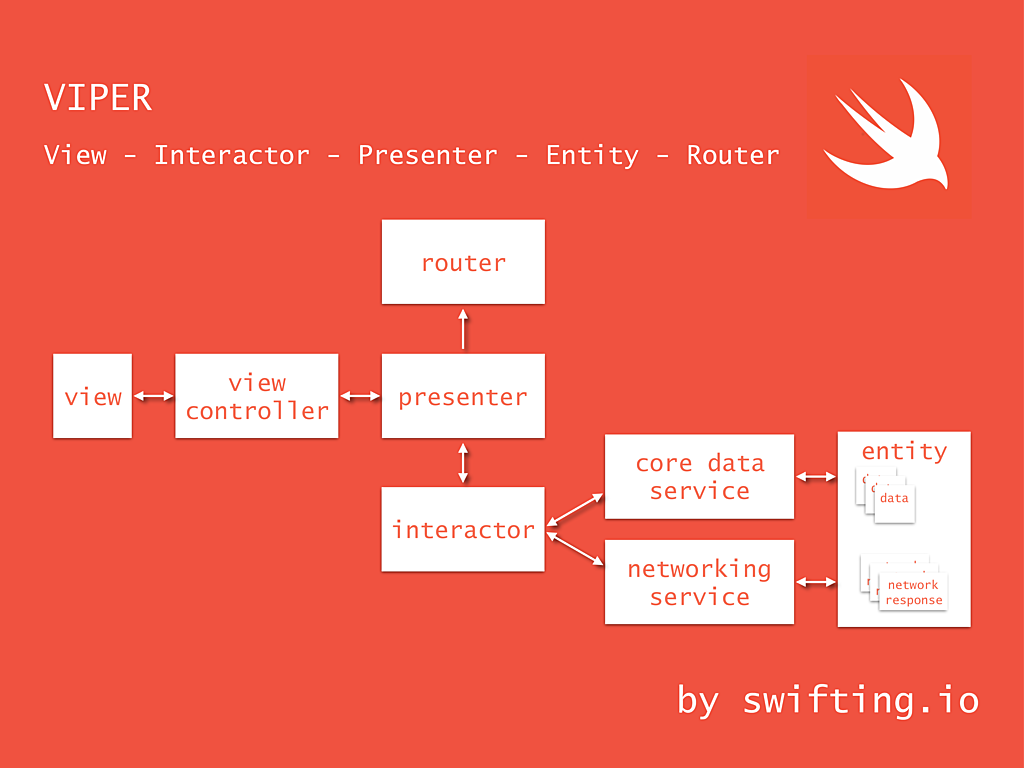
This architecture clearly enforces to write code in a structured way and divides View Controller’s responsibilities onto smaller objects. When compared to MVVM, business logic and data presentation was split from View Model to Interactor and Presenter. There is also an additional component called Router (a.k.a Wireframe), which deals with setting up other view controllers, wiring up their dependencies and setting delegations which allow communication with other scenes. After all, a View Controller shouldn’t have knowledge on what the next view controller is and how to set it up.
Using VIPER for code of your app is hard at first. The architecture is hard to understand, there are too little materials on the topic for iOS world and there is a large entry barrier for new developers in the team. Architecture adds code overhead, components of a module rather cannot be reused. Communication is based on protocols which hardens navigation between many files in Xcode. But c’mon, protocols facilitate testing, which is the thing you should probably use in your apps .
VIP (Clean Swift)
This architecture was proposed by Raymond Law on his Clean Swift blog. In my opinion, VIP (a.k.a. Clean Swift) can be considered as a variation of VIPER. It gets its name from View (Controller) – Interactor – Presenter uni-directional cycle. VIP diverges from VIPER but yet it nicely divides responsibilities and propagates data among components. View Controller interacts directly with an Interactor by sending Requests to it. The Interactor responds to those requests by sending a Response with data model to a Presenter. The Presenter formats data to be displayed, creates a View Model and notifies the View Controller that it should update its View based on the View Model. View Controller decides when the navigation to a different scene should happen by calling a method on a Router. The Router performs setup of the next View Controller and deals with wiring, passing data and delegation setup. VIP components belonging to a single View Controller form a scene.
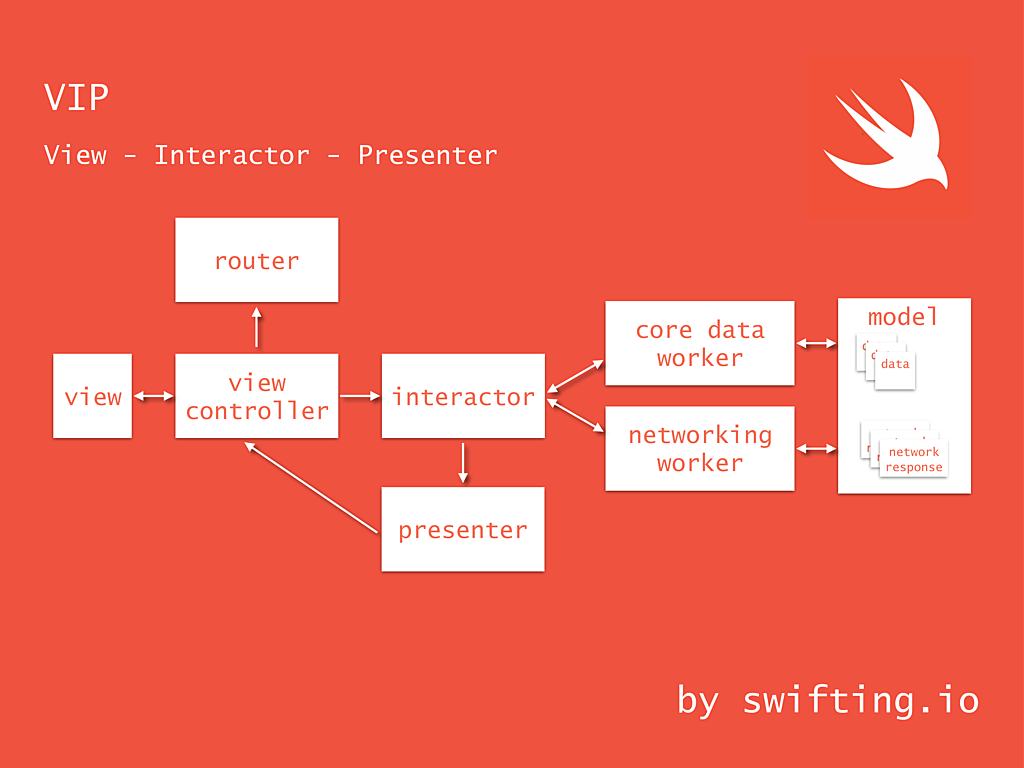
Clean Swift has a very good documentation and reasoning behind its concept explained on the Clean Swift blog. Clean Swift concepts are rigid, especially namespaces created for every scene, data passing in Request, Response and ViewModel objects, which are rather non-reusable within scene, because they correspond to a specific Request-Response chain. Sometimes Interactor methods doesn’t have to take any arguments, yet the architecture enforces usage of empty Request params. Communication between objects is again based on protocols, but it has some overhead in protocol declaration.
Clean Swift assumes, that View Controller has an output that implements methods from ViewControllerOutput protocol. The Interactor is ViewController‘s output, but methods that View Controller calls on Interactor are its input, hence it implements methods from InteractorInput. In code it would look as following:
protocol ViewControllerOutput {
    func doSomehtnig(_ request: Request)
}
protocol InteractorInput: ViewControllerOutput {}
Although Clean Swift imposes strict rules, it appropriately divides responsibilities and creates uni-directional cycle. When compared to VIPER, another difference is that now the View Controller itself contacts Router for navigation, which is in my opinion a nice improvement (no routing of navigation request through VIPER’s Presenter). Currently, we use a slightly modified VIP architecture for a project and we are quite fond of it.
Comparison
It’s time for a comparison of MVC, MVVM, VIPER and VIP. For some of the metrics, MVC is a baseline. We take into consideration the following aspects:
- Responsibilities – describes if there is an object that plays all roles or if there are many objects with different liabilities
- View Controller– describes the role of a View Controller
- Data flow – describes how data flows in the scene
- Testability – evaluates how easy it is to test components
- Entry – rates how easy it is for a person to dive into a project or to start developing an app in a certain architecture
- Collaboration – rates how easy it is to collaborate on a scene written in a certain architecture
- Reusability – evaluates if scene components can be reused in a different scene
- Refactoring – rates how many components are affected during refactoring process
- Number of files – evaluates number of files in the project
- Lines of code in a single file – evaluates number of lines in the single file
| MVC | MVVM | VIPER | VIP | ||
|---|---|---|---|---|---|
| Responsibilities | entangled | dispersed | dispersed | dispersed | |
| View Controller | does everything | passes actions to and binds data from View Model | passes actions and binds data from Presenter | passes actions and displays data from Presenter, decides when to navigate to the next scene | |
| Data flow | multi-directional | multi-directional | multi-directional | uni-directional | |
| Testability | hard (too many responsibilities) | better | best | best | |
| Entry | easy | hard (when starting with reactive extensions) | hardest | hard, but good documentation exists | |
| Collaboration | hard | better | best | best | |
| Reusability | rather none | rather small | ok | ok | |
| Refactoring | normal | normal (affects View Controller – View Model boundary) | worse (can affect many boundaries due to multi-directional flow) | normal (affects one boundary due to uni-directional flow) | |
| Number of files | normal | additional View Model for every View Controller | many | many | |
| Lines of code in a single file | too many | many | most-satisfactory | most-satisfactory |
Summary
It’s not easy to select the best architecture for an app. I hope that this issue will enlighten differences between a few architectures and help you choosing the one that suits you best. As a curiosity, recently I came across Flux architecture for iOS, which develops Facebook’s Flux concept for web apps. I haven’t tried it yet, but the main idea is that application state is passed through a uni-directional flow that allows views to update accordingly and store history of app states. Let us know if you have already tapped into it!
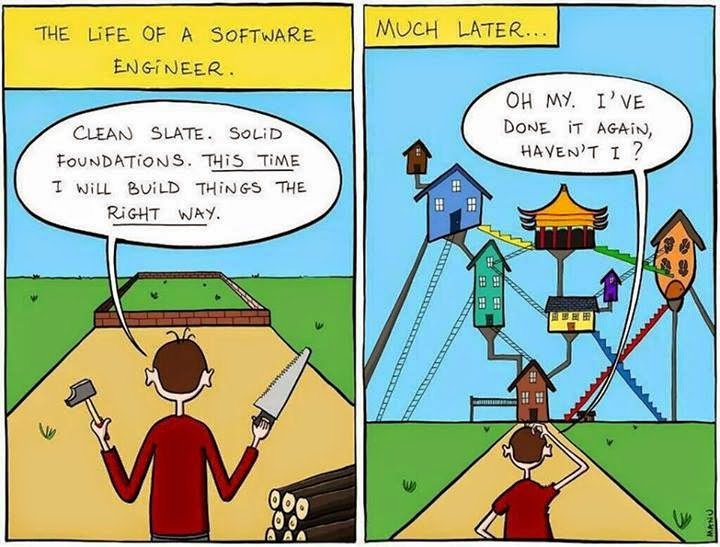
Sometimes we have to fight fiercely for the chosen architecture. Not all developers in the team will like it, not everything will be easy at first, but it is worth discussing and worth using a nice architecture. In the discussion, you can get to the point where you realise that certain aspects of the architecture do not suit or are redundant and you can compromise. After all, it’s better to have a good atmosphere in the team, where developers are friends rather than enemies that feel resentment to each other because of this new and stupid architecture you write your application in. Remember that, if you happen to battle in your Architecture Wars, eventually source code will look as usual…
This issue is just an introduction to architectures realm. We will continue the topic with a sample app written in MVC, MVVM, VIPER and VIP. Stay tuned!
References
]]> Swift code.
General Tips 
It is said that a review goes best when conducted on less than 400 lines of code at a time. You should do a proper and slow review, however, don’t spend on it more than 90 minutes  – you definitely will get tired after that time. It’s tiring to write and understand your own code and it’s even more tiring to understand someone’s. Other tips from the Internet are:
After some years of experience in software development you know what common programming mistakes are. You also do realise what solutions to common problems are most efficient. It’s a good practice to write it down and to check code being reviewed against a checklist ✅ – it leads improved results. Checklists are especially important for reviewers because, if the author forgets a task, the reviewer is likely to miss it too.
In the git flow mentioned in issue #13, code can get merged after receiving agreed number of approvals for a pull request. The number should depend on your team size, but it’s good to get at least 1️⃣ !
When you recommend fixes to the code, suggest their importance  . Maybe some of them could be postponed and extracted as separate tasks. Before approving a pull request, verify that defects are fixed
 .
.
Foster in your company a Good Code Review Culture in which finding defects is viewed positively . The point of software code review is to eliminate as many defects as possible, regardless of who "caused" the error. Few things feel better than getting praise from a peer. Reward developers for growth and effort. Offer as many positive comments as possible. I always try to put a line saying that a solution is good and clever (if it really is ).
You can also benefit from The Ego Effect  . The Ego Effect drives developers to write better code because they know that others will be looking at their code and their metrics. No one wants to be known as the guy who makes all those junior-level mistakes. The Ego Effect drives developers to review their own work carefully before passing it on to others.
And don’t bother with code formatting style …
… there are much better things on which to spend your time, than arguing ☔️ over the placement of white spaces.
Looking for bugs and performance issues is the primary goal and is where the majority of your time should be spent.
So, what to review?
Much better things to look for should be a part of your checklist. When I scrutinise a piece of code I look especially:
- at
ifconditions,forandwhileloops for "off-by-one" errors - for interchanged
<versus<=and>versus>= for accidental interchange of && with || or bitwise operators like & and |UPDATED 11.06.2016 Swift compiler ensures that expression evaluated in a condition returns aBoolvalue, hence there’s no possibility not to catch compilation error if one interchanges operators- at operators importance and execution UPDATED 11.06.2016 If you happen a "million" of operators in one expression you’re probably doing something wrong by overcomplicating the solution… 😉
- if dependancy injection is possible (for the sake of unit testing).
- if variable names as verbose as needed
- if method names express what they do
- if a file contains commented out code
- if a file contains a single class (this one is arguable, depends on agreement with your team and company’s guidelines)
- for code duplication, function length and class length < x lines – SwiftLint or codebeat mentioned in issue #11 and issue #10 is an option to point out such a code without your participation
When performing a review, one can also get extra points for pointing out a more efficient implementation of used algorithm .
You should also check for readability. Is the code easy to understand? Do you have to pause frequently during the review to decipher it?
Some swifts
Boom! Time for some loosely coupled Swift code examples that I look for when reviewing Swift code❗️Wait a moment, this exclamation mark looks strangely familiar … ❗️Look out for code that uses it …
Swift

var foo: Object!

print("\(foo.someString)")
Make sure that your peers (and you as well) use the force unwrapping operator wisely in their code.
If you have ever ended up with code like the one below, then probably something went wrong … 

override init(_ objectId: String?,
viewModel1: ViewModel1,
viewModel2: ViewModel2,
viewModel3: ViewModel3,
viewModel4: ViewModel4,
viewModel5: ViewModel5,
viewModel6: ViewModel6,
viewModel7: ViewModel7,
viewModel8: ViewModel8,
viewModel9: ViewModel9,
viewModel10: ViewModel10,
isSomething: Bool = false) { ... }
This is an excerpt from from one of my projects, object types and names are changed . It’s an initialiser of a ‘container’ view model that encapsulates ‘child’ view models used by a container view controller. If you happen to achieve this and there’s no way to change it, probably usage of a configurator facade, default argument values or convenience initialisers are the best solution to live up with your legacy.
class Configurator {
    class func mainViewController() -> MainViewController {
        let dependency1 = Configurator.dependency1()
        let dependency2 = Configurator.dependency2()
        let dependency3 = Configurator.dependency3()
        let dependency4 = Configurator.dependency4()

        return MainViewController(dependency1: dependency1,
            dependency2: dependency2,
            dependency3: dependency3,
            dependency4: dependency4)
    }
}
The off-by-one errors and interchanged greater than & less than were my favourite mistakes at some point of time. I’ve caught myself a few times last year with using if i > array.count instead of if i < array.count ☔️.
Remember local autoreleasepool? For those who answered ‘what!?’ here is some explanation. I pay attention when reviewing body of a loop to check if local autoreleasepool could be used to reduce peak memory footprint.
for i in 1...100
autoreleasepool {
    NSString *superImportantString = "Super \(i)"
    //strange operations take place
    //superImportantString can be released earlier thanks to local autoreleasepool
}
More than a year ago, when Swift was still in its early days, I hated when my team members overused var. It’s ok when needed, but not all the time! Thanks god that now Swift compiler warns about not mutated var.
Another matter is your object’s properties. If it depends on some values, never ever use var. Use let. Always value more immutable state over var! I wonder how many people would argue with me about that☔️. And if your property really have to be mutable, expose it ‘to the public’ as immutable like that:
private(set) var foo: AnyObject
let bar: AnyObject
Swift’s protocols are a great deal – do you prefer composition over inheritance? Is such an inheritance chain ok for you? One superclass would be probably ok, but this becomes an exaggeration:
class ChildViewModel: TableViewModel {}
class TableViewModel: CRUDViewModel {}
class CRUDViewModel: BaseViewModel {}
class BaseViewModel {}
Final thoughts
Kofi Annan, Ghanaian ex-Secretary-General of the United Nations, when in primary school, was attending a weekly lesson in ‘spoken English’. He and his peers were asked by the teacher what did they see at the picture:

All shouted together, that they saw a black dot! Professor stepped back and said ‘So, not a single one saw the white sheet of paper. (…). This is the awful thing about human nature. People never see the goodness of things, and the broader picture. (…)’.
It’s also true for code review. We perceive better differences than loads of new code when using a merge tool. We get a cognitive overload if flooded with more content. Have that in mind and use the first rule – review for less than 90 minutes , take breaks. Remember that:
- new code is more difficult to understand
- not all bugs can be caught during a review
- hot fixes
 without review can happen …
And always – Review your own code first! Before committing a code look through all changes you have made!
Let us know in comments or on Twitter what is on your checklists for code review!
The only true measure of code quality
