#17 Unit test all the things!
There is always a half
When I was at the 3rd year of my BEng studies I had a chance to visit Turin, Italy, and to take part in Erasmus student’s exchange programme. At Politechnico di Torino I attended “Operating Systems” course on which the lecturer used to ask participants wether they had ever done some programming in C or not, had used selected linux commands and etc. Then he would count all the hands in the air to check how many of us had had a knowledge about the certain topic. No matter how many hands were up he always wittingly said a half.
Recently I did the same on iOS Developers Meetup in Poznań, Poland. And of course, the result was that a half of attendants had done the activity I asked about 😉. I wonder to which group you belong. So now I’m asking you:
Are you a person who has never written a unit test in Xcode?
If not, maybe you are a person who would answer positively to this question:
Have you 🙊ever written a unit test in Xcode?
Regardless of your answer, this post is for you 💡! It will cover basic topics in BDD🔮, explain my Swift toolset🔧🔨 for unit testing and summarise benefits🍓 of performing unit tests in your project.
3 types of programmers
When I started my professional career I didn’t know what unit tests are. But after a few years I can easily point out three groups of programmers.
There is a small group of unit test lovers who say that unit testing is cool ❤️ and they couldn’t live without testing all the things. Really, a really small group!
There is also the majority that says that real men 👨🏻 test on PRODUCTION. Kinda risky but good luck for them 🍀!
And there are many, especially in iOS world, that don’t know how the 🙊 they can start doing it? I was one of them two years ago. Thanks to interesting people I have met now I know …
… WT🙊 a unit test is?
If you have ever tried out searching on Wikipedia what a unit test is you would be surprised what its standard bla, bla, bla says.
In computer programming, unit testing is a software testing method by which individual units of source code, sets of one or more computer program modules together with associated control data, usage procedures, and operating procedures, are tested to determine whether they are fit for use.
–Wikipedia
It didn’t illuminate me a bit. So based on my experience I have created my own definition:
code that tests source code
–Maciej Piotrowski

To understand the definition🔮 profoundly we have to understand a few terms at first.
What’s an app?
There are a few equations that can define an app. Let’s look at them.
First of all we should know that the app is a set of behaviours. By behaviour one can understand certain actions that take place, e.g. when user taps a button in our app it shows another view controller, etc.
- App = Set(behaviours😄😭)
Application consists of components. If not, you’re probably doing it wrong 😉!
- App = component 🎁 + … + component 🎁
Those components interact with each other in order to fulfil a certain behaviour.
- component ← interaction 👏🏻 → component
Our code that tests source code can test that particular interaction between components took place. This is called behavioural unit testing.
- unit test = checks(🎁 ← interaction 👏🏻 → 🎁) == ✅
Of course we can also test function’s output when sticking to BDD. BDD!? Wait. What’s BDD?
TDD & BDD
BDD stands for Behaviour Driven Development. It’s built upon TDD, Test Driven Development. Basic rule of TDD is:
Don’t you dare writing code before writing a test for it!
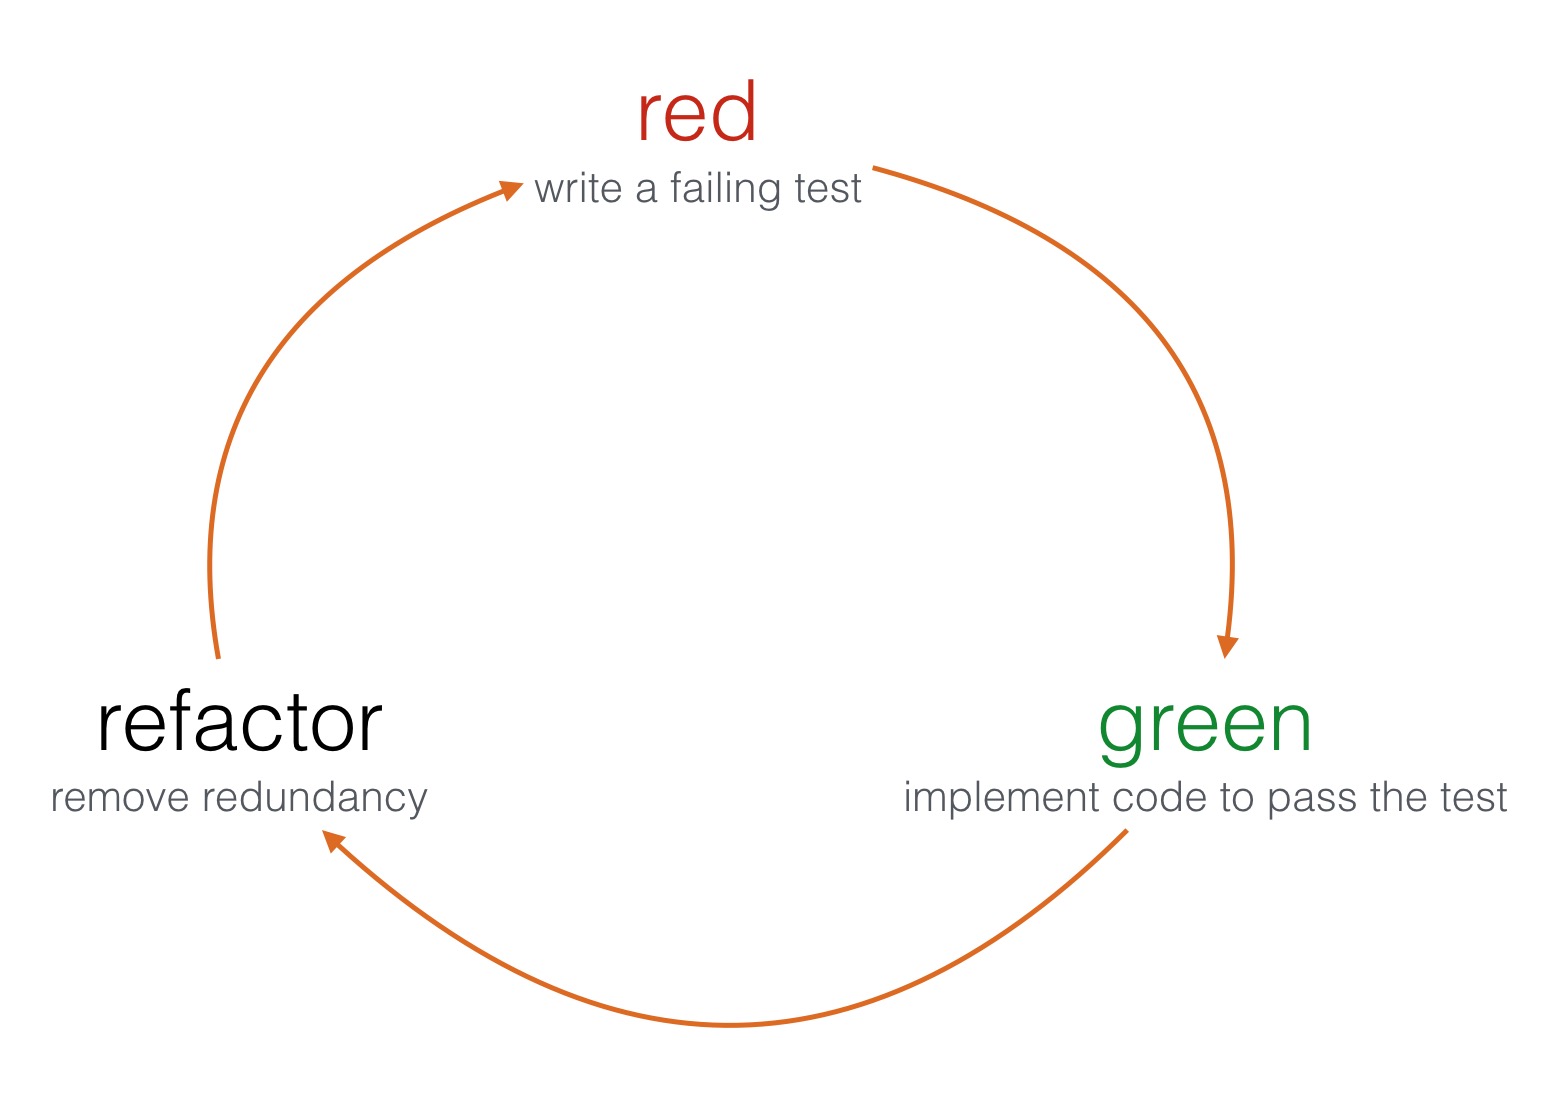
Namely, you have to write testing code to assert what component code should do and then implement the component itself. TDD flow distinguishes three steps: RED, GREEN, REFACTOR.
What’s different in BDD? Behaviour-driven development tells that tests of any unit of software should be specified in terms of the desired behaviour of the unit. Basically, a behaviour is what a component does when a certain action (i.e. method call) takes place. When you call a function it probably communicates and interacts with other components. When writing a unit test we can just test if an interaction took place (as mentioned earlier).
Behaviours😄😭
Imagine we have to write a component which deals with CoreBluetooth API. Let’s call it BluetoothModule. It’s main responsibility is to start and stop advertising Bluetooth Services. It will support only that, hence our iPhone would become a Bluetooth Low Energy Peripheral (information for curious readers)
Ok, so let’s write down our expected Behaviours 😄😭.
        "BluetoothModule"
			"when turned on"
				"advertises services"

			"when turned off"
				"doesn't advertise services"
What the 🙊 spec?!
I kinda looks like a specification 📋 of our source code. There is a nice BDD framework to write testing code with a 🔮DSL. It’s called Quick and we can create specs with it! :). An excerpt from a spec would looks like this:
context("BluetoothModule") {
	describe("when turned on") {
		it("advertises services") {}
	}
	describe("when turned off") {
		it("doesn't advertise services") {}
	}
}
Normally a spec contains assertions 🔔 (testing code). Quick has a counterpart, called Nimble - it has a set of matchers handy in writing expectations. More on that in a moment, but before let’s have a look on how to write a QuickSpeck:
import Quick
import Nimble
@testable import <#Module#>
class <#TestedClass#>Spec: QuickSpec {
	override func spec() {
		//🔮Magic goes here 🙈🙉🙊
	}
}
First and second lines import Quick (BDD DSL) and Nimble (matchers) frameworks. The @testable directive introduced in Swift 2.0 let’s us import our app’s module in a ‘testable’ manner, i.e. we can access components’ internal methods and properties.
All tests should be contained in spec() method overriden in QuickSpec subclass. Inside the method we use Quick DSL to describe component’s specification and assert its behaviours.
Arrange, Act, Assert
Ok, but now a question should have already crossed your mind - how to write asserting (testing) code?
Every test consists of three phases:
- Arrange - arrangement of our ‘scene’, i.e. initialisation of tested object and its dependencies (components that it interacts with)
- Act - execution of an action, i.e. a method call on a tested object
- Assert - actual testing code, an assertion that checks that the expected behaviour/interaction took place
Let’s assume our component to be tested has this simple interface:
class BluetoothModule {
    init(peripheralManager: CBPeripheralManagerProtocol)
    func turnOn()
    func turnOff()
}
It has two methods and takes an object that implements CBPeripheralManagerProtocol as its dependency. Why CBPeripheralManagerProtocol and not just CBPeripheralManager? More will be explained in I wish we had mockingjays 🐦 section of this article. We can arrange testing “scene” for with mock object as in the snippet below:
class BluetoothModuleSpec: QuickSpec {
    override func spec() {
        context("BluetoothModule") { //i.e. newly initialised
            var sut: BluetoothModule!
            var peripheralManager: CBPeripheralManagerProtocol!
            beforeEach {
                peripheralManager = MockPeripheralManager()
                sut = BluetoothModule(peripheralManager: peripheralManager)
            }
            afterEach {
                peripheralManager = nil
                sut = nil
            }
        }
    }
}
Quick gives us a few functions we can use to arrange a “scene”:
- context - description of object’s state (e.g. object is newly initialised), takes
Stringwith a description and aclosureas argument - beforeEach - takes a
closureargument to setup local variables (corresponds XCTest’s setup) - afterEach - takes a
closureargument to cleanup local variables (corresponds XCTest’s tearDown)
When we have all objects set up the Act phase approaches. It’s the phase in which we invoke certain methods on the tested object:
context("BluetoothModule") {
	//...
	describe("when turned on") {
		beforeEach {
			sut.turnOn()
		}
	}
	describe("when turned off") {
		beforeEach {
			sut.turnOff()
		}
	}
}
Again, Quick gives us a few functions we can use to perform actions on the arranged object:
- describe - used for description of an action performed on the subject, takes
Stringwith a description and aclosureas argument - beforeEach - used for performing an action on the sut (subject of unit testing a.k.a. system/subject under test - choose what suits you best)
The last, but not least, is Assert phase. In this part we write actual testing code (code that tests source code):
context("BluetoothModule") {
	describe("when turned on") {
		//...
		it("advertises services") {
			expect(peripheralManager.isAdvertising)
				.to(beTrue())
		}
	}

	describe("when turned off") {
		//...
		it("advertises services") {
			expect(peripheralManager.isAdvertising)
				.to(beFalse())
		}
	}
}
Quick comes in handy with it function - takes a String with a description of desired outcome of a test and closure with a test of an expected behaviour. Nimble gives as a way to write some expectations. But what and how to expect?
What and how to 🙊 expect?
Of course you can Expect the unexpected. Sometimes test outcome will surprise you remarkably. In the next issue I will write about one of surprises I had with my testing code.
In our code that tests source code we use expect() method from Nimble 💥 framework, which also provides a number of matchers to fulfil the expectation. Matchers are used in it blocks to assert the expectation ✅. Let’s have a look at some example expectations:
expect(sut.something)
	.to(equal(5))

expect(sut.somethingDifferent)
	.toNot(beAKindOf(MyClass))

expect(sut.somethingElse)
	.toEventually(beNil())
As you can easily see, the expect() function takes as an argument an expression to be evaluated by using a matcher provided in to*() function. We can expect e.g. a property on our tested object to equal some value, to be a certain kind of class, or to eventually be Optional(.None) 😉.
The to() and toNot() functions are rather straight forward - they test the actual value of expectation with the matcher. The toEventually() function is used for asynchronous tests. It continuously checks the assertion at each pollInterval until the timeout is reached.
Hey, if an object needs to be checked ✅ with equality with other object, we need to implement Equatable protocol! To do so, we just need to implement the ==() operator:
extension MyClass: Equatable {}

func ==(lhs: MyClass, rhs: MyClass) -> Bool {
	return lhs.propertyX == rhs.propertyX
	&& lhs.propertyY == rhs.propertyY
	&& lhs.propertyZ == rhs.propertyZ
}
When the above approach is suitable for structs, for classes we could be lazier and compare arguments’ ObjectIdetifier() instead of comparing different properties:
extension MyClass: Equatable {}

func ==(lhs: MyClass, rhs: MyClass) -> Bool {
	return ObjectIdetifier(lhs) == ObjectIdentifier(rhs)
}
If you happen to be a super lazy person, this approach is for you. Just allow your class to inherit from NSObject, or probably any Cocoa/CocoaTouch class, because all of them are NSObject subclasses, and you get equality comparison for free🎁!
class class1: NSObject {}
class class2: NSObject {}

let c1 = class1()
let c2 = class2()

it("should not be equal") {
	expect(c1).toNot(equal(c2))
}
It’s important to implement Equatable or use the approach for super lazy people, if we do not, we won’t be able to compare objects for equality with Nimble and will get a confusing message from compiler 😢.

I wish we had mockingjays 🐦
Remember our BluetoothModule object? It takes in init() an object that implements CBPeripheralManagerProtocol as its dependency. There are at least two reasons why the dependency is declared in terms of protocol instead of pure CBPeripheralManager instance.
In unit testing we want to have full control over dependencies injected to tested object. To have it we inject test doubles as dependencies. We distinguish a few types of test doubles:
- stub - fakes a response to method call
- mock - allows to check if a call was performed
- partial mock - actual object altered a bit (some responses faked, some not)
W🙊W. Out of the box mocks are not possible in Swift
In Objective-C we were able to easily mock objects thanks to its dynamism and access to run time. But Swift is currently read-only 📖. There is no way to change class types & objects at run time 😢. So …
Communicate with objects through protocols:
protocol CBPeripheralManagerProtocol: class {

	//...
	weak var delegate: CBPeripheralManagerDelegate { get set }

	func startAdvertising()
	func stopAdvertising()
}
If you don’t you will end up with inheritance and partial mocks, which is not recommended. Bad things can happen when you inject real CBPeripheralManager instances or partial mocks made by subclassing it.
So we have an interface defined by protocol. Why not to implement it in our Mock?
class MockCBPeripheralManager: CBPeripheralManagerProtocol {

	//...
	var startAdvertisingCount = 0

	func startAdvertising() {
		startAdvertisingCount += 1
	}

}
Of course we can leave some methods or properties with an empty implementation. Implement just those you need. E.g. to check if a method was called add a method call counter and assert it’s value in a test:
context("BluetoothModule") {
	describe("when turned on") {
		//...

		it("advertises services") {
			expect(peripheralManager.startAdvertisingCount)
				.to(equal(1))
		}

	}
}
What is it all f🙊r ?
Unit testing is still not common in iOS development. If someone asks TDD/BDD gurus about how much time they spend on writing tests when developing an app, they answer a half⌛️. That’s a lot, isn’t it? But it pays off in the end by having:
- better understanding 🔍 a codebase
- 📈 well thought architecture
- properly documented assumptions 🔮
- no fear of making changes 💥
- getting to know 🍏 Apple frameworks better
- ❤️ fun !!! ❤️
If you don’t know how to start, on June 18th Mobile Academy organises Swift TDD training in Poznań. Let’s meet there :)!
TL; DR
The time to start writing unit tests❤️ is now!